PRACTICING & PERFORMING
Play Mode
The play mode is designed to stay active during the entire performance. The library panel can be swiped into view from the left side of the screen during playback to provide easy access to your song catalog.
Songs can either be auto-scrolled or displayed one page at a time. Bluetooth page turner pedals and MIDI footswitches may be used to move about the lyrics and go to the next song of a 'Setlist'.

|
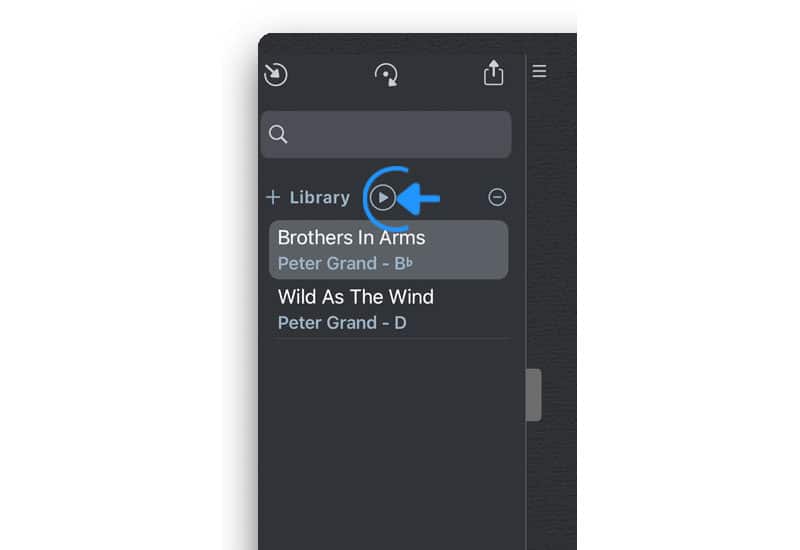
To activate the Songs app’s play mode select a title in the 'Songs' section and tap/click on the play button. (See Library Panel to learn more.) |

|
The play button above the library will initiate the playback of a single song. Create a set to play a collection of songs. |
|
|
To play a set instead of a single song open the set and tap/click on a song in a 'Setlist'. Then tap/click on the play button above the 'Setlist' to start the playback. (See Library Panel to learn more.) |

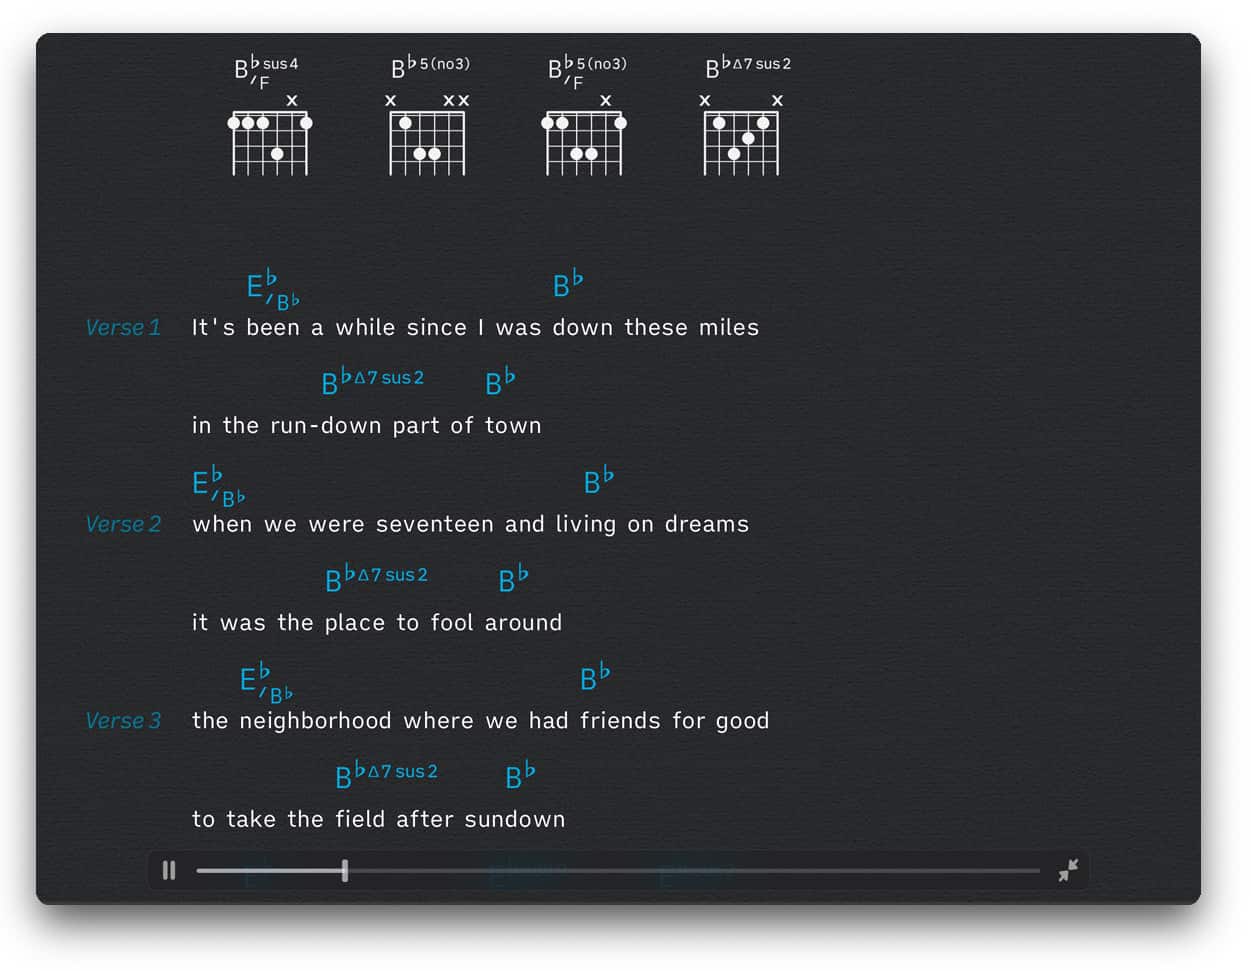
The library panel will slide out to the left, the lyrics of the selected song will fill the entire screen. A playback slider appears at the bottom of the screen as the song begins to play.
-
If desired a 'smart scroll' chord chart can be shown above the slider. (See Smart Scroll Chord Chart at the bottom of this page to learn more.)
The Songs app’s settings/preferences offer the option to display a legal rights footer instead of a playback slider. Show the legal rights footer whenever you are projecting songs in public.
Auto-Scroll vs Page Flip
The Songs app offers two options to advance the lyrics. You may choose between 'Auto-Scroll' and 'Page Flip' in the Songs app’s settings (preferences).
Auto-Scroll
When 'Auto-Scroll' is selected the Songs app will automatically scroll the entire lyrics from the beginning to the end in a specified time frame. The time frame is entered in the 'Duration' field of the song info side panel. (See Song Info to learn more.)
You may jump several lines forwards (or backwards) while the lyrics are being auto-scrolled by…
-
pressing the 'down' (or 'up') key of an external keyboard.
-
using the pedals of MIDI controllers or 'Bluetooth Page Turners'.
-
tapping/clicking on the Songs app’s 'touch zones' in the upper half or lower half of the screen.
Jumping forwards or backwards will not affect the playback of the optional audio backing track linked to the song. (See Song Info to learn more about backing tracks.)
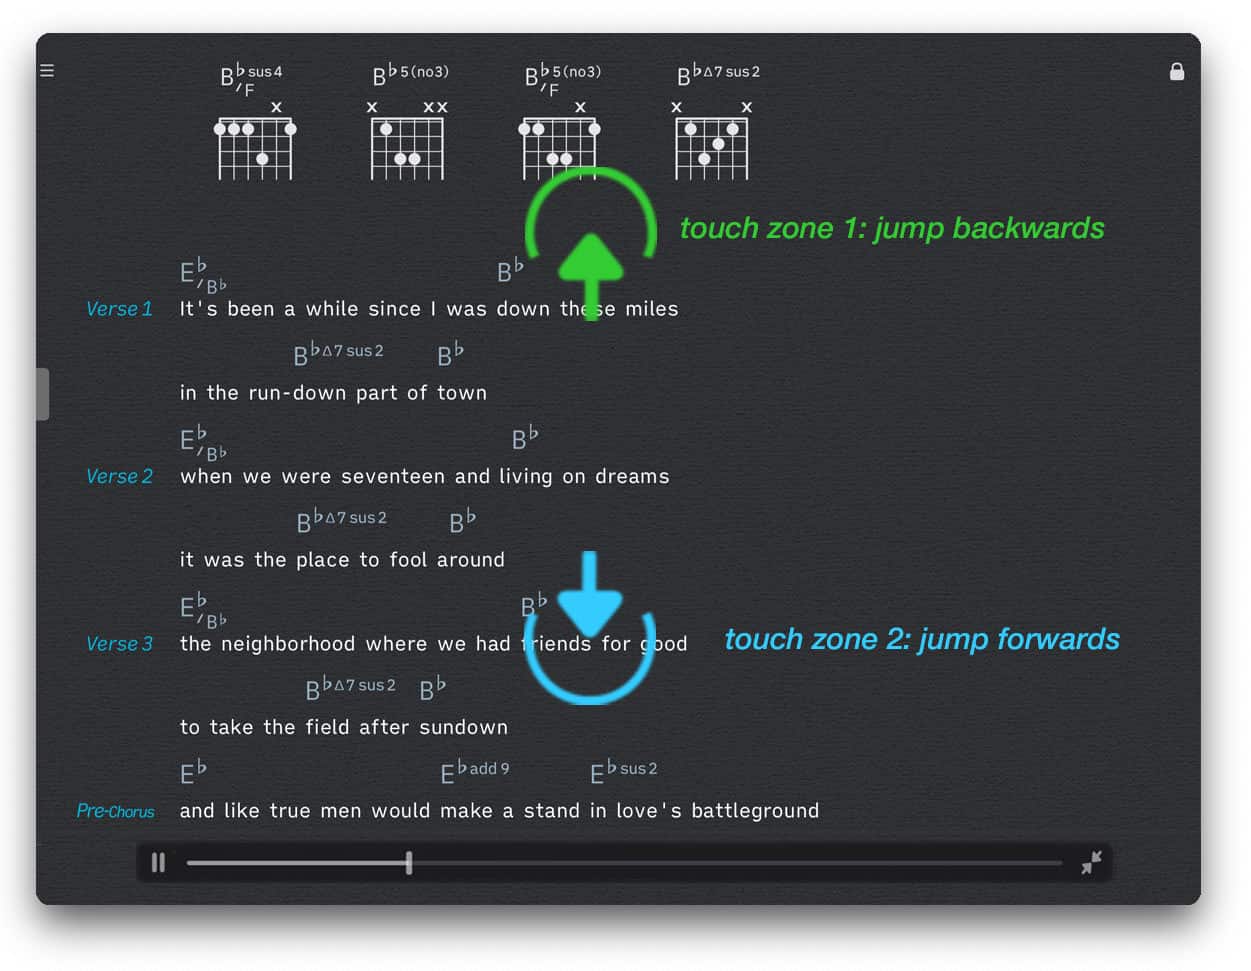
When jumping forwards the Songs app will indicate the end of a song by outlining the icons of the bottom toolbar. Jumping forwards when the end is reached will open and auto-scroll the next song of a 'Setlist'. A linked backing track of the next song will start playing automatically. (See Library Panel to learn how to create setlists.)
Page Flip
When 'Page Flip' is selected in the Songs app’s settings (preferences) the lyrics will not be scrolled. PDF documents will be 'flipped' one page at a time. Native Songs document will be advanced according to the zoom level.
Go to the next (or previous) page by…
-
pressing the 'down' (or 'up') key of an external keyboard.
-
using the pedals of MIDI controllers or 'Bluetooth Page Turners'.
-
tapping/clicking on the Songs app’s 'touch zones' in the upper half or lower half of the screen.
Flipping pages will not affect the playback of the optional audio backing track linked to the song. (See Song Info to learn more about backing tracks.)
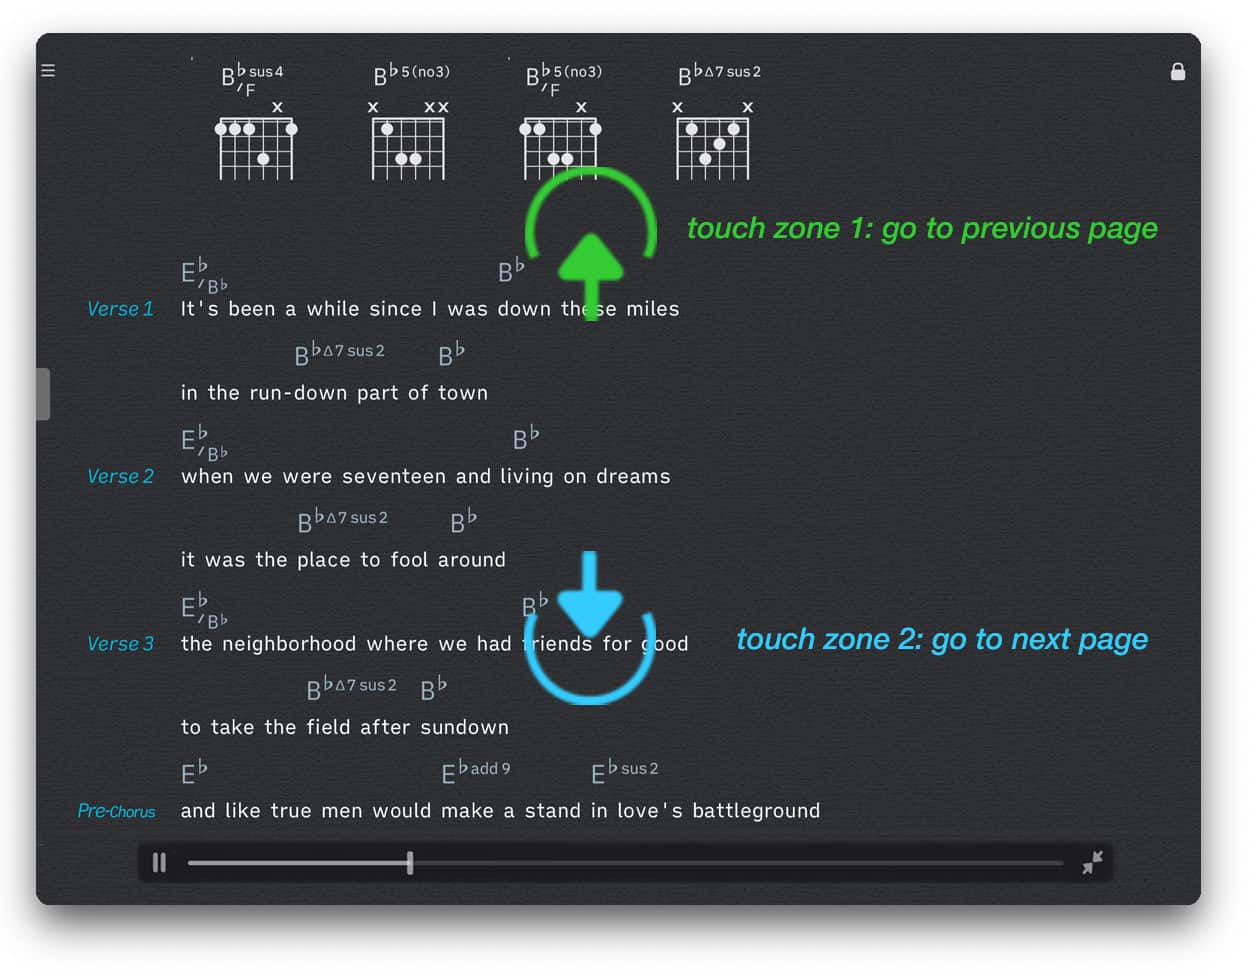
The Songs app will indicate the end of the last page of a song by outlining the icons of the bottom toolbar. Using a 'down' command when the end is reached will open the next song of a 'Setlist'. A linked backing track of the next song will start playing automatically. (See Library Panel to learn how to create setlists.)
When 'Page Flip' is active the slider above the bottom toolbar indicates the playback position of a linked audio backing track.
-
Move the slider to stop and restart the playback of the backing track at a desired position. The position of the lyrics will not be affected.
Playback Control Buttons
The playback slider appears when the lyrics are being auto-scrolled. The slider represents the scrolling position of the document and may be used to move about the lyrics.
|
|
Move the slider to jump to a specific part of the lyrics and auto-scroll from that position onward. |

Dragging the slider to a new position will stop the playback of the backing track. The playback of the backing track will restart at the slider’s new position.
|
|
Tap/Click on the play/pause button to (re)start or pause auto-scrolling the lyrics. |

When auto-scrolling is paused the lyrics can be scrolled manually (via swipe gestures) and the zoom level can be adjusted. The slider will disappear to provide access to additional buttons:
The touch zones of the play mode buttons are wider than their icons. This allows you to control the playback without having to precisely tap on the icon during live performances.

|
|
Tap/Click on the button with the audio wave icon to add an audio backing track.(See Playback Via Apple’s Music Apps and Importing Audio Tracks to learn more.) |

Once an audio track has been added the wave icon will change into a chain link icon. You may tap on the chain link icon to (un)mute the added backing track.
|
|
Tap/Click on the button with the rectangle to show or hide the 'smart scroll' chord chart. (See Smart Scroll Chord Chart at the bottom of this page to learn more.) |

|
|
Tap/Click on the two inward pointing arrows to de-activate the Songs app’s play mode and re-open the library panel. |

|
|
Tap/Click on the button with the slider icon to open the song’s 'Timeline' window. |

Repositioning Menu
The Songs app offers a repositioning menu to allow you to jump to a specific song section. The default location is the beginning of the song (at 00:00). The menu is expanded when you add section events to the timeline. (See Timeline to learn more.)
|
|
To jump to a specific song section perform a long tap / right click / two finger tap on the play/pause button and select the desired location from the repositioning menu. |

The Songs app updates the repositioning menu when you edit the section events of the timeline.
-
The timeline does not have to be visible to use the repositioning menu.
Setlist Navigation
You may skip to the next (or previous) song of a 'Setlist' at any time regardless of whether 'Auto-Scroll' or 'Page Flip' is selected . (See Library Panel to learn how to create setlists.)
|
|
When playback is active skip to the next (or previous) song of a 'Setlist' by tapping/clicking on the Songs app’s 'touch zones' in the left half or right half of the screen. |

|
|
You may also skip to the next (or previous) song of a 'Setlist' with swipe gestures. Swipe gestures may be performed regardless of wether playback is active or paused. |
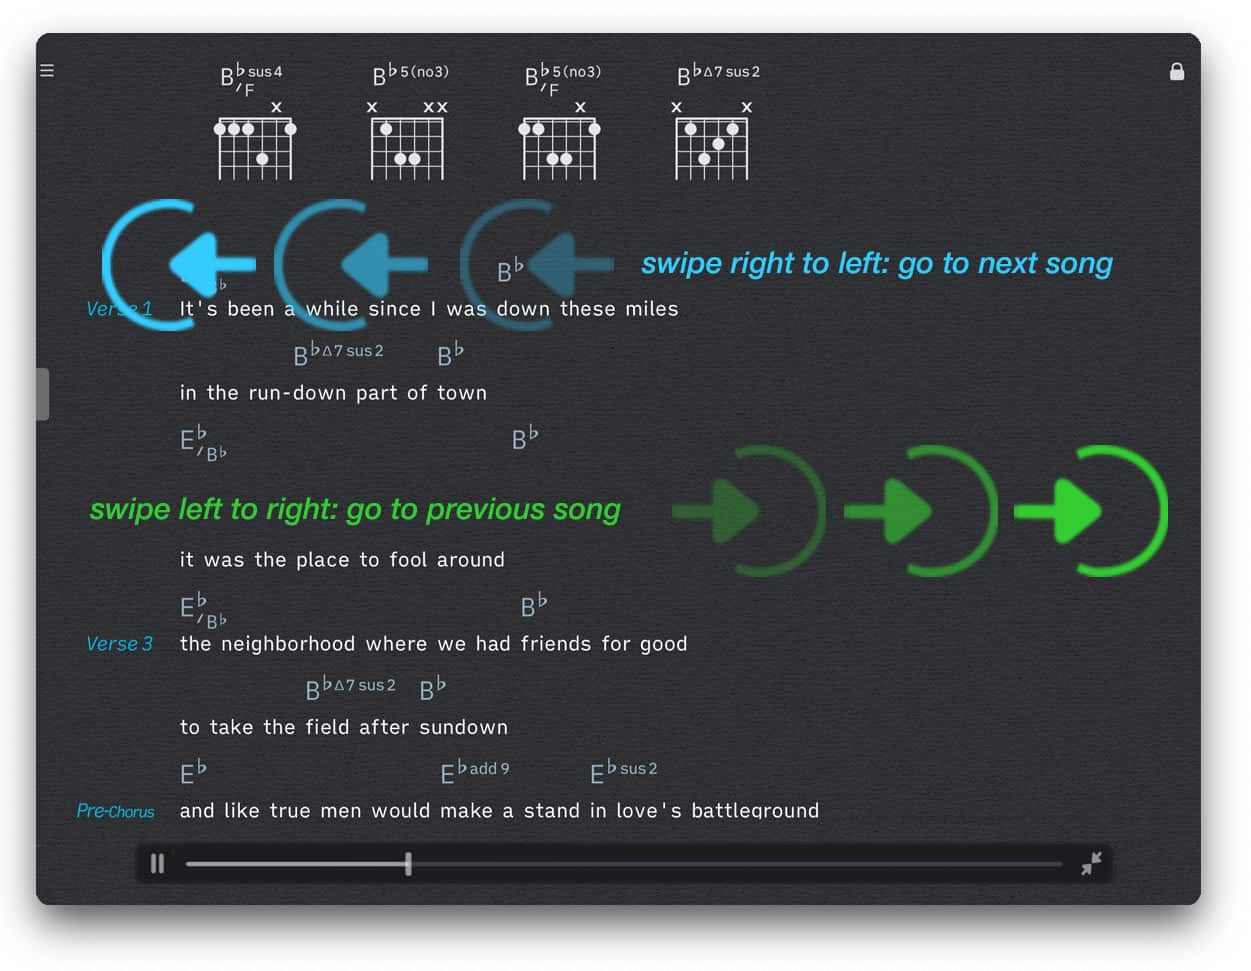
Note: When 'Auto-Scroll' is selected the Songs app will automatically go to the next song of a 'Setlist' when both the lyrics and a linked audio backing track (optional) have reached the end.
Smart Scroll Chord Chart
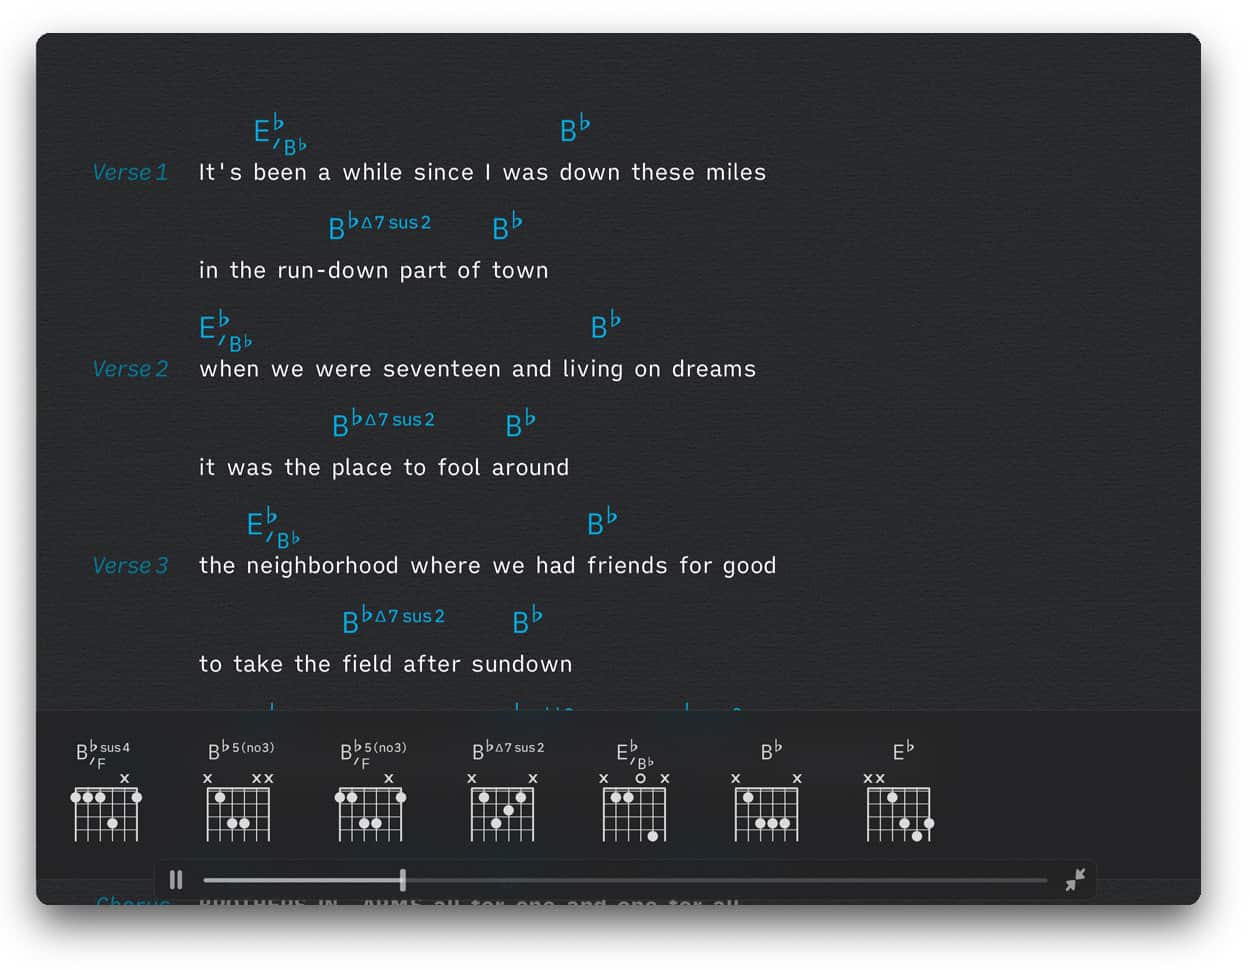
Traditional chord sheets feature the chord chart at the beginning of the song. This causes the chord chart to scroll out of view as the song progresses. The Songs app’s 'smart scroll' option allows you to view an automatically updating chord chart while the lyrics are advancing. It is displayed at the bottom of the screen.
|
|
Pause playback and tap/click on the button with the rectangle to show or hide the 'smart scroll' chord chart. |
|
|
Smart scroll will also update the bottom chord chart when the playback of the song is paused and the lyrics are scrolled manually. |
-
While smart scroll is optimized for native Songs documents it also generates chord charts for text-based PDF lyrics sheets. The Songs app analyzes the text of the PDF document by looking for chords that are placed above the lyrics and generates the diagrams.
-
The chord diagrams of an entire PDF page are displayed at the bottom of the screen. Convert the PDF document to a native Songs document to limit the chord diagrams to the viewed section of the page.

|
You have the option to export a native Songs document as a PDF document. However, this is not advisable if plan to re-import the document. A 'Songs' generated PDF document includes chord symbols that are not saved in plain text format. If you re-add the exported PDF document to your song catalog the Songs app will not be able to generate chord diagrams. |
Auto-Fill
The Songs app uses 'Section Labels' (tags) to identify song sections (Intro, Verse, Chorus, etc.). When writing songs it is common practice to omit the lyrics of repeated song sections and refer to the previous sections with only the section label.
The Songs app offers a feature in its settings/preferences that automatically fills in the lyrics of the corresponding previous section: 'Auto-Fill Tagged Repeated Sections'.
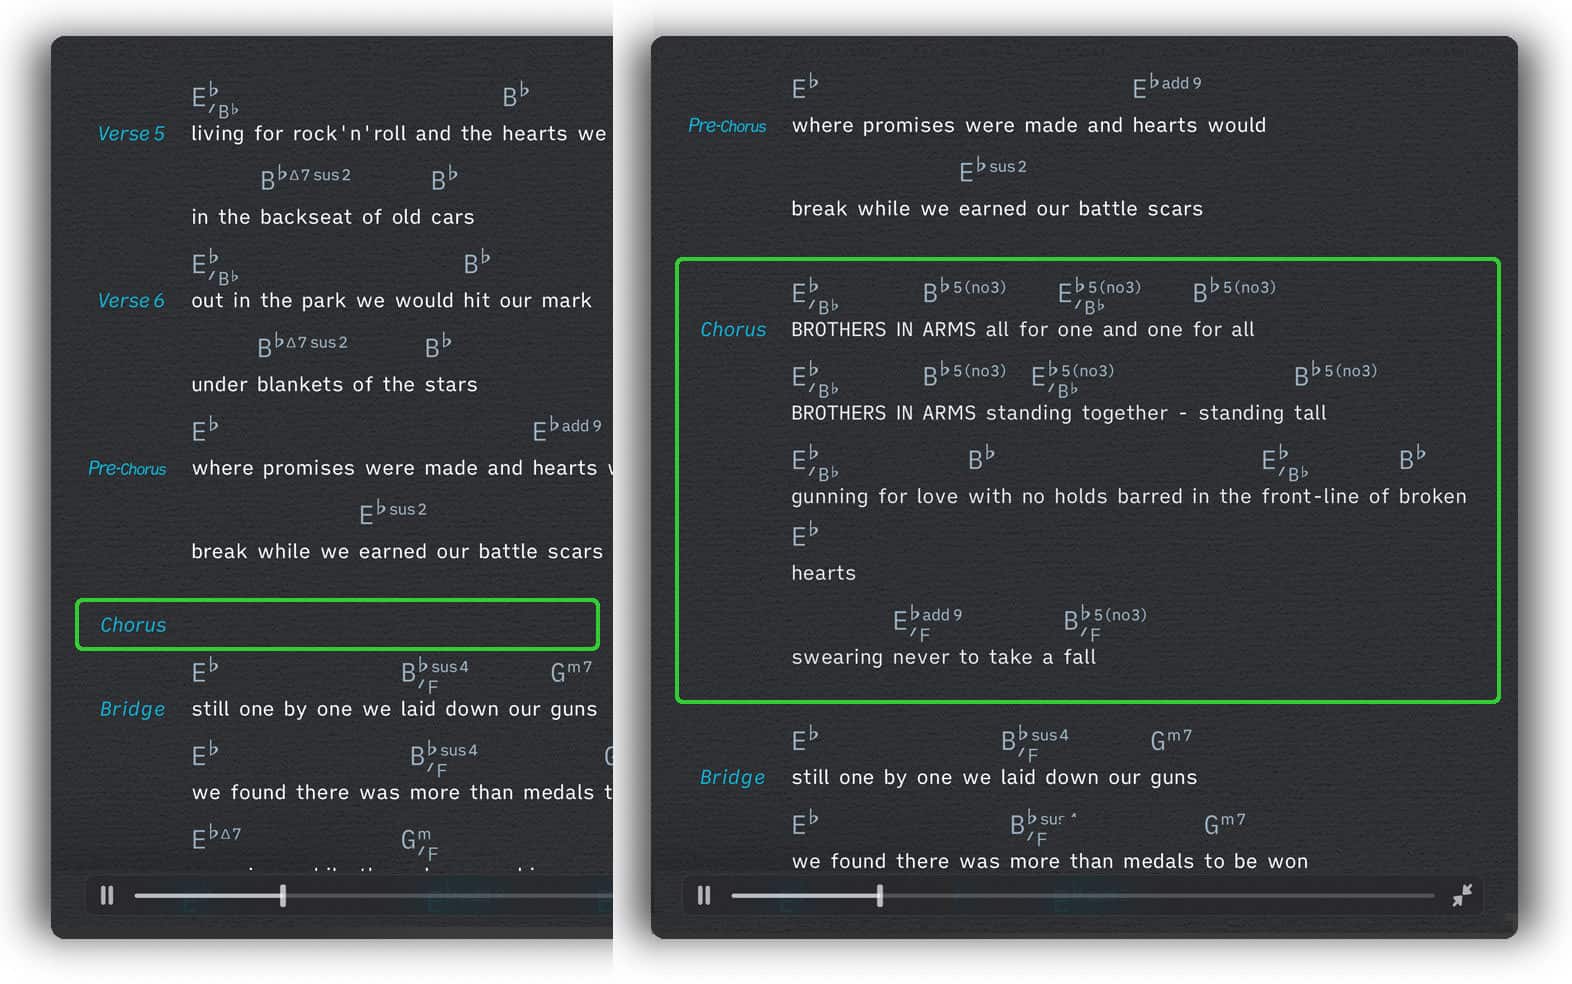
Auto-Fill is automatically disabled when you exit the play mode.
Playback Sync
Playback Sync allows you to remote-control the playback of songs on multiple devices. One 'Sender' device can be connected via Bluetooth or Wi-Fi to one or more 'Receiver' devices to control the song selection, the playhead position as well as the start and stop actions.
The playback of backing tracks, count ins, click tracks and MIDI Beat Clock signals are automatically disabled on all 'Receiver' devices: They are exclusively executed on the 'Sender' device. The timeline’s MIDI events can be executed by all connected devices. A song’s theme settings, layout and zoom level remain customizable on each device individually.
|
|
A song has to be in the catalog of a 'Receiver' device to be played back in sync. An 'AirDrop Song' icon appears when a song cannot be located on the 'Receiver' device: |

All missing songs have to be forwarded by the 'Sender'. The 'Sender' can share the entire set of songs via AirDrop. This set will not overwrite songs that already exist in the song catalogs of the 'Receiver' devices. (See AirDrop Songs & Sets to learn more.)
|
|
Enable playback sync via the main menu of the library panel (top center): Tap/Click on 'Connect As Sender' (or 'Connect As Receiver') in either the Bluetooth or Wi-Fi submenu. |

Only devices with the same 'Group' name can be connected. When using the default group name ('songs-app') any Songs app user is able to connect to your device.
|
|
Limit access to the devices of your band only: Have every band member tap/click on 'Group' in the playback sync’s submenu and enter the chosen custom name consisting of lowercase letters, numbers and hyphens. |

|
|
All connected devices will appear in the sender’s playback sync’s submenu: |

-
The Songs app automatically re-establishes a connection should either the 'Sender' device or a 'Receiver' device disconnect unintentionally.
-
Additional 'Receiver' devices can be connected at any time even when the 'Sender' is already playing a song.
-
All devices will continue to auto-scroll (or page flip) the current song even when the 'Sender' device temporarily enters into the iOS sleep modus.
-
Enable the count in on the 'Sender' device: This gives the 'Receiver' devices more time to load and prepare the songs for playback. (See Count In & Guide Click to learn more).
-
A Wi-Fi connection is preferable to a Bluetooth connection: Wi-Fi offers a greater signal strength and is not prone to interference from other 2.4 GHz devices.
-
Apple’s 'Hotspot' technology cannot be used to connect devices when using playback sync. Connect via Bluetooth if you do not have access to a Wi-Fi network.
-
Due to system limitations it is only possible to connect via Bluetooth as a 'Receiver' but not as a 'Sender' on macOS. (When using macOS use Wi-Fi to connect as a 'Sender'.)
|
|
To disable playback sync on a specific 'Receiver' device tap/click on 'Disconnect' in the connection submenu of the device. |

Playback Log
The playback log allows you to keep track of songs you perform at events.
|
|
Enable the playback log via the main menu of the library panel (top center): |

|
|
Alternatively enable the playback log when the play mode is active via a long tap/click on the play icon. |

Enter the event name in the optional note field to create reports for performance rights organizations.

|
|
Disable the playback log via a long tap/click on the play icon prior to band rehearsals. |

To view or print out the playback log:
-
…tap/click on 'Export (.csv)' in the playback log’s main menu (see above).
-
…import this .csv file into a spreadsheet editor or a text editor.
|
|
Save the log externally (with your spreadsheet or text editor): Tapping/Clicking on 'Delete' in the playback log’s menu will remove all entries. |
Hiding the Playback Slider/Play Mode Footer
You may wish to hide the playback slider/play mode footer when you work with PDF-based sheet music or when the 'Smart Scroll' Chord Chart and the 'Timeline' are not used.
To do so open the Songs app’s app settings and:
-
……select 'Show Legal Rights Footer Instead Of Playback Slider' in the 'Play Mode Footer' section of the 'Rights' category.
-
…disable all other display/formatting options of the 'Play Mode Footer' section.
