PRACTICING & PERFORMING
Timeline
The timeline controls the Songs app’s adaptive scrolling engine and allows you to perform the following actions:
-
Auto-scroll songs within an exact duration regardless of the device’s screen size and the song’s zoom level.
-
Program the song’s scrolling speed/page position and sync it with the audio backing track’s waveform.
-
Specify lines in the song editor to be highlighted during playback.
-
Remote control external devices and apps (e.g. ProPresenter) via MIDI note and MIDI queue events added to the timeline.
The timeline can be accessed when the play mode is active and playback is paused:

|
Tap/Click on the button with the timeline icon to open the song’s timeline window. |
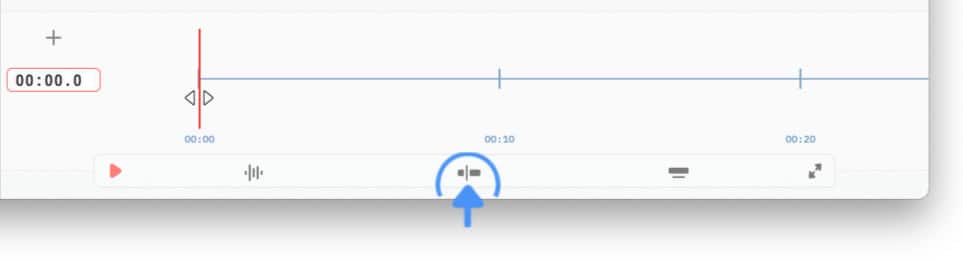
Timeline Playback Controls
The length (duration) of the timeline is determined by the song’s duration entered in the song info panel. When an audio backing track is added to a song the length is automatically updated to match the duration of the audio track’s waveform:
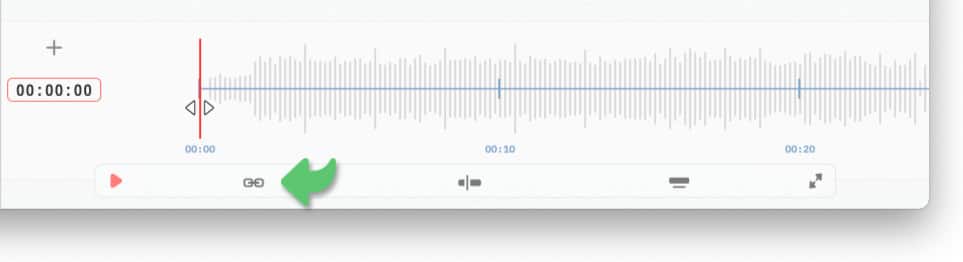
A playhead in the left corner of the timeline indicates the playback position of a song. When auto-scroll is enabled (instead of page-flip) the playhead position will also control the scrolling position of the lyrics.
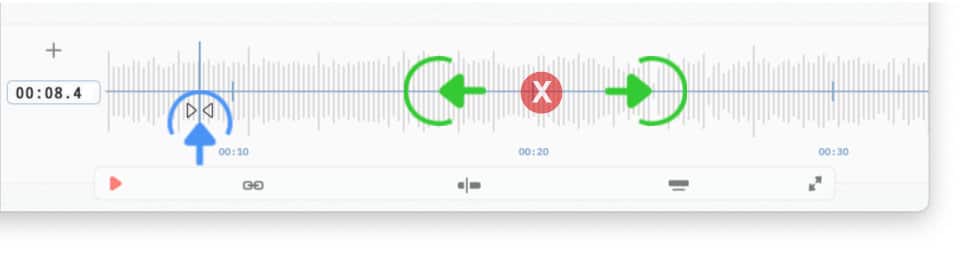
A red playhead with outward pointing arrows indicates that the timeline/waveform is unlocked during playback.
|
|
Swipe the timeline/waveform left or right to change the playback position of the backing track and view a different portion of a song. (The playback of the song does not have to be stopped to reposition the timeline/waveform.) |

macOS: Swipe over the trackpad with two fingers to reposition the timeline/waveform.
The playhead is auto-locked during playback to avoid interrupting the playback of the backing track when the screen is touched:
|
|
Tap/Click on the playhead’s arrows to unlock/lock the timeline/waveform for all songs during playback. |
Timeline Markers
Markers can be added to the timeline to execute specific commands during the playback of a song.
|
|
Tap/Click on the plus sign above the time display (to the left of the timeline/waveform). |
The timeline event window will appear:
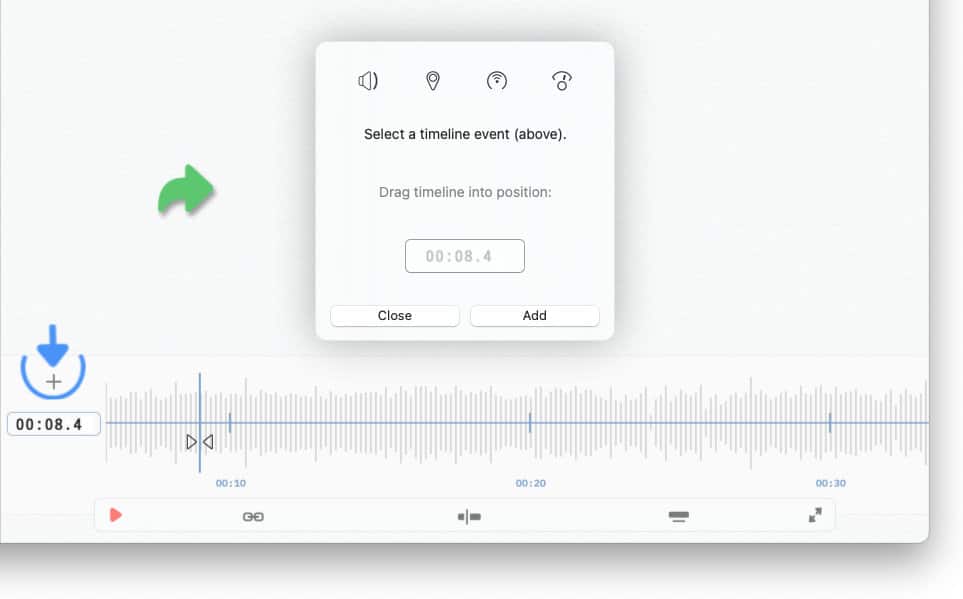
All markers are selectable via the drop-down menus of the timeline event window:
Section Marker
A section marker scrolls the lyrics to a specific section label that you have added to a song (e.g Verse 1, Chorus). (See Section Labels to learn more.)
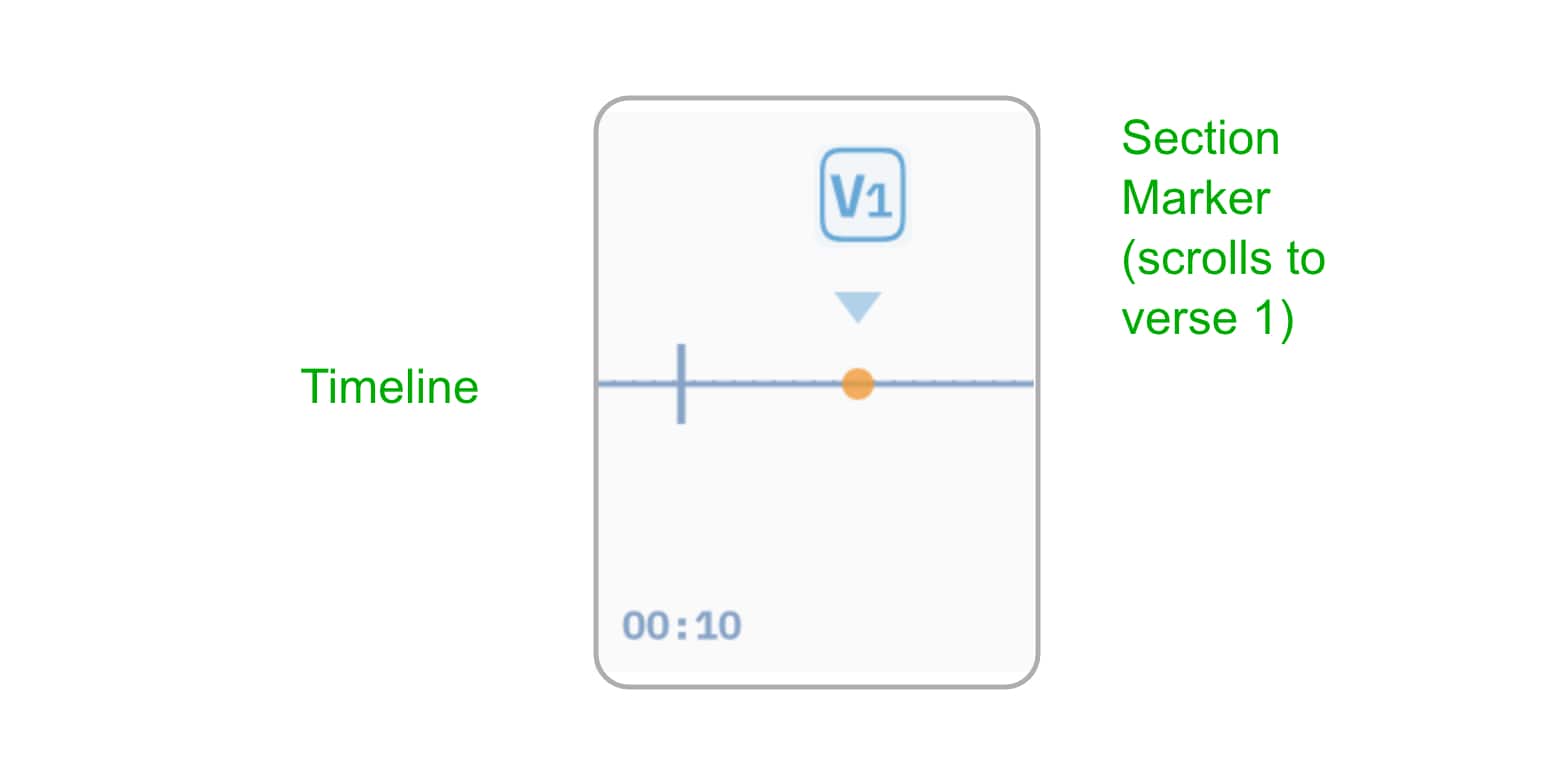
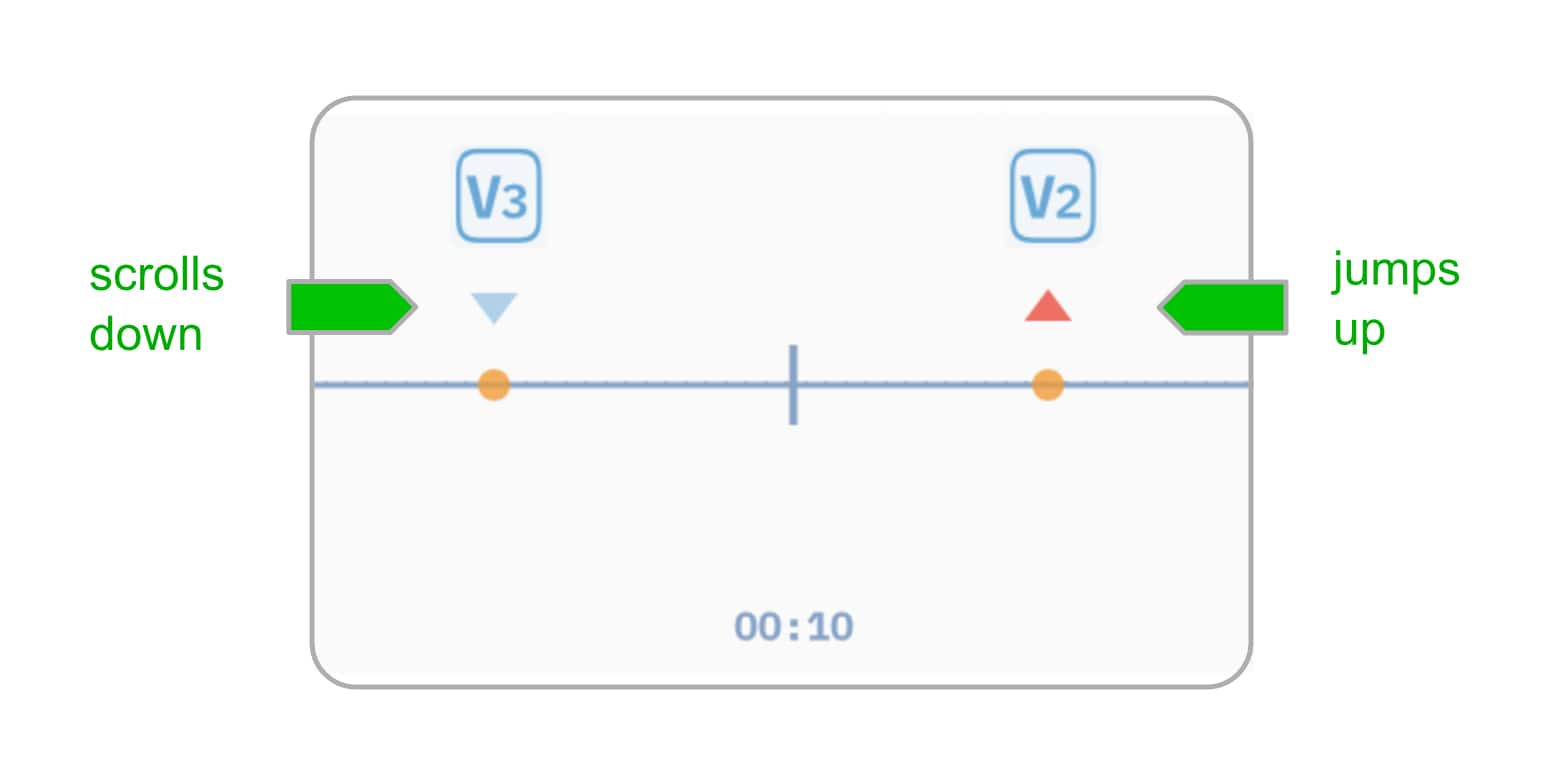
Section markers reposition a document either up or down:
-
The lyrics will jump upwards when the timeline reaches a section marker that refers to a section above the current scrolling position.

|
You may specify in which part of the screen a section is displayed when its section marker is reached on the timeline: Navigate to the 'Play Mode' section of the app settings and customize the 'Section Scrolling Position Offset'. |

|
A section marker cannot be used to advance PDF documents or 'Print Snapshots'. (Use a 'PDF Page Marker' to do so.) |
To add section markers to the timeline:
|
|
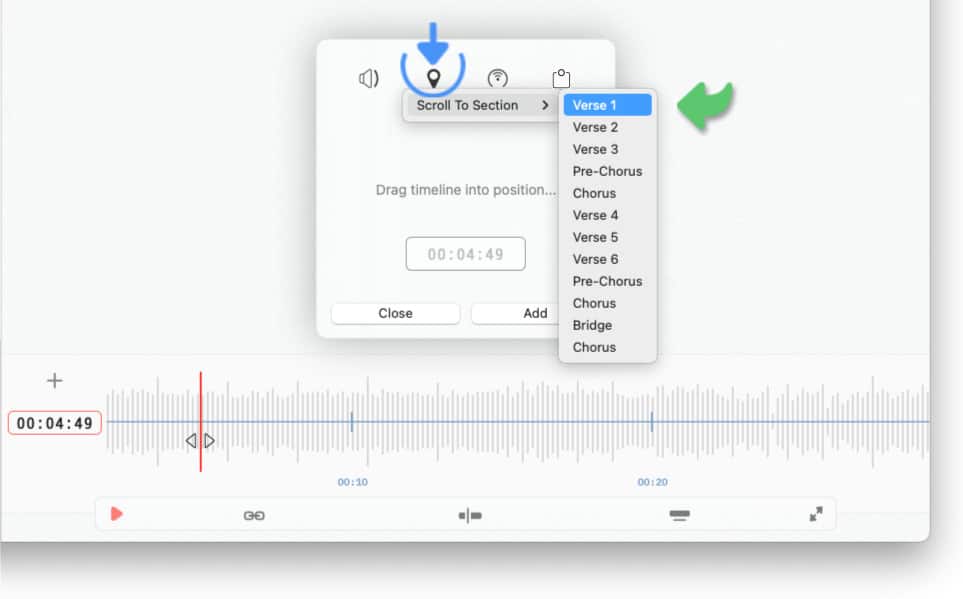
Tap/Click on the location icon at the top of the timeline event window and make a selection from the 'Scroll To Section' drop-down menu. |
|
|
The drop-down menu is empty if you have not added Section Labels (e.g. Verse 1, Chorus) to the song. (See Section Labels to learn more.) |
|
|
Start the playback of the backing track (or drag the timeline into position by swiping it left or right) and tap/click on the 'Add' button to add the event to the timeline. |
Once the section marker has been added the Songs app automatically suggests the next section label from the list:

|
|
When the audio backing track has reached the next song section (e.g. Verse 2) tap/click on the 'Add Next' button to add the marker to the timeline. |
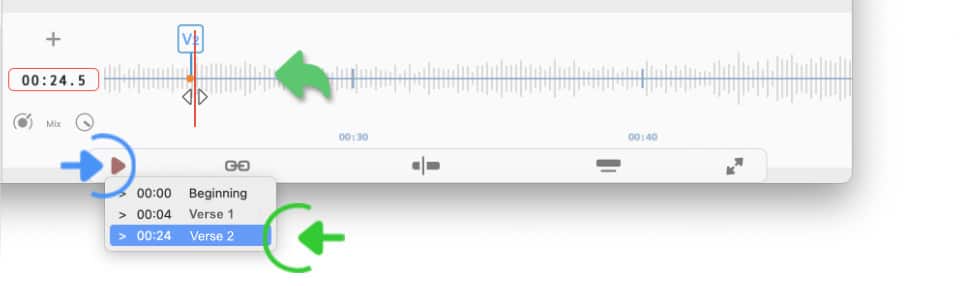
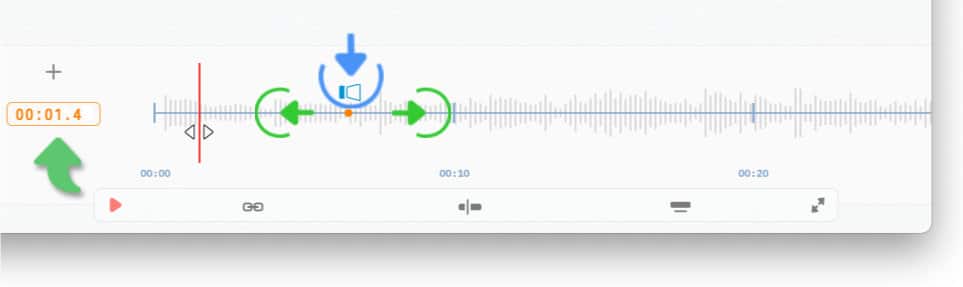
Added section markers may be repositioned by performing a long tap on the event’s icon and dragging it left or right. (The time display to the left of the timeline will turn orange while the event is being dragged to indicate the drop position of the event.)

|
|
A repositioning pop-up menu allows you to jump to a specific location on the timeline. Perform a long tap/click on the play icon to access the menu and select the location. |
|
|
Once a section marker has been added to the timeline the scrolling position is controlled via timeline and cannot be manually adjusted (via a bluetooth controller or screen taps). |
|
|
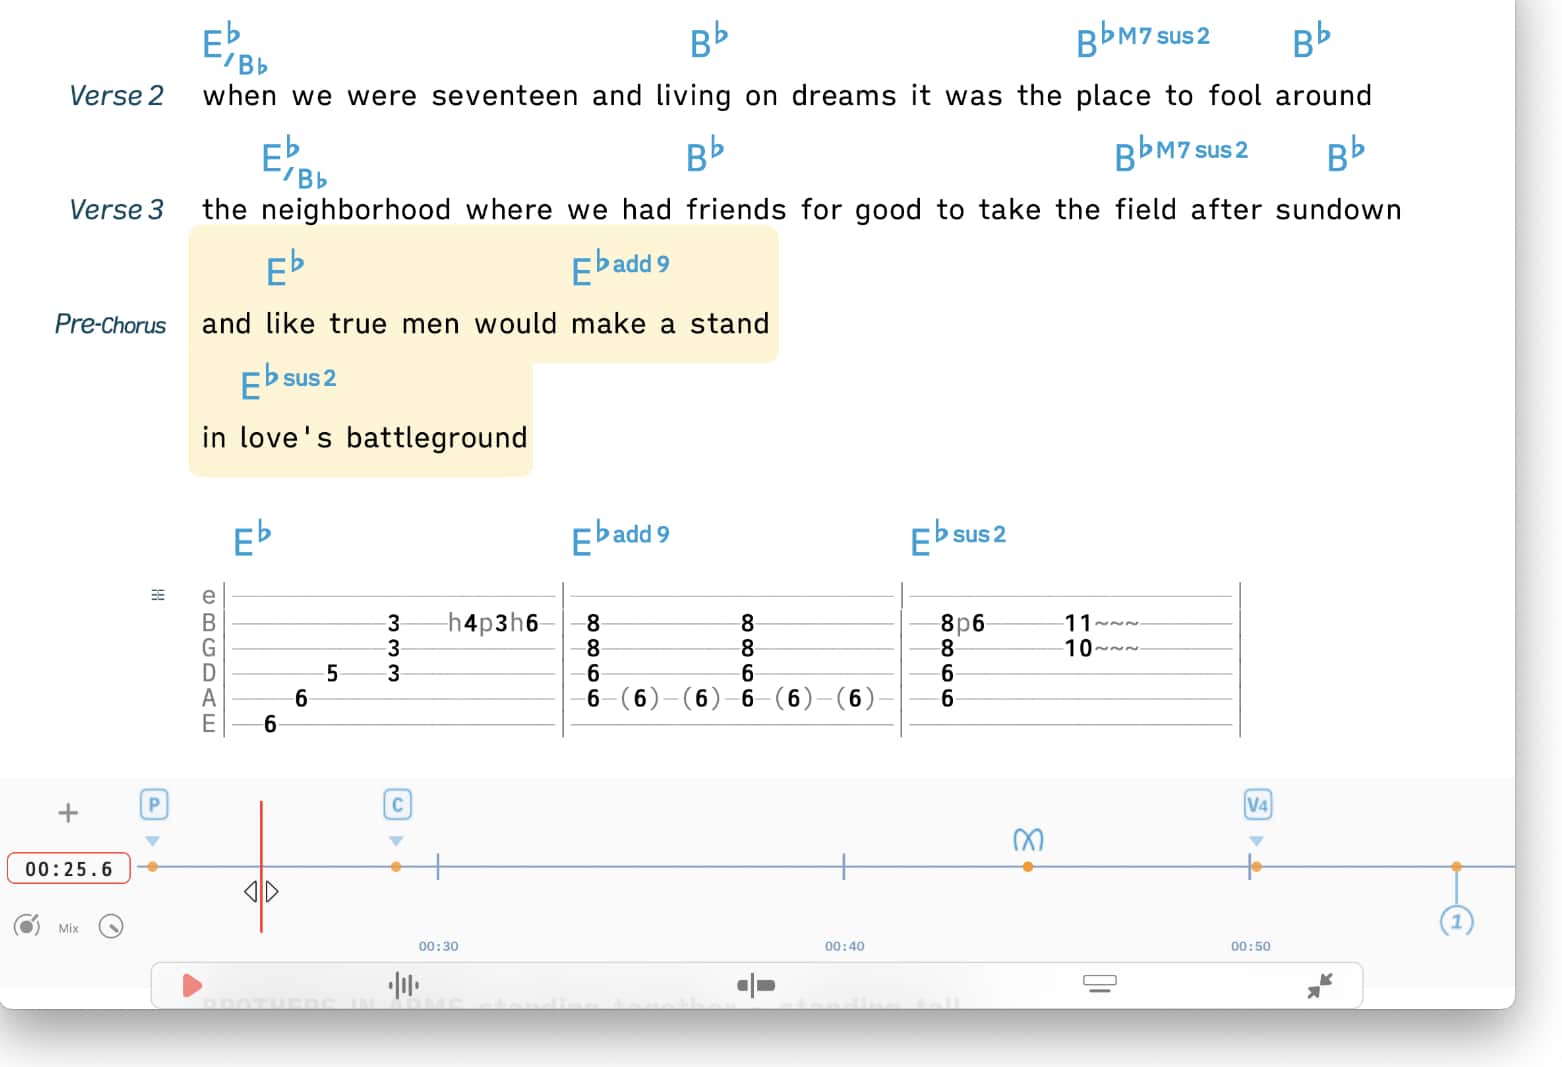
Section markers can auto-highlight the current section when reposition the song: |
|
|
Go to the app settings and select 'Auto-Highlight Sections When Repositioning Songs Via Section Markers' at the bottom of the 'Play Mode' section. |
Note: 'Section Markers' will not auto-highlight song sections (e.g. Verse 1, Chorus) when you have added 'Highlight Markers' to the timeline which highlight specific lines. (See 'Highlight Marker' to learn more.)
Highlight Marker
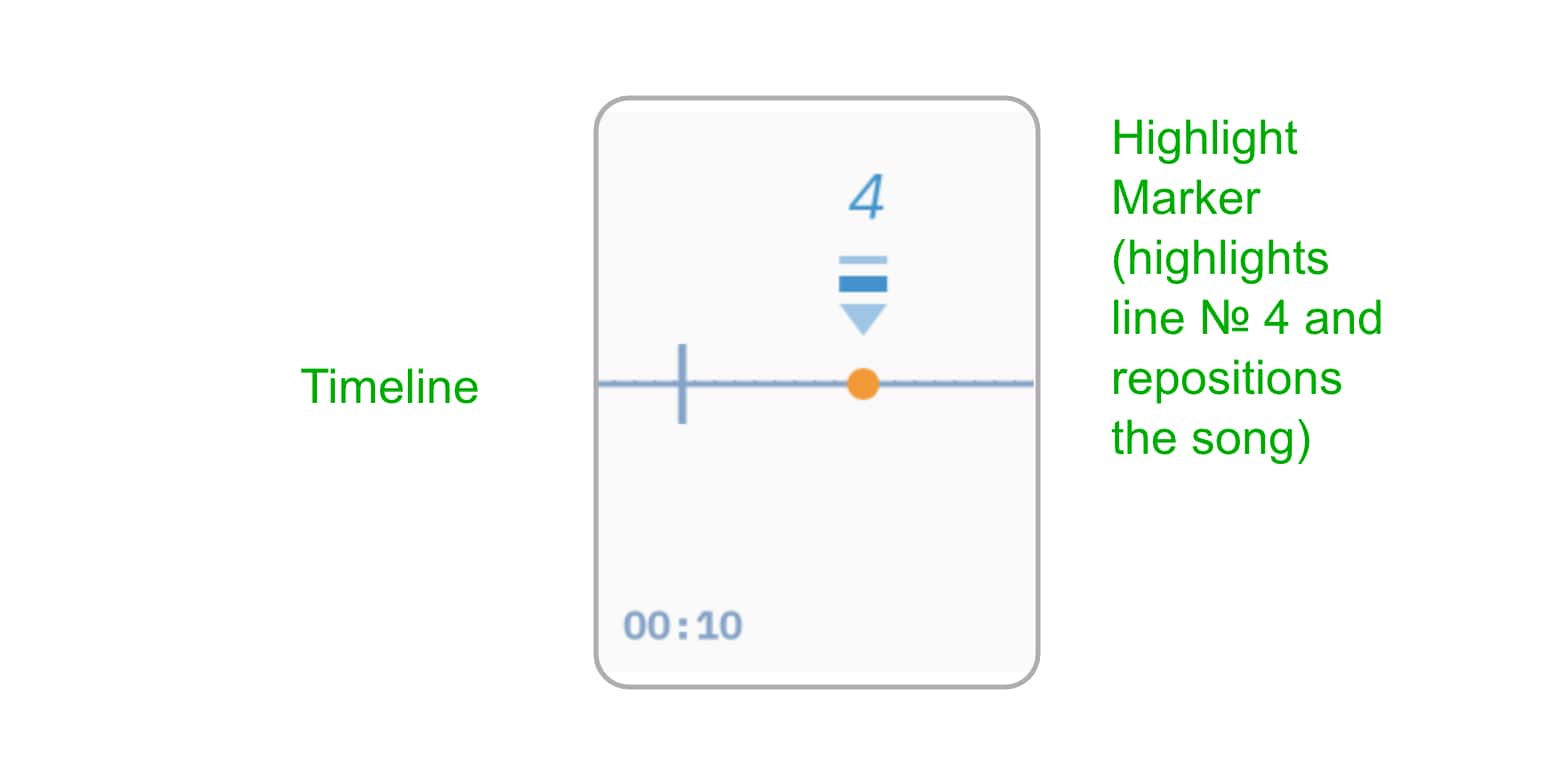
Highlight markers highlight specific lines in the lyrics during playback.
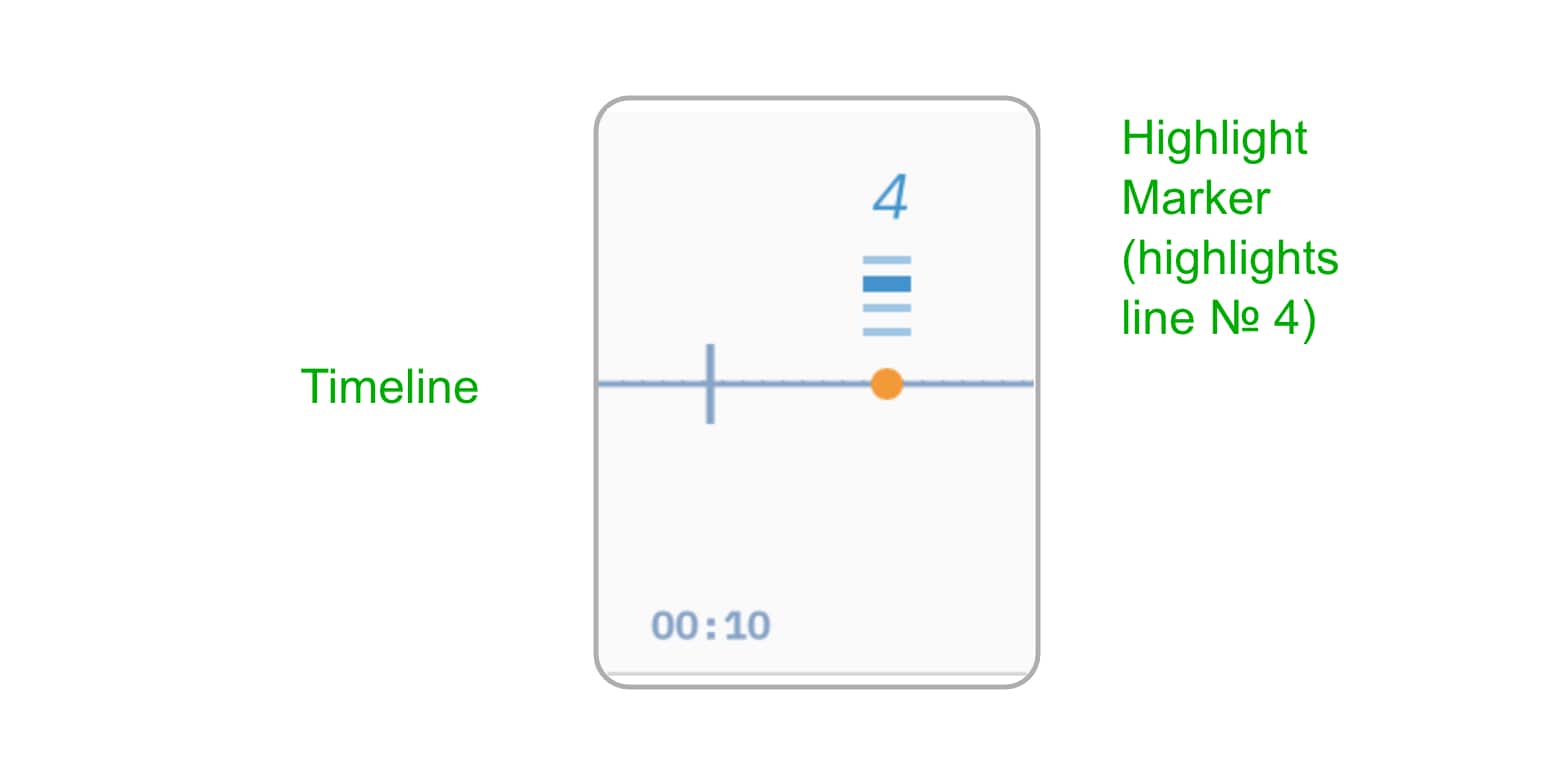
Highlight markers will also reposition the song if they are placed on a timeline without section markers. These highlight markers are displayed with an arrow:
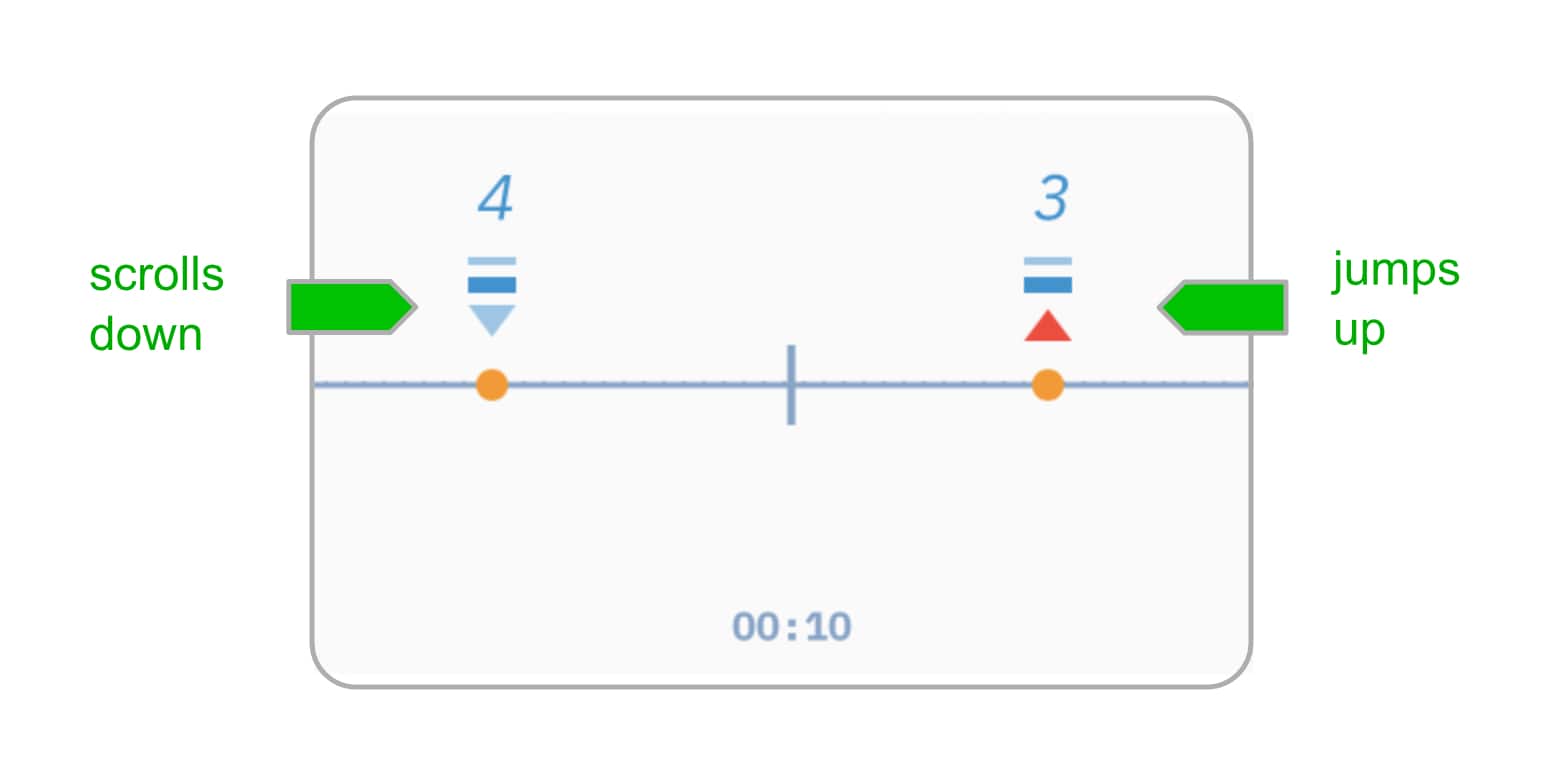
Highlight markers reposition a document either up or down:
-
The lyrics will jump upwards when the timeline reaches a highlight marker that refers to a line above the current scrolling position.
When using auto-scroll you can pause the scrolling by adding the highlight marker of a specific line a second time:
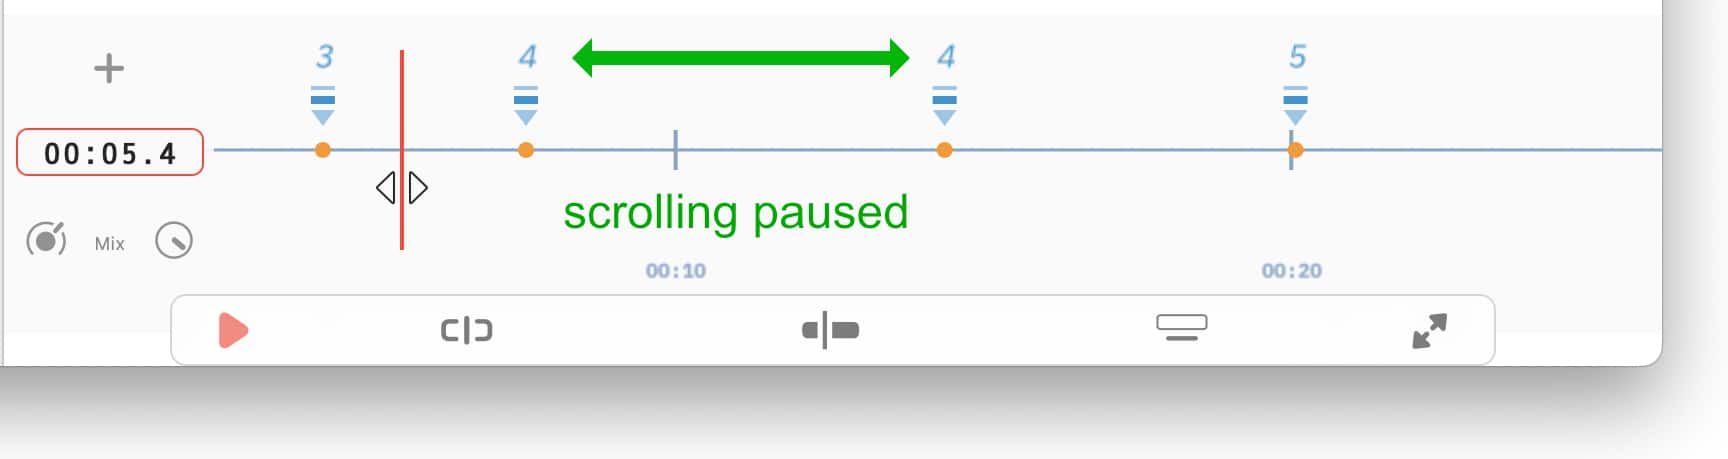
|
|
You may specify in which part of the screen a highlighted line is displayed when its marker is reached on the timeline: Navigate to the 'Play Mode' section of the app settings and customize the 'Section Scrolling Position Offset'. |
|
|
A highlight marker cannot be used to advance PDF documents or 'Print Snapshots' (Use a 'PDF Page Marker' to do so). |
To add highlight markers to the timeline:
|
|
Tap/Click on the location icon at the top of the timeline event window and make a selection from the 'Highlight Line' drop-down menu. |
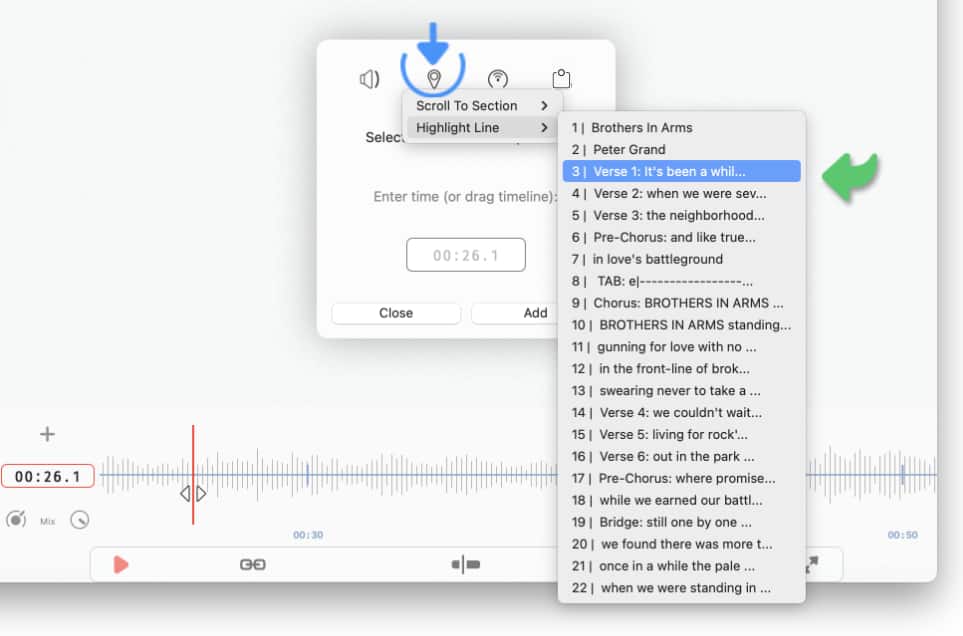
|
|
Start the playback of the backing track (or drag the timeline into position by swiping it left or right) and tap/click on the 'Add' button to add the marker to the timeline. |
Once the highlight marker has been added the Songs app automatically suggests the next line from the list:
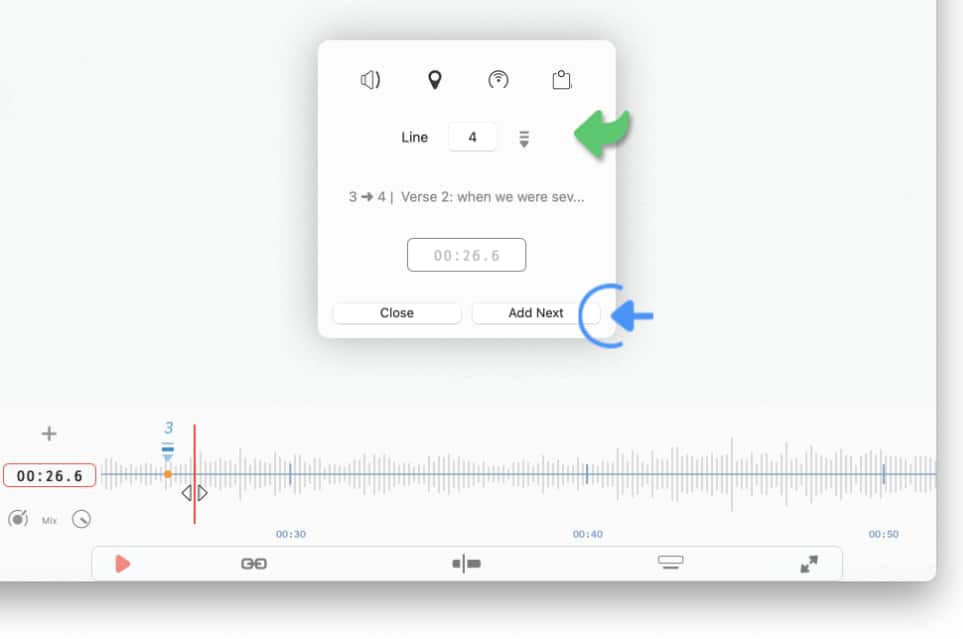
|
|
When the audio backing track has reached the next line in the lyrics tap/click on the 'Add Next' button to add the marker to the timeline. |
Added highlight markers may be repositioned by performing a long tap on the marker’s icon and dragging it left or right. (The time display to the left of the timeline will turn orange while the marker is being dragged to indicate the drop position of the event.)
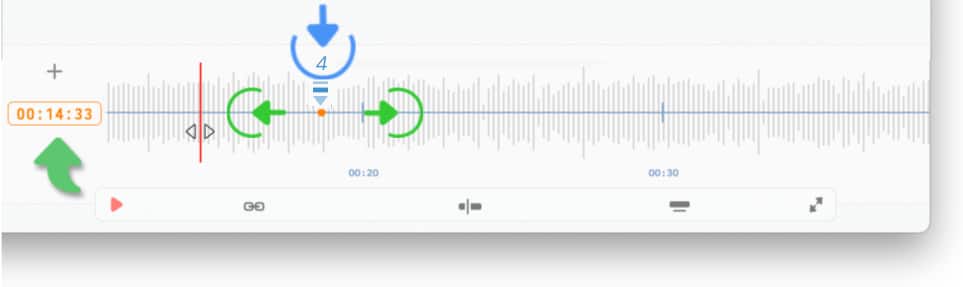
|
|
A repositioning pop-up menu allows you to jump to a specific location on the timeline. Perform a long tap/click on the play icon to access the menu and select the location. |
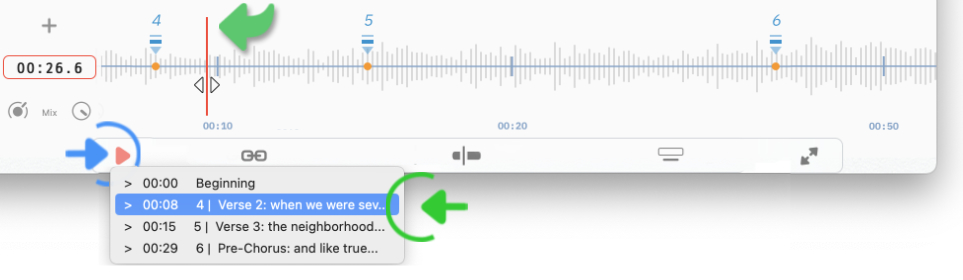
PDF Page Marker
A PDF page marker controls which section of a PDF document or 'Print Snapshot' is shown at a specific time.
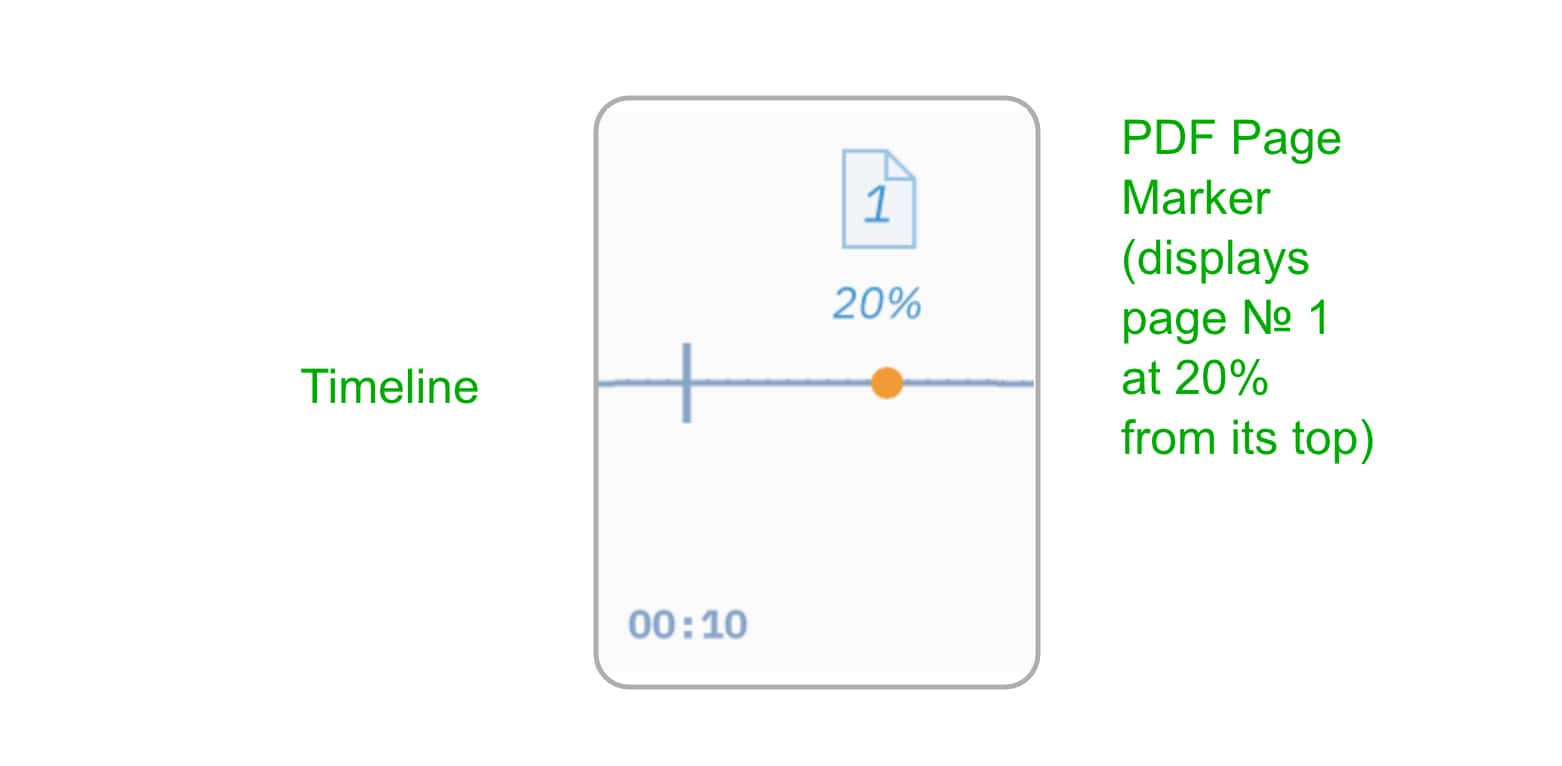
|
|
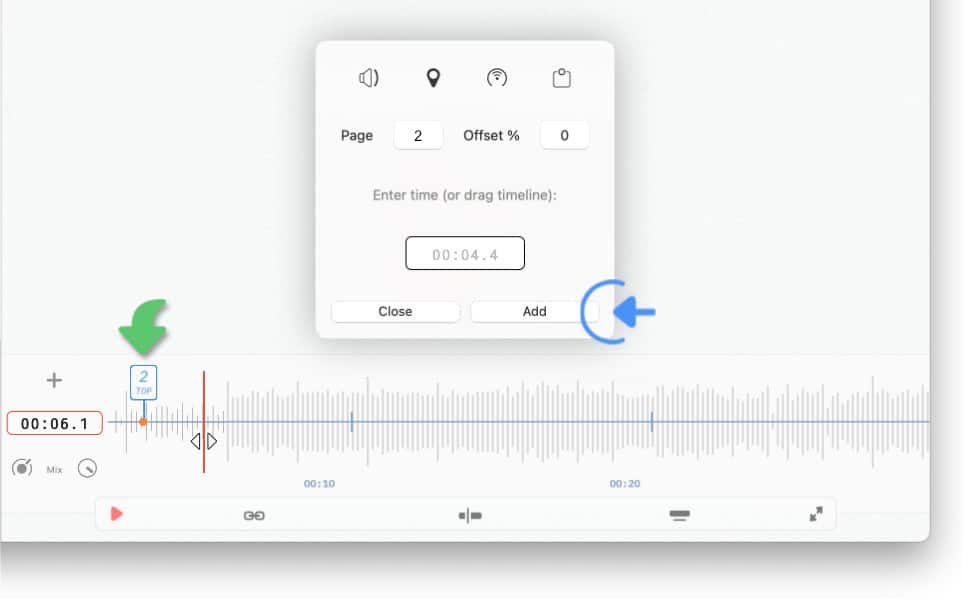
Tap/Click on the location icon at the top of the timeline event window and select 'Scroll / Position PDF'. |

|
|
Specify a page number and an optional scrolling offset percentage: The offset value refers to a specific portion of a page (e.g. enter an offset of 50% to scroll to the middle of the page). |
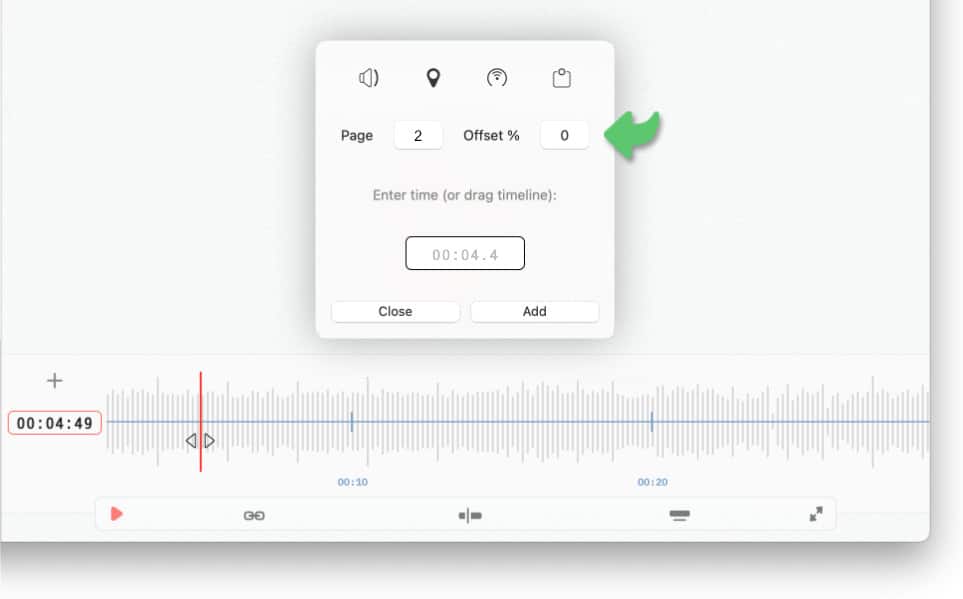
|
|
Enter the execution time of the event (or drag the timeline into position by swiping it left or right) and tap/click on the 'Add' button to add the event to the timeline. |
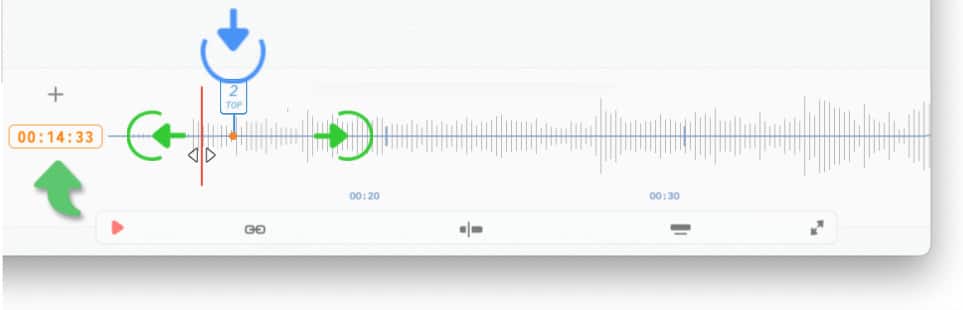
Added PDF page markers may be repositioned by performing a long tap on the event’s icon and dragging it left or right. (The time display to the left of the timeline will turn orange while the event is being dragged to indicate the drop position of the event.)
|
|
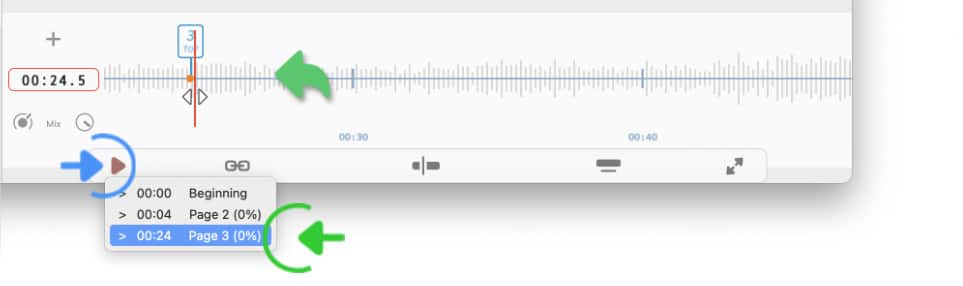
A repositioning pop-up menu allows you to jump to a specific location on the timeline. Perform a long tap/click on the play icon to access the menu and select the location. |
Vocal Cue Marker
A vocal cue marker assists the performers during band rehearsals and live events. Vocal cues are audible in the performers' in-ear monitor system in addition to a click track or a backing track.
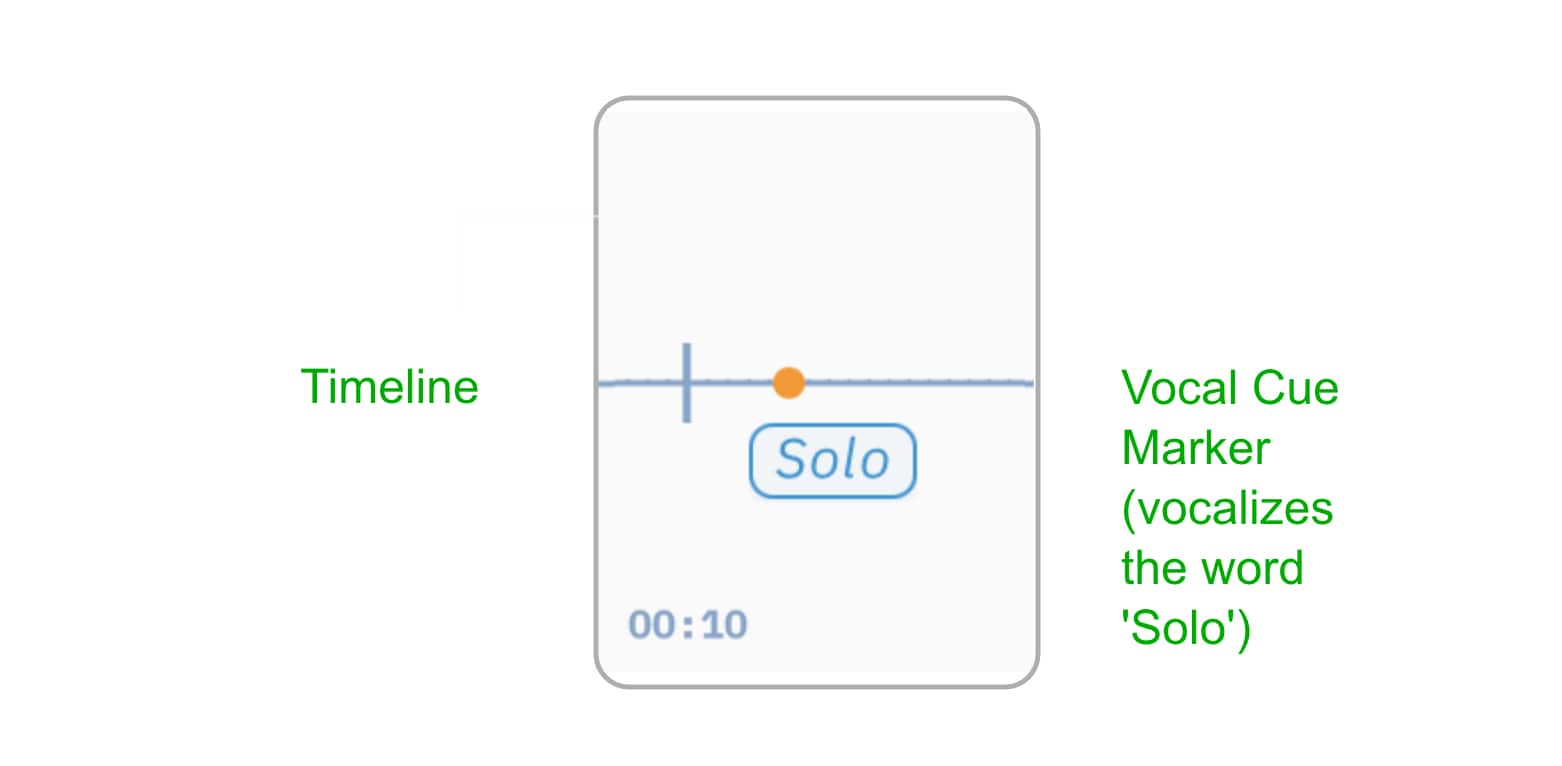
Typical vocal cues include:
-
A count-in to inform the drummer when to start playing,
-
the name of the upcoming song section to guide the band.
The Songs app comes pre-installed with 214 pre-recorded vocal cues. (You may expand this collection with your own vocal cues.)
To add a pre-installed vocal cue to the timeline of a song:
|
|
Tap/Click on the vocal cue icon at the top left of the timeline event window, select 'Play Vocal Cue' and type the cue into the text field (e.g. 'Verse 1'). |
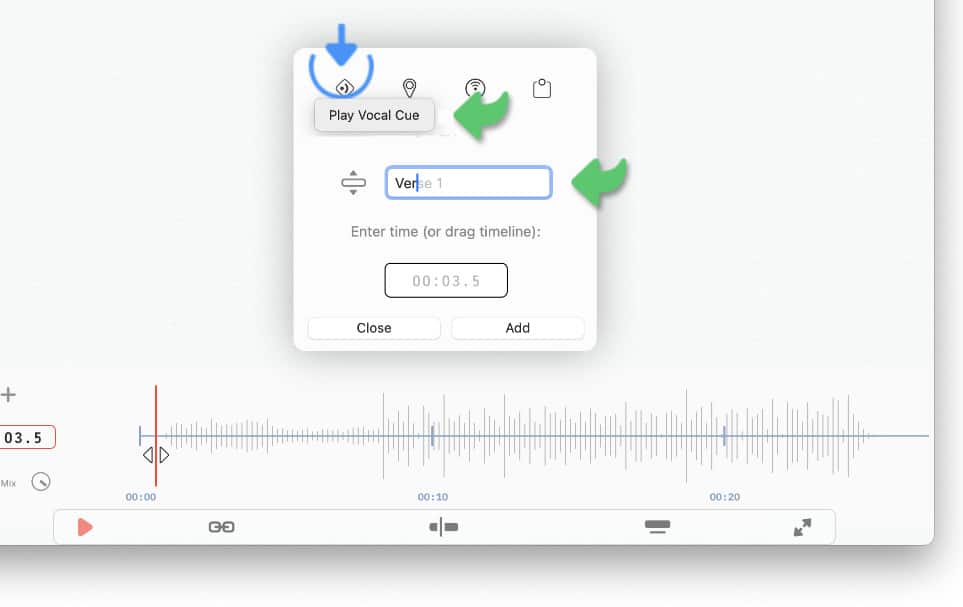
Matching vocal cues are suggested while you type: Press the return key to auto-complete your entries.
|
|
Alternatively you may select a vocal cue from a menu after tapping on the icon to the left of the text field. |
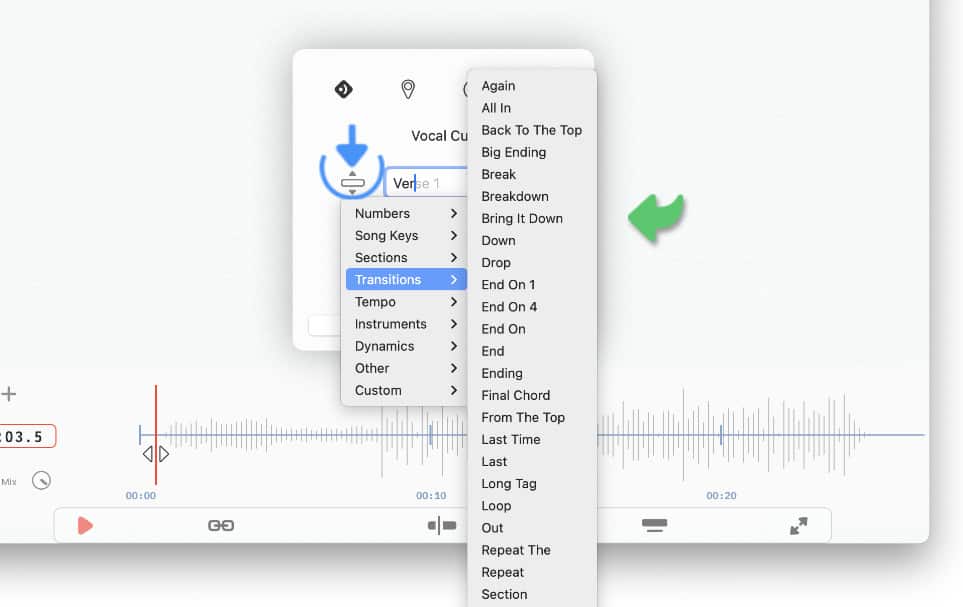
|
|
Once the vocal cue has been entered start the playback of the backing track (or drag the timeline into position by swiping it left or right). Then tap/click on the 'Add' button to add the vocal cue marker to the timeline at the desired position. |
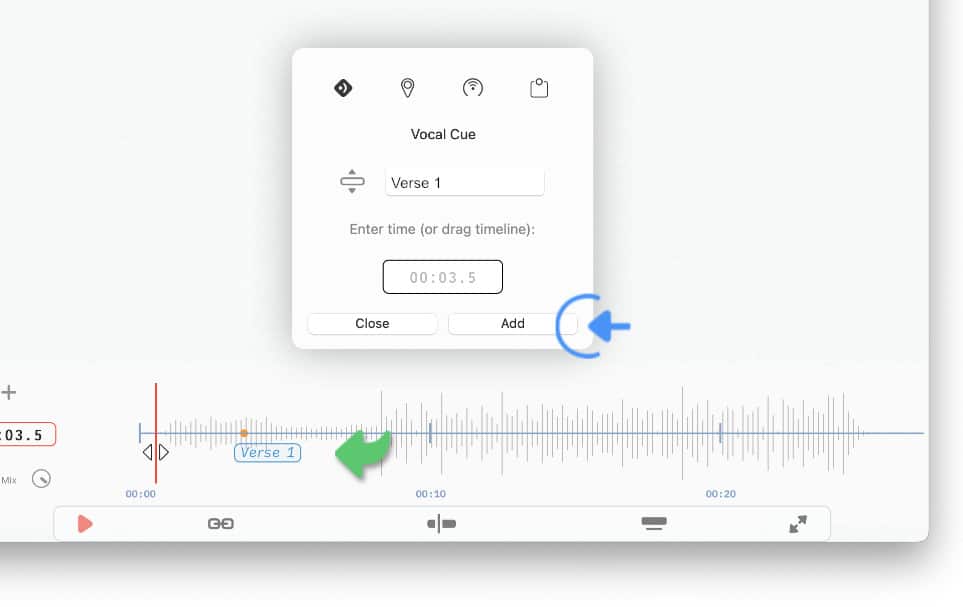
Note: Added vocal cue markers may later be repositioned by performing a long tap on the marker and dragging it left or right.
-
The time display to the left of the timeline will turn orange while the marker is being dragged to indicate the drop position of the event.
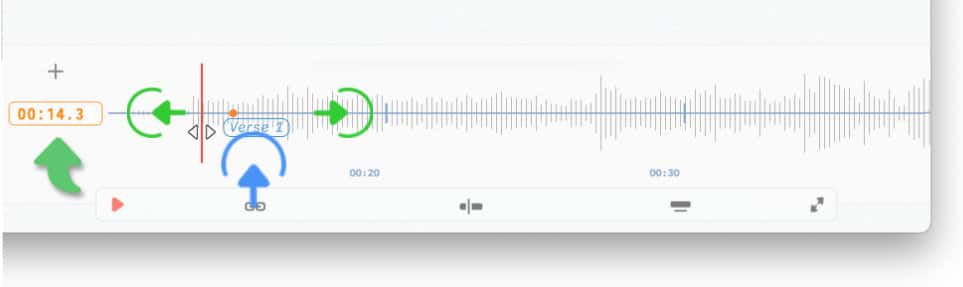
The pre-installed vocal cue collection can be expanded with your own WAV audio recordings (maintained in an external folder).
|
|
Open the vocal cue pop-up menu and tap/click on 'Select Folder (WAV Files)' under 'Custom'. Then select the external folder on your device to create a permanent link to it. |
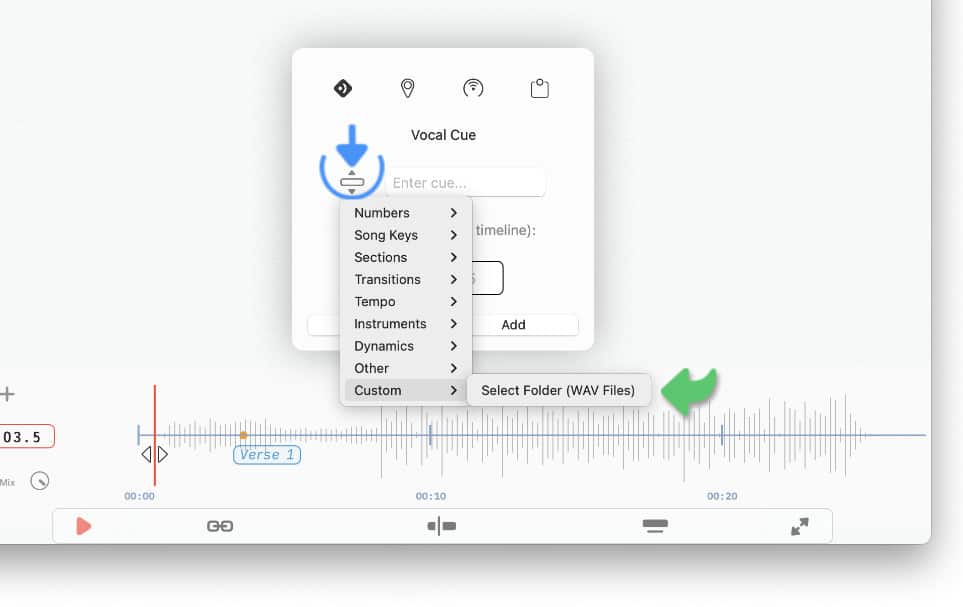
Once the folder has been linked all of its WAV files are automatically added to the 'Custom' submenu.
-
You may add more custom vocal cues to the folder at a later time without re-linking it.
-
Custom vocal cues should be recorded in mono (16-Bits / 44.1kHz) and saved in the WAV ('.wav') file format.
-
Make sure the names of your vocal cues are unique: The Songs app will play one of its pre-installed vocal cues if it has the same name as a custom vocal cue.
-
To ensure the immediate availability and playback of your custom vocal cues store them in a local folder on your device (rather than on your iCloud Drive).
|
|
The Songs app only creates a link to the custom WAV files but does not import them. Custom vocal cues added to the timeline will no longer produce a sound if you have removed the linked WAV files from the external folder. Re-add any removed WAV files to the external folder to automatically re-link them. |
|
|
The Songs app does not sync your custom WAV files via iCloud and does not include them in your song catalog backups. Copy the external folder to all your devices and perform the 'Select Folder (WAV Files)' menu option to link it. |
ProPresenter Marker
A Pro-Presenter marker remote-controlls the popular ProPresenter app. ProPresenter is a presentation software created by Renewed Vision. It is used to generate dynamic visuals during live performances and church services.
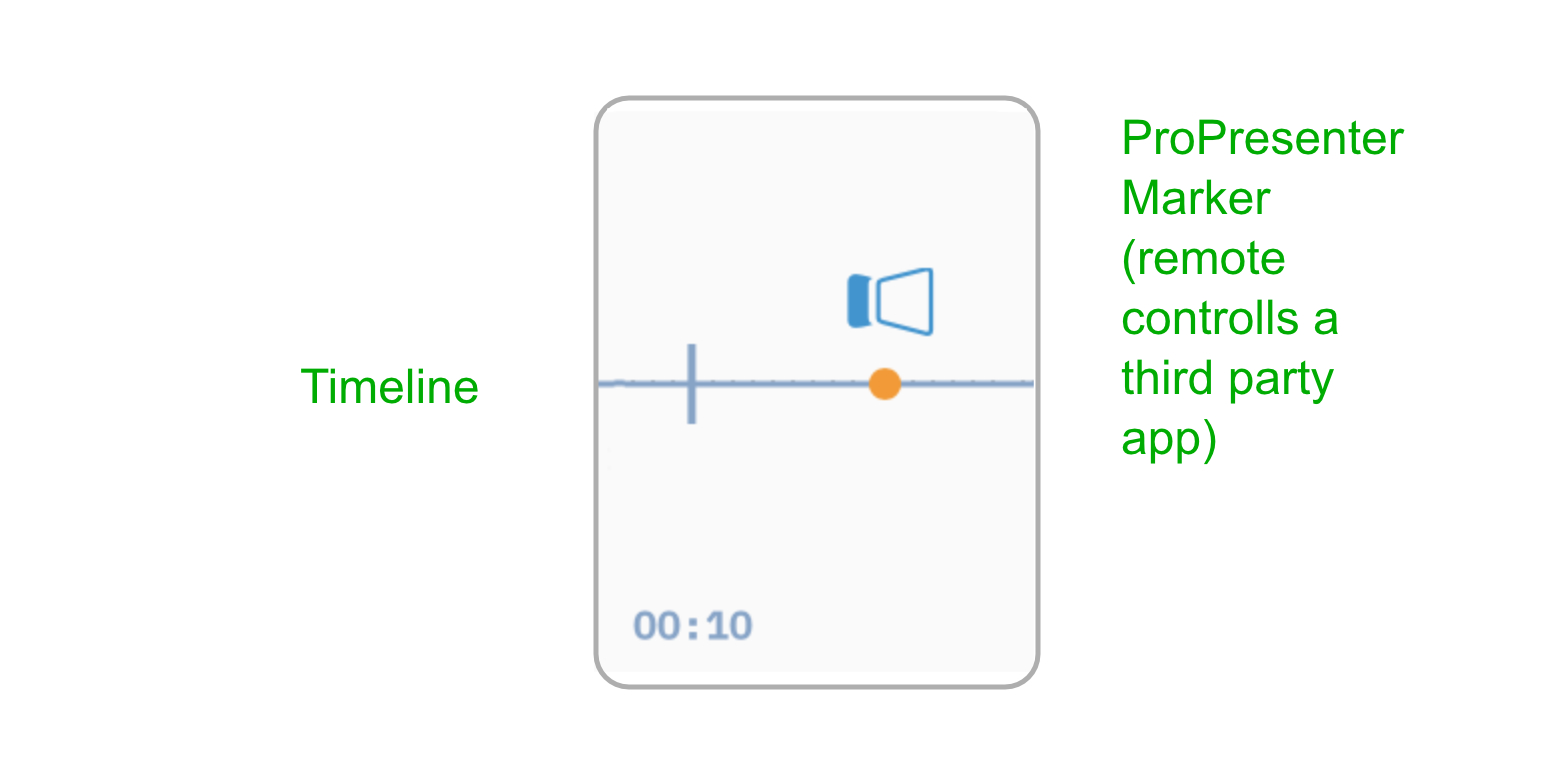
The Songs app’s outgoing MIDI commands are compatible with ProPresenter’s default 'MIDI Map' settings. Revert to ProPresenter’s default settings as follows:
|
|
Open ProPresenter’s 'Devices' Settings Window (ProPresenter > Settings > Devices) and tap/click on the 'MIDI Map' button. |
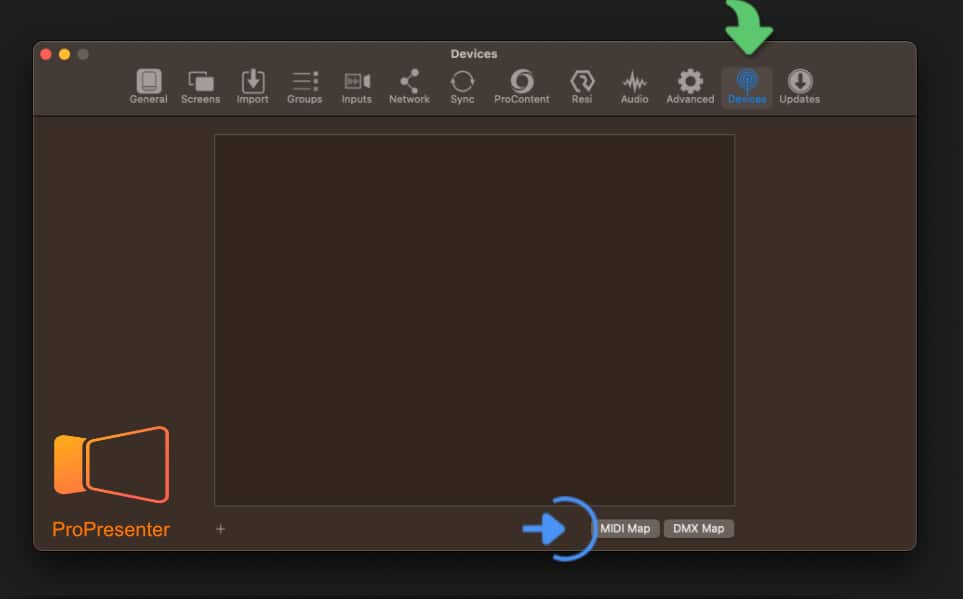
|
|
Enter the number '0' in the top left field of the MIDI Map window and tap/click on the 'Auto Fill' button. |

ProPresenter’s MIDI Map is now configured to work with the Songs app’s timeline events. Consult ProPresenter’s user guide to learn more about the app’s MIDI capabilities.
Now you can add ProPresenter’s MIDI events to the timeline/waveform of Songs. (The playback of the song does not have to be stopped to add events to the timeline.)
|
|
Tap/Click on the plus sign above the time display to the left of the timeline/waveform.. |
The timeline event window will appear:
To add a new ProPresenter marker to the timeline…
|
|
Tap/Click on the MIDI Icon at the top of the timeline event window and make a selection from the 'Control ProPresenter' drop-down menu. |
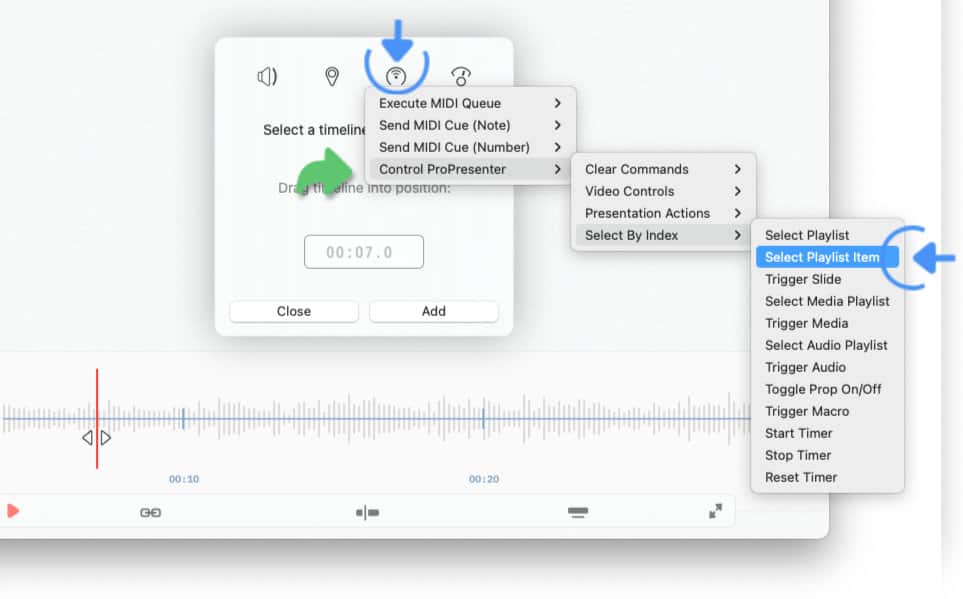
|
|
Drag the timeline into position by swiping it left or right and tap/click on the 'Add' button to add the event to the timeline. |

Note: Added ProPresenter markers may later be repositioned by performing a long tap on the event’s icon and dragging it left or right.
-
The time display to the left of the timeline will turn orange while the event is being dragged to indicate the drop position of the event.
Disabling & Deleting Timeline Markers
Markers you have added to the timeline can be deleted.
|
|
To delete a single timeline marker tap/click on its marker and select 'Delete' in the timeline events window. |

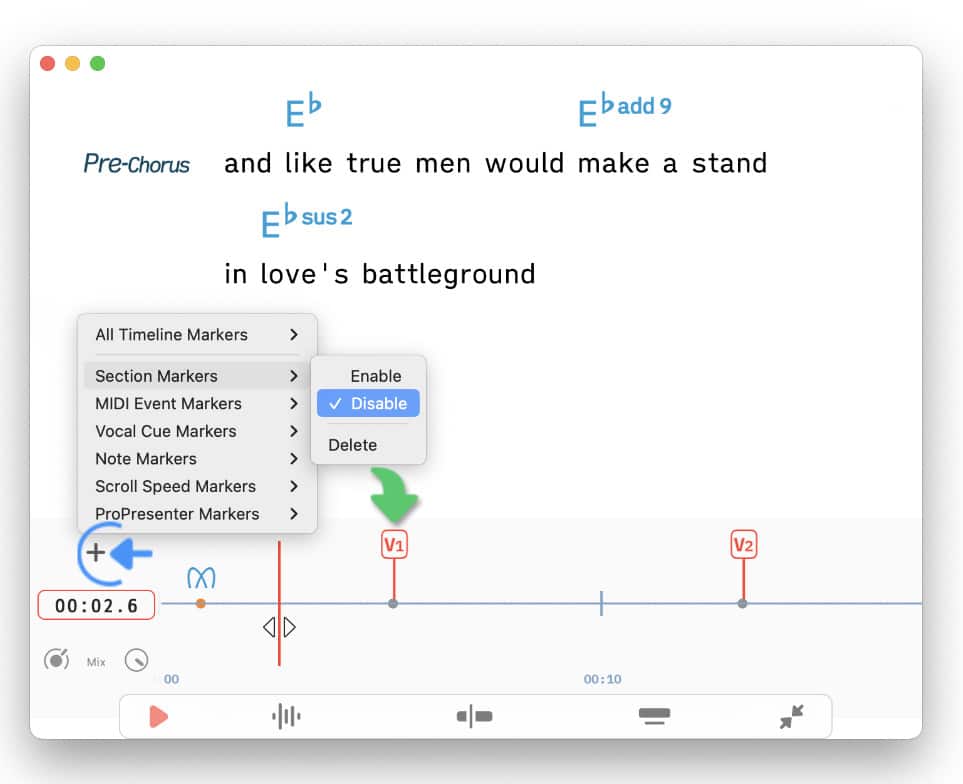
A group of markers can also be disabled. Disabled markers can easily be re-enabled when needed. Disabled timeline markers are displayed in red and are not executed during playback.
For instance, disabling added section marker allows you to controll the scrolling speed via the highlight markers.
|
|
To disable/enable (or delete) a group of timeline markers perform a long tap / right click / two finger tap on the plus icon and make the appropriate selection from the pop-up menu. |