EDITING SONGS
Song Editor
A tap/click on the song editor enables you to edit the lyrics and chords of a song.
Adding Chords
The Songs app’s song editor recognizes and auto-formats chords as you type and displays them in their most commonly used format. You may choose between 'Jazz' notation or 'Pop/Rock' notation. (See Themes to learn more.)
Chords do not have to be enclosed in square brackets to be distinguished from the lyrics. The Songs app is able to recognize thousands of different variations of over 200 chord types with added extensions and altered bass notes.

|
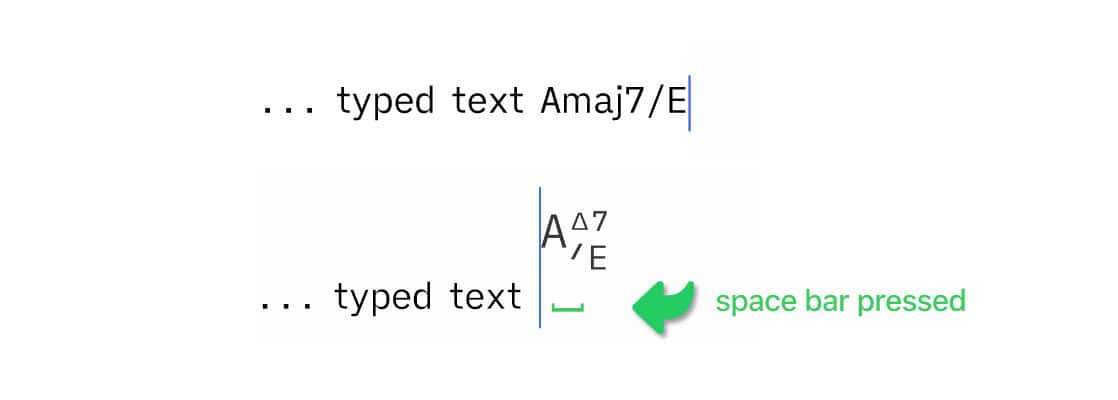
The chords are typed in the same line as the lyrics. The typed text is auto-formatted each time the space bar is pressed. |
-
Non-standard chord symbols are corrected whenever possible.
-
Hold the 'alt/option key' when pressing the space bar (masOS) or use the 'Tap'/'⇥' key (iOS) (to avoid transforming capitalized single letters into chords (e.g. 'A').
|
|
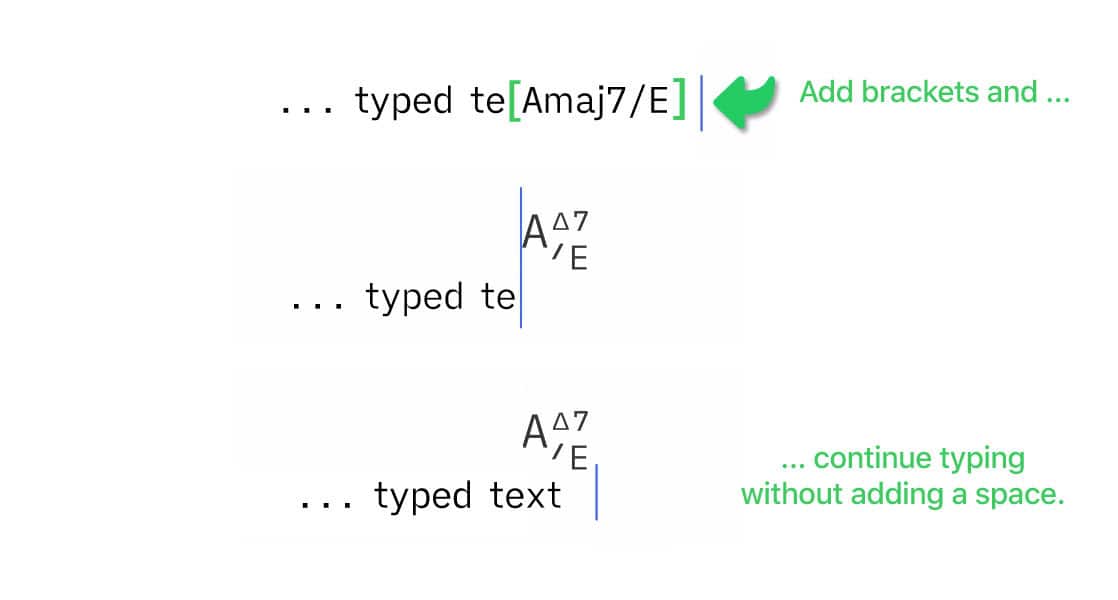
When you wish to add a chord symbol immediately after a text character (within a word) add square brackets when typing the chord. |
The typed chord is automatically converted into a symbol when you enter the right bracket:
Chords do not have to be typed to be added to the lyrics. They may also be created with the 'Chord Matrix' or auto-created from the selected notes of the 'Virtual Fretboard' or 'Virtual Keyboard'.
If you prefer to edit songs in the ChordPro/simple text format deselect 'Auto-Format Typed Chords' in the Songs app’s settings (under 'Song Editor').
-
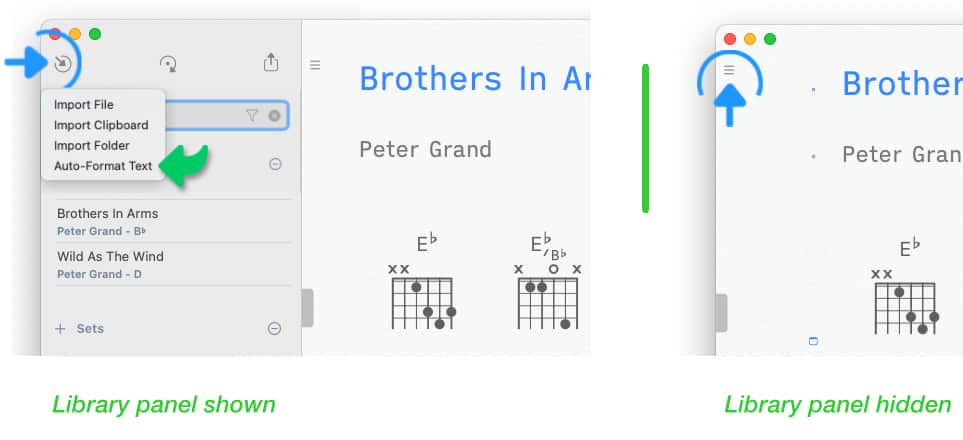
Once you done editing the song in simple text format you may format the text by selecting 'Auto-Format Text' from the import menu of the library panel. (See Library Panel to learn more.)
Auto-Spacing
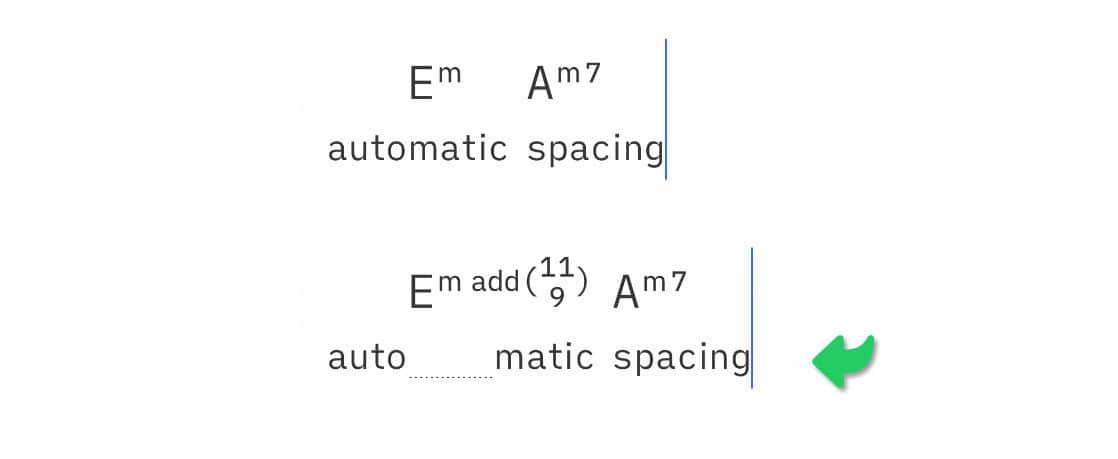
When chords are added to the lyrics the Songs app links the chord symbols to the corresponding words. When you edit the lyrics a linked chord will move together with its corresponding word.
|
|
The Songs app ensures that a chord symbol does not overlap by automatically adding a dotted space to the lyrics when needed. |
Importing Content
The song editor can import content from a variety of sources. (Click/Tap on the appropriate link to learn more.)
-
Content from 'OnSong', 'SongSheet Pro' and other song editors
-
'ChordPro'-formatted files
-
'PDF Files' and image files (JPEG, TIFF, PNG, GIF)
-
Scanned documents ('Scanning Documents (iOS)')
-
Website content (via the 'Add to Songs Action Extension')
-
Word processor files with RTF or TXT file extensions ('Text-Based Files')
-
Text copied to your device’s clipboard:
Copying & Pasting Text
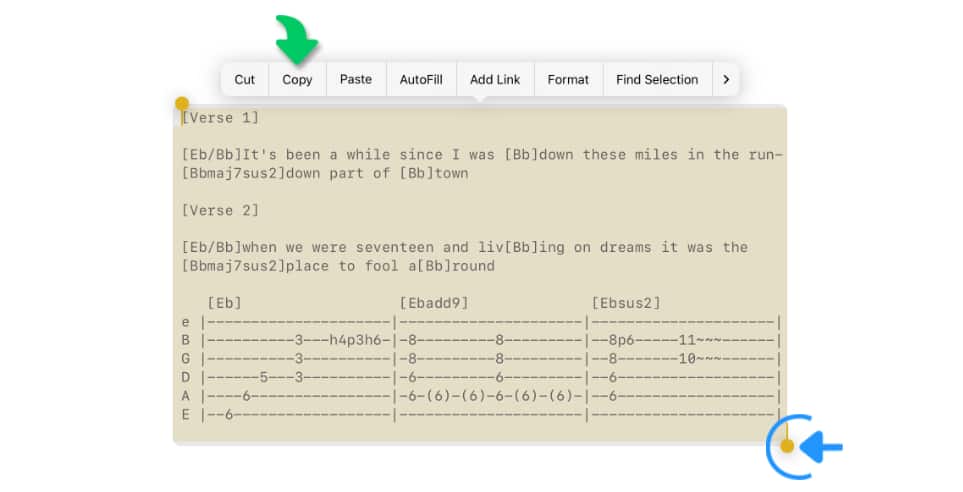
One of the easiest ways to import text is to copy and paste it via your device’s clipboard:

|
macOS: Highlight the text in the third-party app and press ‘command’ + ‘c’ (or select ‘Copy’ from the app’s ‘Edit’ menu). |
|
|
iOS: Highlight the text in the third-party app and select it with a long tap to access the iOS cursor menu and tap on ‘Copy’. |
You have two options to import the copied text:
Option 1: Create a new song with the copied text.
|
|
Click/Tap on the inward pointing arrow in the upper left corner of the library panel and select ‘Import Clipboard’ from the Songs app’s import menu. (If the library panel is not visible tap/click on the three lines in the upper left corner of the Songs app’s main window.) |

Option 2: Amend a song with the copied text.
|
|
macOS: Positioning the cursor in the Songs app’s lyrics editor and press ‘command’ + ‘v’. |
|
|
iOS: Position the cursor in the Songs app’s lyrics editor, access the cursor menu with a long tap and select ‘Paste’. |

|
|
To format the newly pasted content when amending a song select 'Auto-Format Text' from the Songs app’s import menu. (If the library panel is not visible tap/click on the three lines in the upper left corner of the Songs app’s main window.) |
|
|
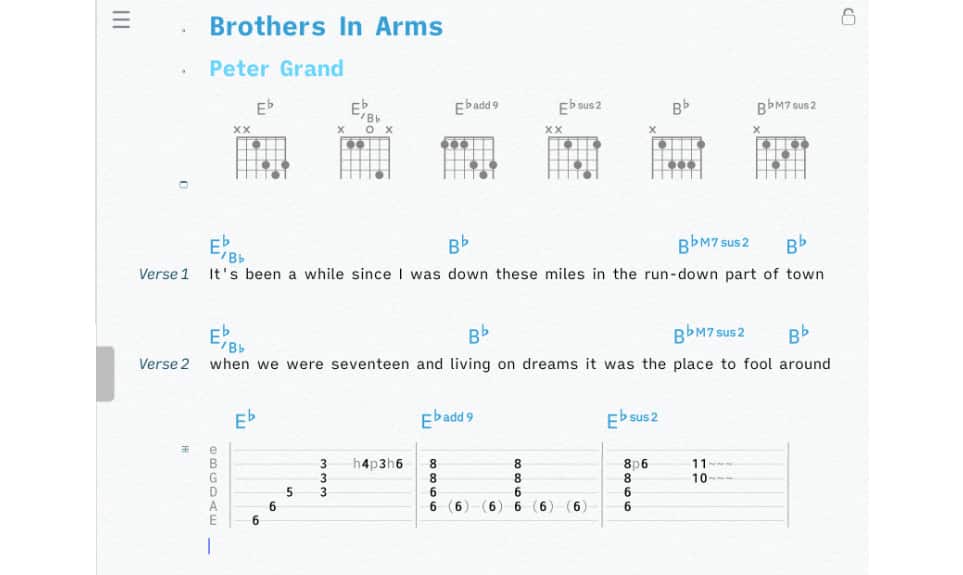
The Songs app will auto-format and auto-space the identified chords (square brackets are removed). Non-standard chord symbols will be corrected whenever possible. The chord diagrams of the original document are replaced with a set of diagrams created by the Songs app in the specified tuning. (See Virtual Fretboard to learn more.) |
Selecting Chords
A chord that has been added to the lyrics may be selected in four ways:
1) Tap/Click
|
|
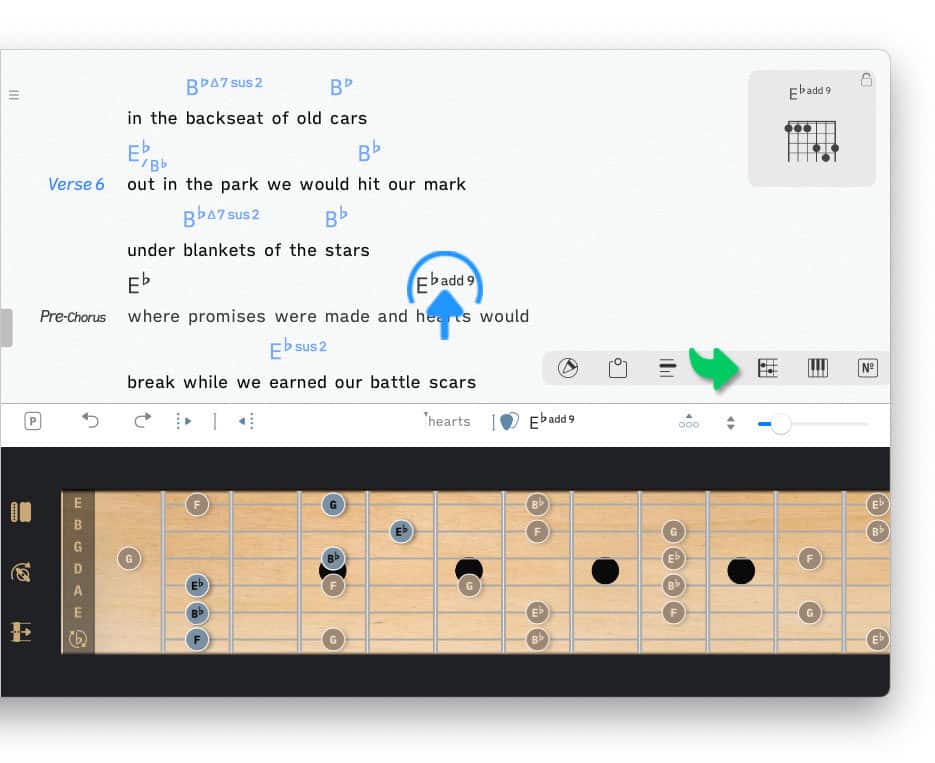
Tap/Click on a chord symbol to display its chord diagram and auto-play its notes on the virtual keyboard or fretboard. (See Virtual Fretboard and Virtual Keyboard to learn more.) |
Note: When 'Focus Mode' is enabled chords cannot be selected with a short tap/click. Use the swipe gesture instead:
2) Swipe
You may select a chord without changing the cursor position by swiping over it.
|
|
Start the swipe gesture at (or after) the beginning of a chord symbol. Alternatively you may swipe over the linked word below the chord. |

When a chord is selected its chord symbol is shown in the bottom toolbar next to the guitar pick icon:

Chords that are linked to single letters like 'a' are more difficult to select with a swipe gesture. In that case start the swipe gesture further to the right at the beginning of the next word.
3) Long Tap/Click
|
|
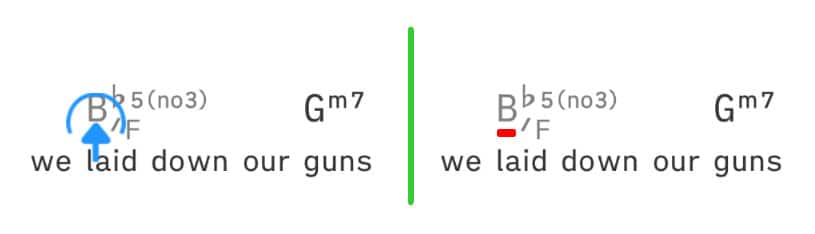
You may perform a long tap/click underneath a chord’s root note, separator bar, repeat sign or note marker to select the symbol. The selected symbol is displayed in grey. |
You may perform the long tap/click in an area without text or symbols and move towards the symbol you want to select. The symbol is automatically selected when you release the tap/click.

4) Left/Right Arrow Keys
|
|
Use the left or right arrow keys of your keyboard (or the Songs app’s 'Cursor Toolbar') to move the cursor towards the chord symbol. Once reached the chord symbol is automatically selected. |
Deleting Chords
A chord that has been added to the lyrics may be deleted in four ways:
|
|
Option 1: Select the chord with a long tap/click and tap/click on the guitar pick icon with the minus sign of the main toolbar (left) |
|
|
Option 2: Place the cursor at the beginning of the chord and press the delete key of your keyboard. |
|
|
Option 3: Use the left/right arrow keys of your keyboard (or the Songs app’s 'Cursor Toolbar') to move the cursor towards the chord until the chord is selected. Then tap/click on the guitar pick icon with the minus sign of the main toolbar (left). |
|
|
Option 4: On iOS you may press the space bar of the on-screen keyboard and reposition the cursor by moving your finger in the desired direction: |
|
|
Move the cursor toward the chord from the right and release the spacebar once the beginning of the chord is reached. Then press the delete key to remove the chord. |
Replacing Chords
You have the following four options to replace a chord after selecting it with a long tap/click or with the help of the left/right arrow keys:
|
|
Option 1: Type the new chord and press the space bar. Make sure there is a space to the left of the chord (or add square brackets when typing the chord.) |
|
|
Option 2: Tap/Click on the desired chord symbol in the 'Cursor Toolbar'. |
|
|
Option 3: Create a new chord with the help of the 'Chord Matrix', the 'Virtual Keyboard' or the 'Virtual Fretboard'. Then tap/click on the guitar pick icon of the bottom toolbar. |

|
|
Option 4: To replace ALL copies of a chord in the lyrics with a newly created chord: |
|
|
Create a new chord with the help of the 'Chord Matrix', the 'Virtual Keyboard' or the 'Virtual Fretboard'. |
|
|
Then perform a long tap/click on the chord you wish to replace in the 'Cursor Toolbar'. |
Repositioning Chords
Use the Songs app’s 'drag & drop' procedure to reposition a specific symbol. The 'drag & drop' procedure requires two long taps/clicks:
|
|
Perform a long tap/click underneath the chord’s root note to select the chord symbol. |
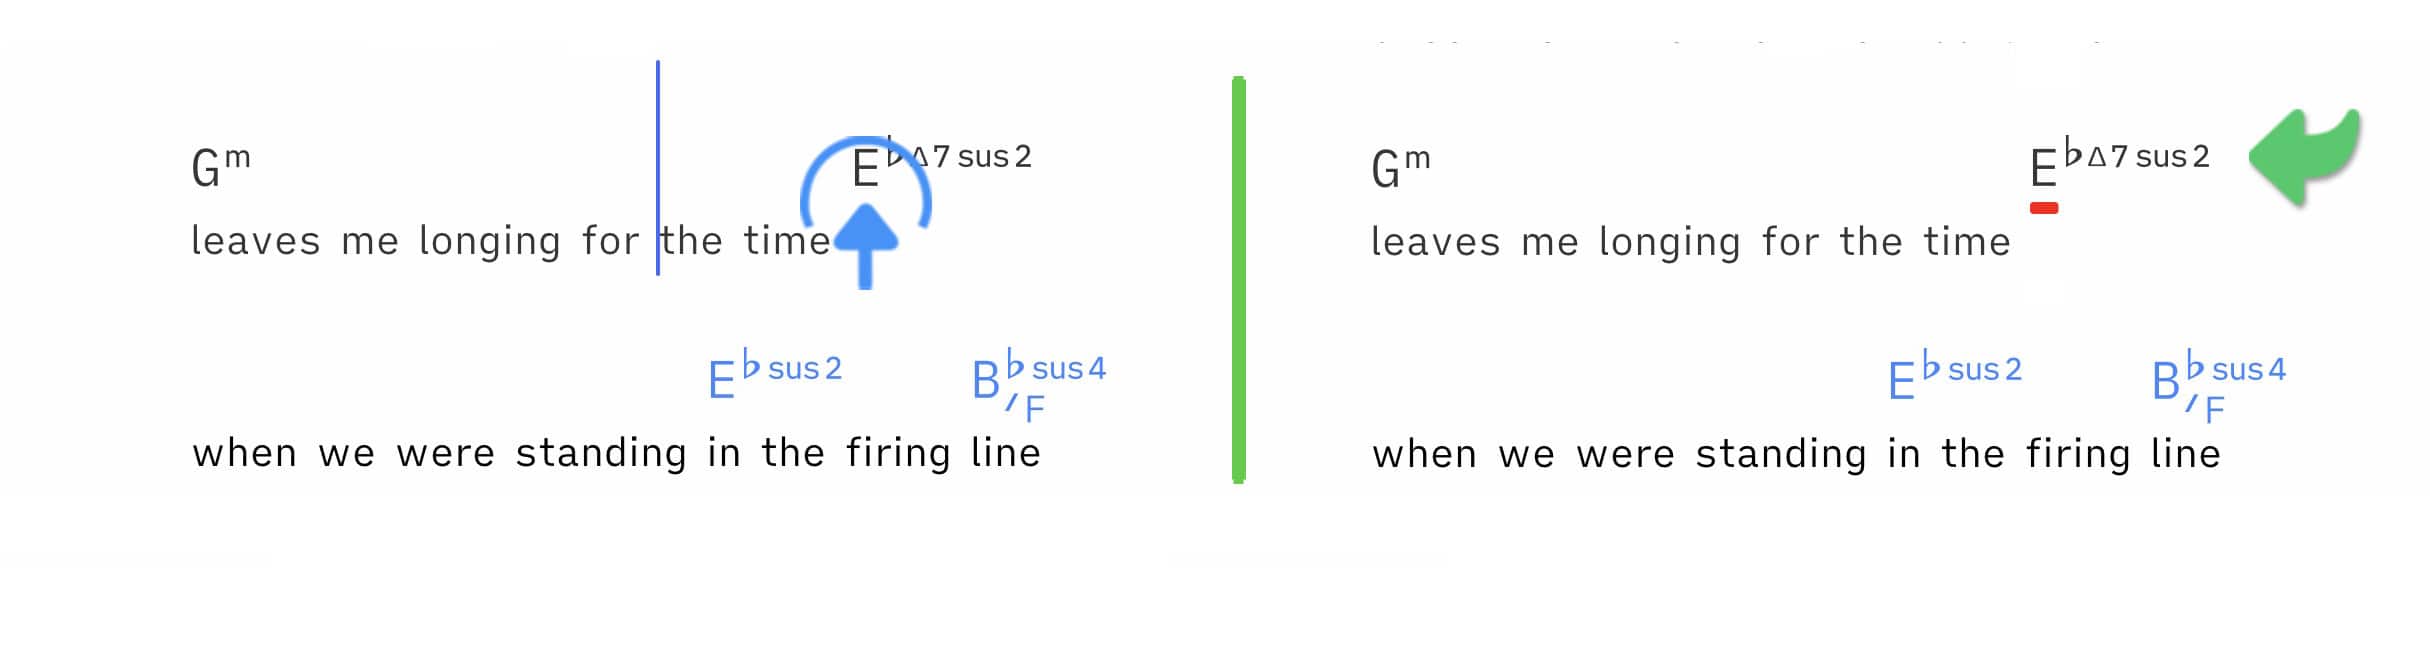
The second long tap/click allows you to reposition the selected symbol:
|
|
Perform a second long tap/click underneath the chord’s root note. The drop preview will appear. Move the cursor to the deisred location and release the tap/click. |
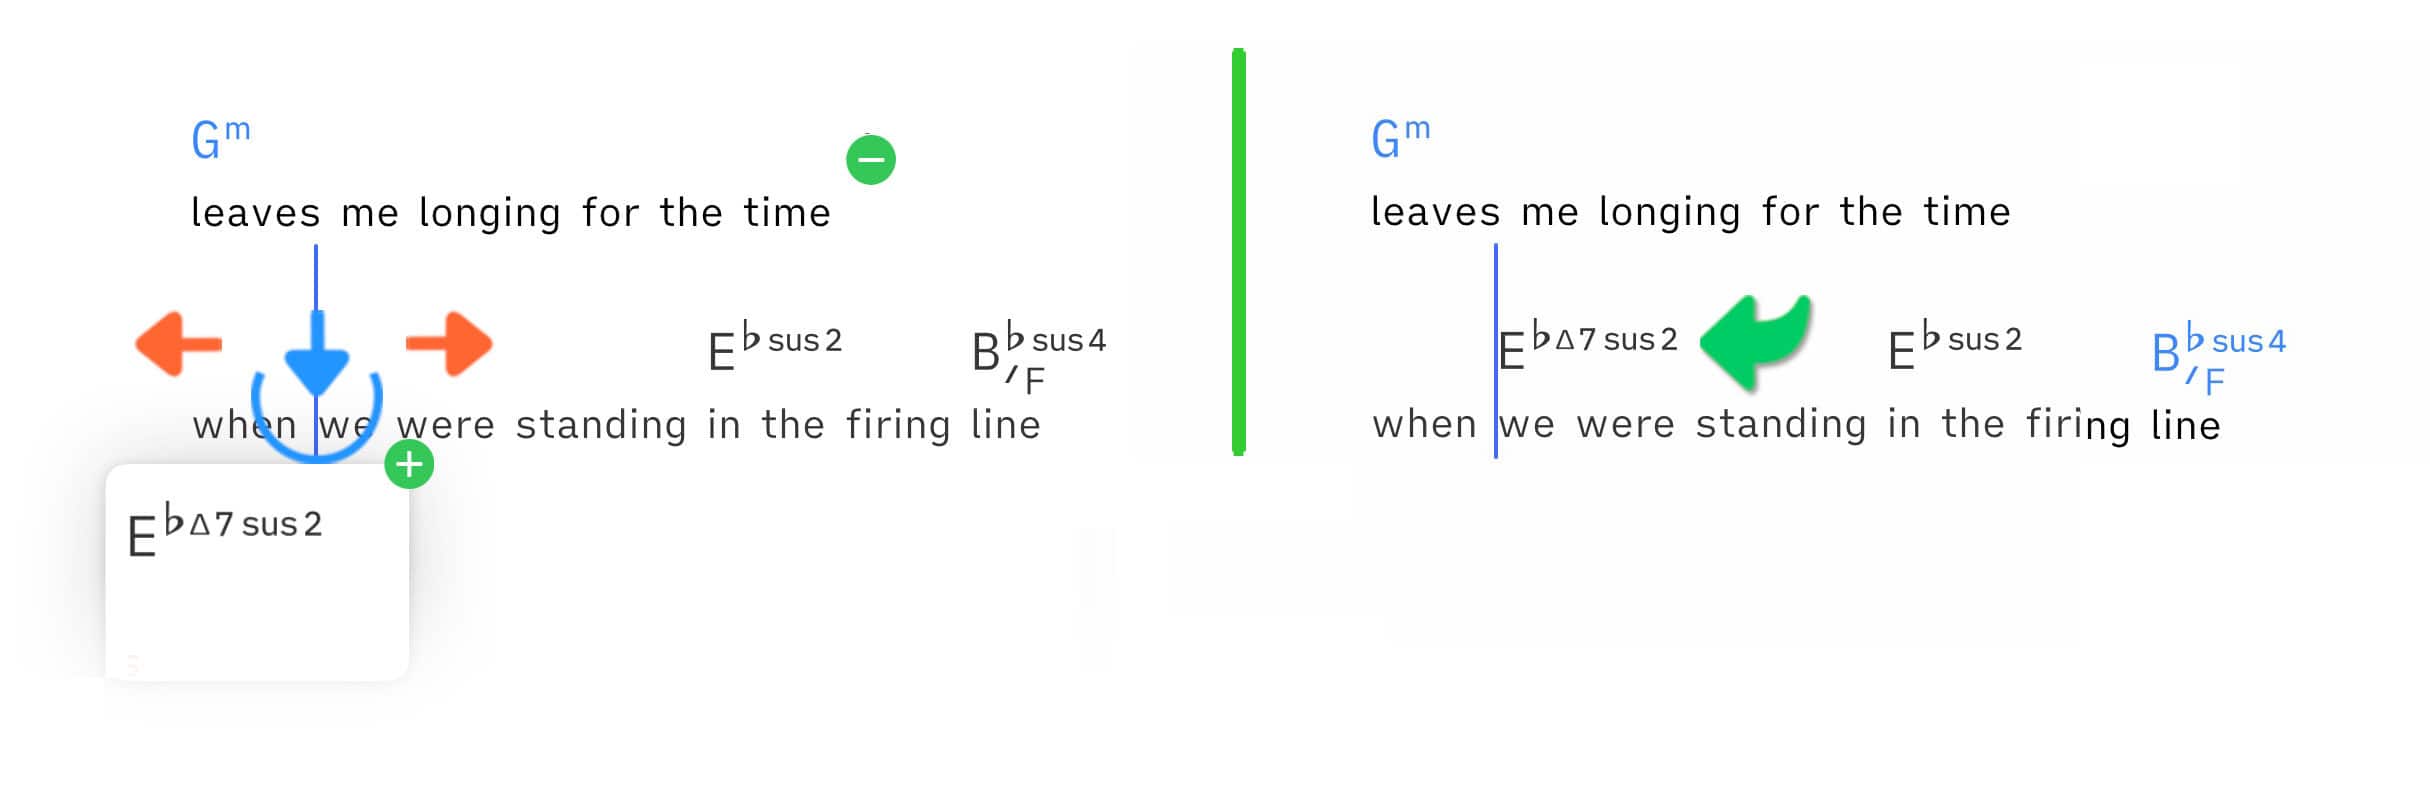
Tapping/clicking briefly anywhere in the song editor after the first long tap/click will cancel the impending drop of the selected symbol. (A drop will be automatically canceled when you delete the selected symbol.)
Reposition Buttons
The reposition buttons fulfill two functions:
When selecting a chord with a long tap/click you may use the reposting buttons to position the cursor to the right or to the left of a selected chord.

When editing lyrics you may use the reposting buttons to move a chord to the left or right without selecting the chord first.

Moving a Chord to the Left
|
|
Place the cursor at the desired position in the text. (The chord itself does not have to be selected.) |

|
|
Tap/Click on the dotted vertical line (with the arrow pointing to the left) in the bottom toolbar. |
The first chord to the right of the cursor is moved to the cursor position:
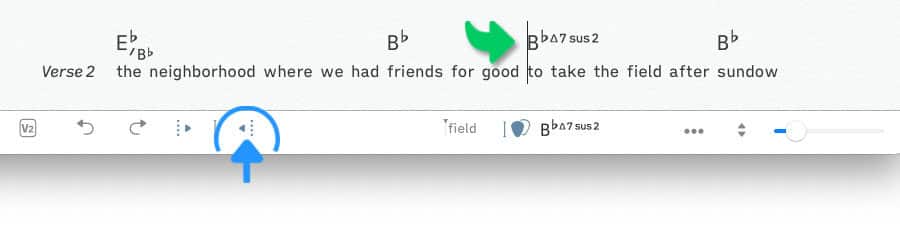
Alternatively you may use a keyboard shortcut: Press and hold the 'command' key and then press the 'left arrow' key to move the chord to the left.
Moving a Chord to the Right
|
|
Place the cursor at the desired position in the text. (The chord itself does not have to be selected.) |

|
|
Tap/Click on the dotted vertical line (with the arrow pointing to the right) in the bottom toolbar |
The first chord to the left of the cursor is moved to the cursor position:
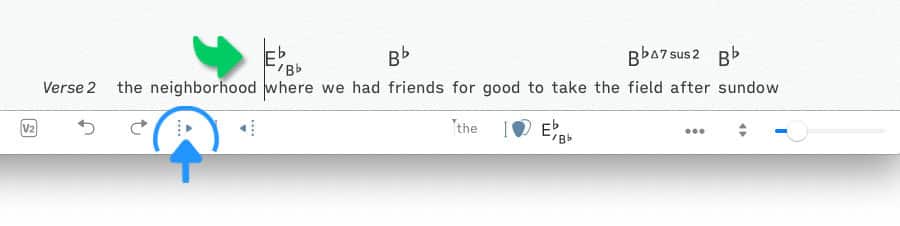
Alternatively you may use a keyboard shortcut: Press and hold the 'command' key and then press the 'right arrow' key to move the chord to the right.
Copying Chords
Use the Songs app’s swipe gesture to copy a chord to a desired position:
|
|
1. Place the cursor at the desired position. |
|
|
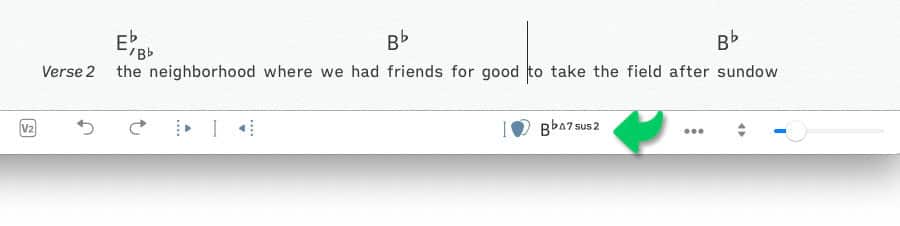
2. Swipe over the chord you wish to copy: The swiped chord will appear in the bottom toolbar. |
|
|
3. Tap/Click on the guitar pick icon in the bottom toolbar to insert a copy of the swiped chord at the cursor position. |
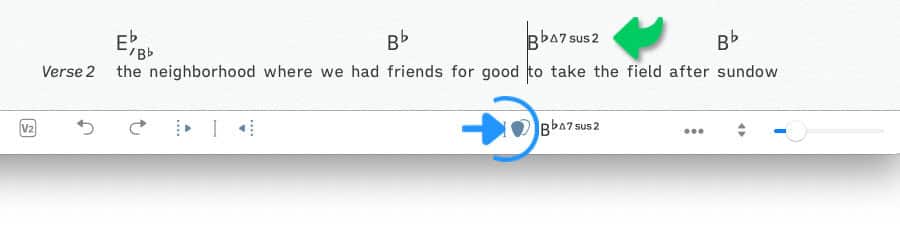
Alternatively you may place a copy of a chord at the current cursor postion by tapping/clicking on the chord in the 'Cursor Toolbar'.
Cursor Toolbar
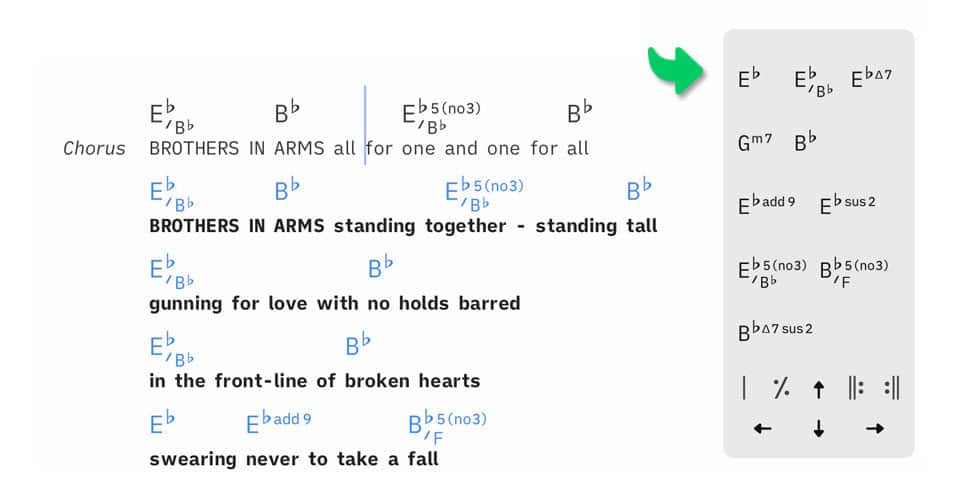
Use the cursor toolbar to add separator lines/bars, repeat signs and chords to a song.
|
|
Place the cursor at the desired position in the song editor and tap/click on the cursor symbol between the chord reposition buttons (bottom toolbar). |

The cursor toolbar appears.
The cursor toolbar includes the chords that have already been added to the selected song:
|
|
Tap/Click on a symbol in the cursor toolbar to place it at the current cursor position. |
|
|
Use the arrow keys at the bottom of the cursor toolbar to reposition the cursor. |
|
|
Perform a long tap/click on a chord in the 'Cursor Toolbar' to replace ALL copies of this chord in the lyrics with a newly created chord (shown next to the guitar pick icon in the main toolbar). |
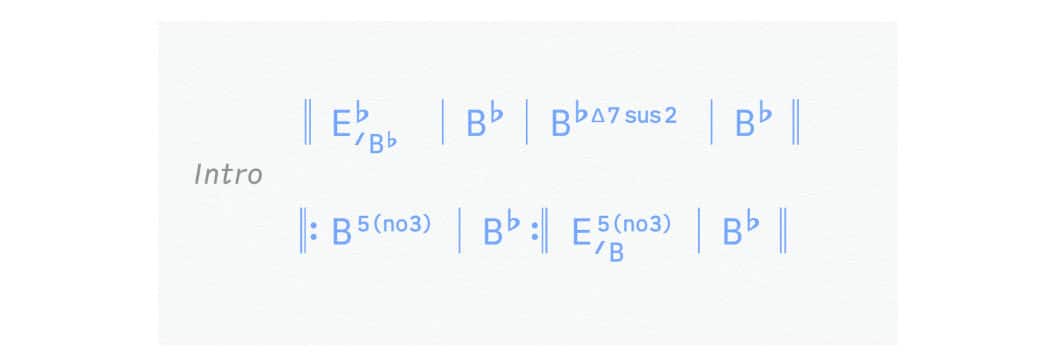
You may place separator lines/bars between the chord symbols when no lyrics are present.
-
The Songs app automatically adds these separators when a song is imported.
-
Indicate the beginning and the end of a chord progression by creating a double line: Tap/Click twice on the standard separator line/bar of the cursor toolbar.
-
Add a 2-measure repeat sign by tapping/clicking twice on the repeat measure symbol of the cursor toolbar.

Separator Lines / Repeat Signs / Rhythm Slashes
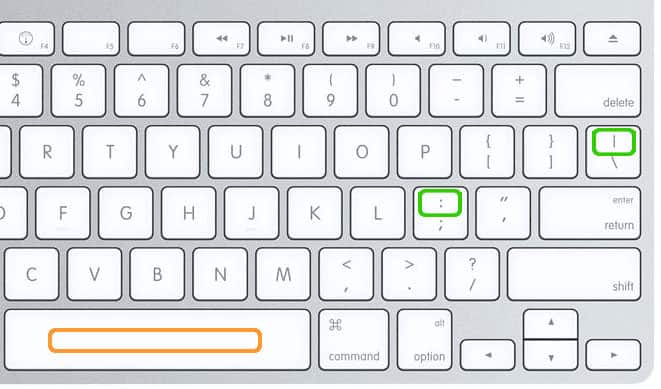
Repeat signs (i.e. '||:', ':||') may also be added with the keyboard of your device.
|
|
Enter two vertical lines and the colon. Then press the space bar to auto-format the entered characters. |
Make sure there is a space between the newly entered characters and the previous chord/word (or add square brackets when typing the repeat signs).
|
|
To add a repeat measure sign (i.e. '%') with the keyboard enter the vertical line followed by the percentage sign. Then press the space bar. |
Enter the percentage sign twice to add a 2-measure repeat sign.

|
|
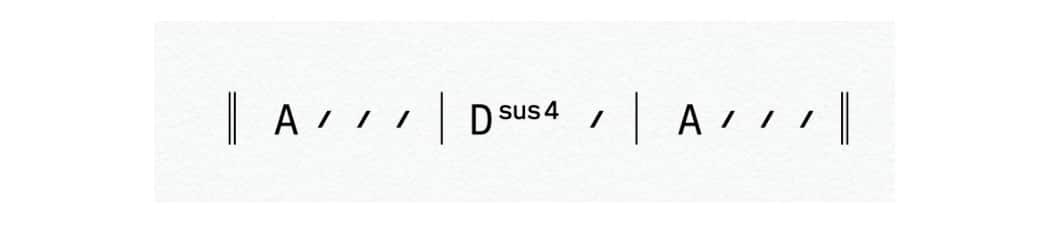
To add a rhythm slash with the keyboard enter the vertical line followed by a forward slash ('|/'). Then press the space bar. |
Undo/Redo Buttons
When you edit songs the main toolbar displays two rounded arrow buttons (undo/redo buttons) on the left. These buttons allow you to access the history of the changes that you have made to the selected song.
|
|
Tap/Click on the round arrow pointing to the left to go back in your changes. |
|
|
Tap/Click on the round arrow pointing to the right to go forward in your changes. |
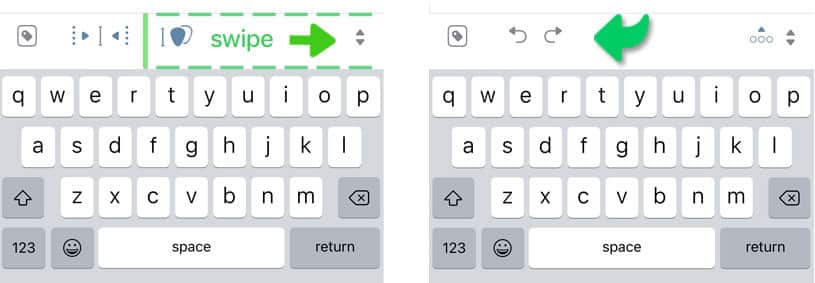
On the iPhone the undo/redo buttons are initially hidden in the portrait mode. Access them by swiping left to right on the main toolbar. Swipe right to left to hide the undo/redo buttons and show the chord reposition buttons again.
Locking Editing
A small lock icon in the top right corner of the song editor enables you to lock a native Songs document to disallow further editing.
|
|
Tap/Click on the lock icon to (un)lock the currently viewed song. |

A locked document is more responsive to tap/swipe gestures (when looking up 'Chord Diagrams' or when auto-playing its chords on a virtual instrument). It enables you to tap/click on the chords of the lyrics without accidentally repositioning the cursor.
-
Songs with 'Limited Access' cannot be unlocked.
-
All songs are automatically locked when the play mode is active.
-
PDF documents cannot be unlocked since their text cannot be edited.
Zooming In & Out
You may zoom in and out of the document shown in the song editor.
|
|
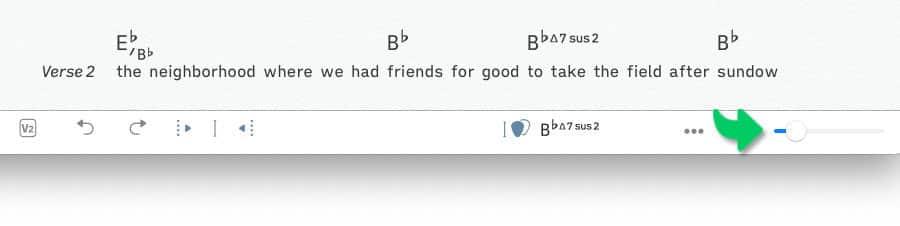
Adjust the zoom level of the song editor by using the standard pinch-to-zoom gesture (iOS) or by moving the slider at the right of the bottom toolbar on (macOS). |
Zooming Native Songs documents
All native Songs documents of your song catalog are displayed at the same zoom level specified by you. The zoom level applies to both the editing and the auto-scrolling of the songs. Dynamic line breaks ensure that you can view the lyrics of a song at any size.
-
Themes allow you to increase or decrease the zoom level of specific sections (e.g. 'Title', 'Chord Chart').
Zooming PDF Documents
The PDF documents of your song catalog have individual zoom levels. Each PDF document is automatically sized to fit the song editor from left to right. Manually increasing the zoom level may cut off parts of the lyrics on either side.
-
Zooming is not possible when PDF documents are being auto-scrolled.
-
The position and zoom level of a PDF document is temporarily locked when the pencil tip icon is selected to add annotations.
|
|
Convert PDF documents to the native Songs format to gain more control over the zoom level. |
On-Screen Keyboard (iOS)
iOS identifies connected bluetooth page turner pedals as external keyboards and will hide the on-screen keyboard. The Songs app automatically displays a custom on-screen keyboard when the iOS keyboard is hidden.
Disable the Songs app’s on-screen keyboard when using an external Apple keyboard:
|
|
Go to the Songs app’s settings/preferences and deselect the option 'Show On-Screen Keyboard When Using Bluetooth Devices' (navigate to 'Devices' > 'Mobile Devices'). |