PRACTICING & PERFORMING
Audio Mixer
The Songs app’s built-in mixer allows you to adjust the volume level and the sound of imported backing tracks. The mixer offers up to 50 channels with EQ to mix the multitracks. The individual tracks can either be summed to the stereo output of your computer device or can be routed as mono signals to 32 outputs of a connected USB audio interface.
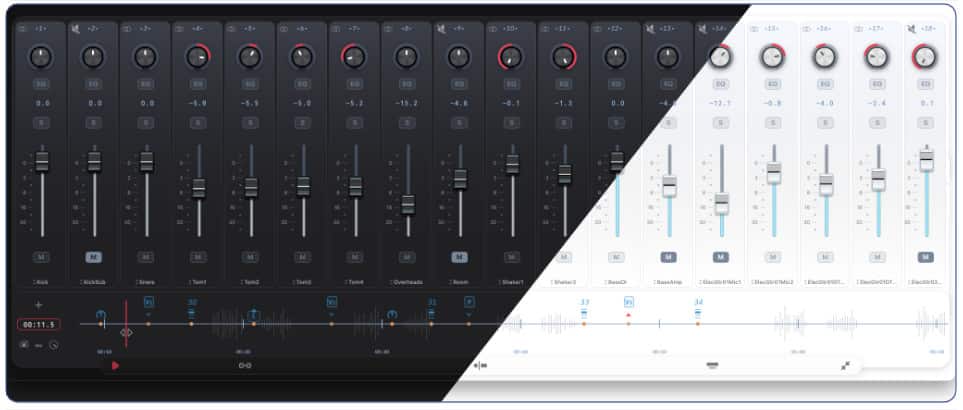
The mixer’s settings (see below) are saved per song and are automatically recalled when a song is re-selected. A change in the mixer’s output format (from stereo to 32 mono channels) is applied globally and will affect all songs of your catalog.
There are two options to show or hide the mixer when the play mode is active:

|
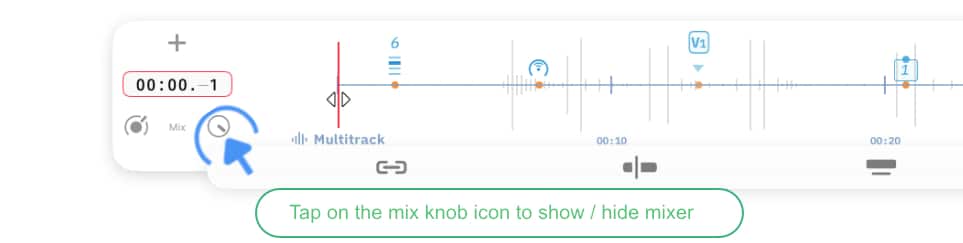
Option A - Tap/Click on the mix knob icon to the left of the timeline. (See [Timeline] to learn more.) |
|
|
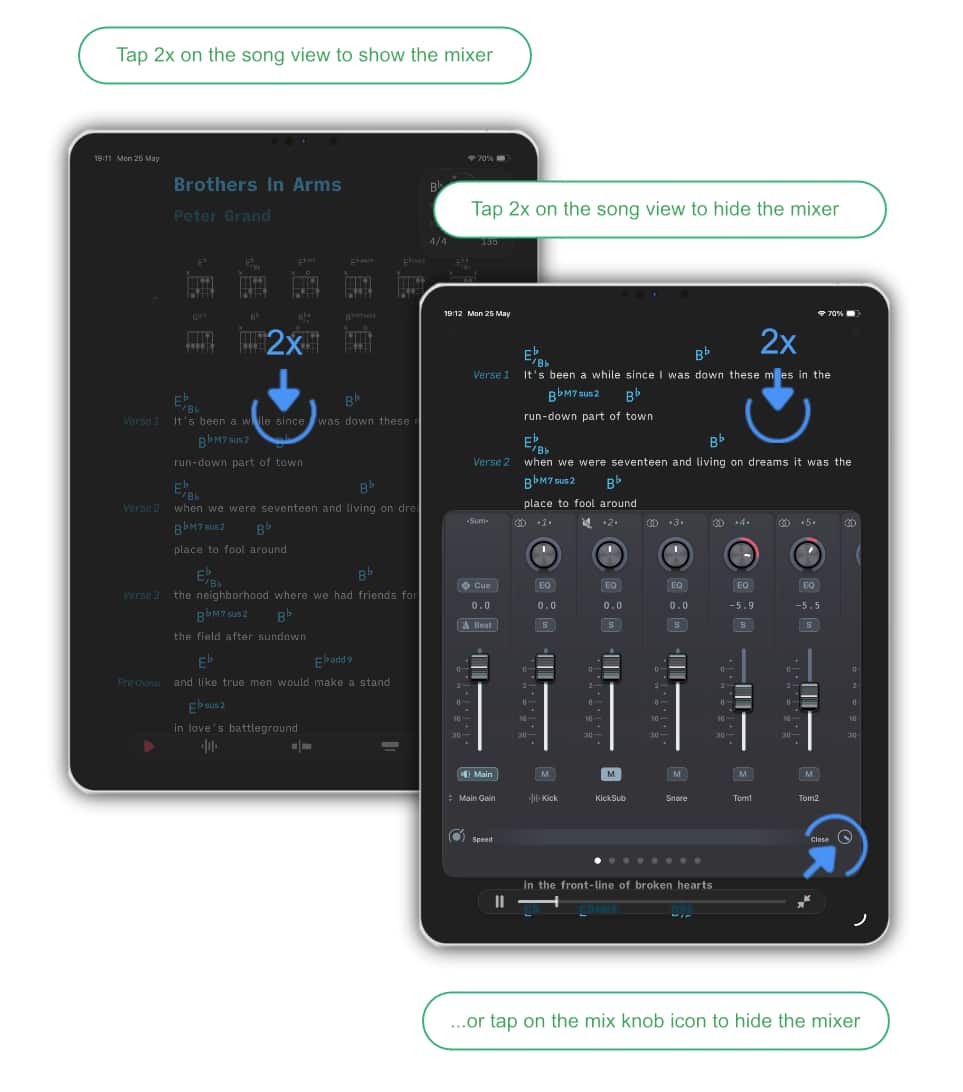
Option B - Perform a double tap on the song view. (This option can be disabled in the 'Play Mode' app settings.) |
Mixer Navigation
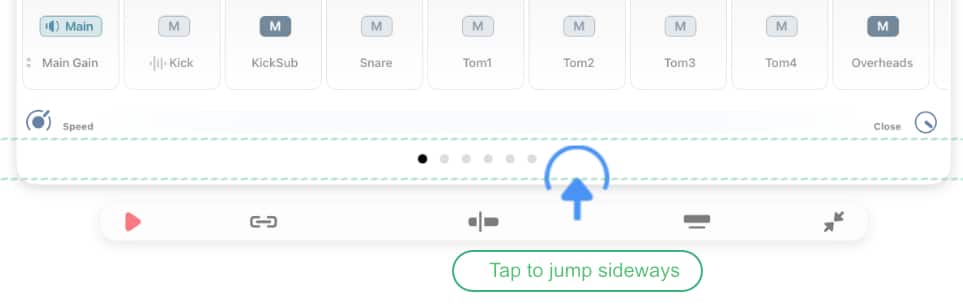
You can navigate to a specific channel via left (or right) swipe gestures. When the timeline and the smart chord chart are hidden you have access to a touch bar and a step controller at the bottom of the mixer.
|
|
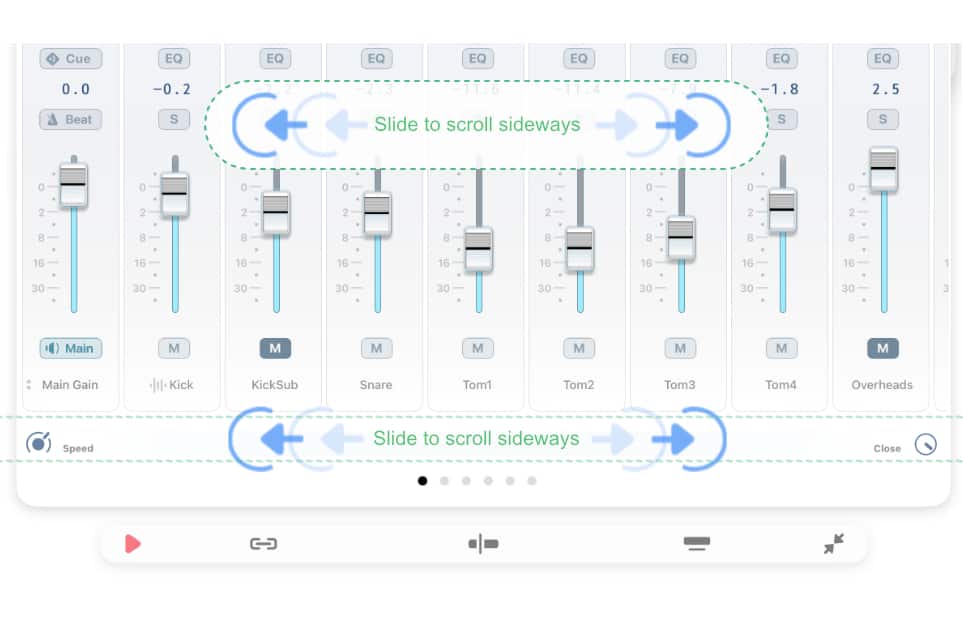
Perform left (or right) swipe gestures in the mixer area or on the touch bar to scroll to a different channel. |
|
|
Tap/Click to the right (or the left) of the step controller to jump to the next (or previous) group of faders. |
Mixer Size
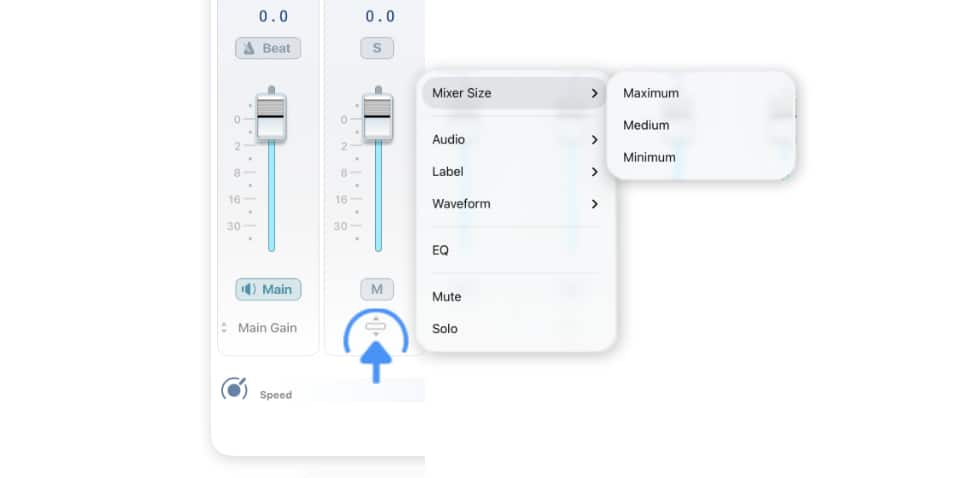
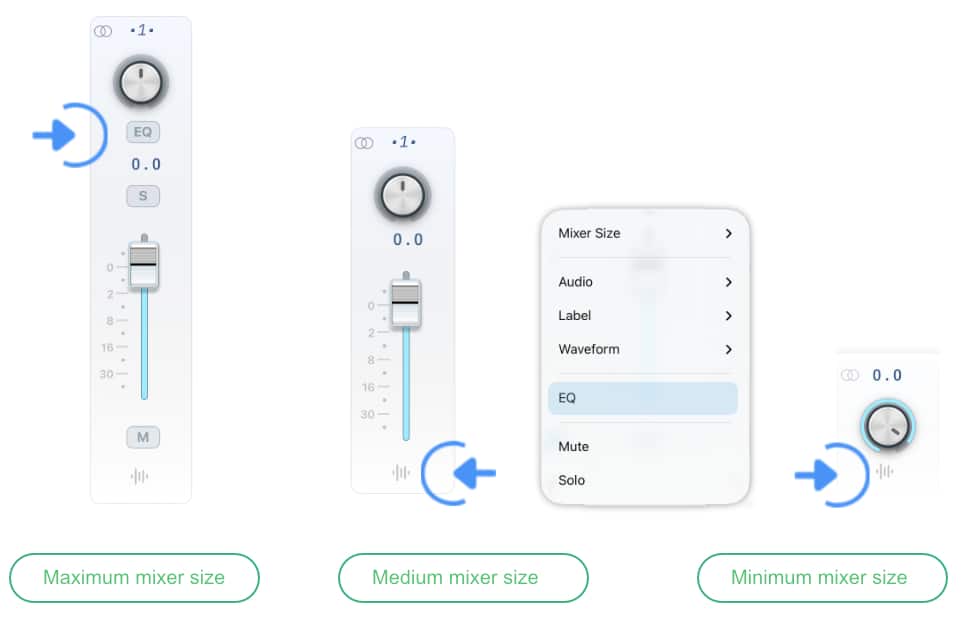
You can customize the size of the mixer via a channel menu.
|
|
Tap/Click on a track label and make a selection under the 'Mixer Size' submenu. Changes to the mixer size are applied to all channels. |

|
The 'Maximum' size allows you to easily mute or solo tracks to mix newly imported multitracks. |
|
|
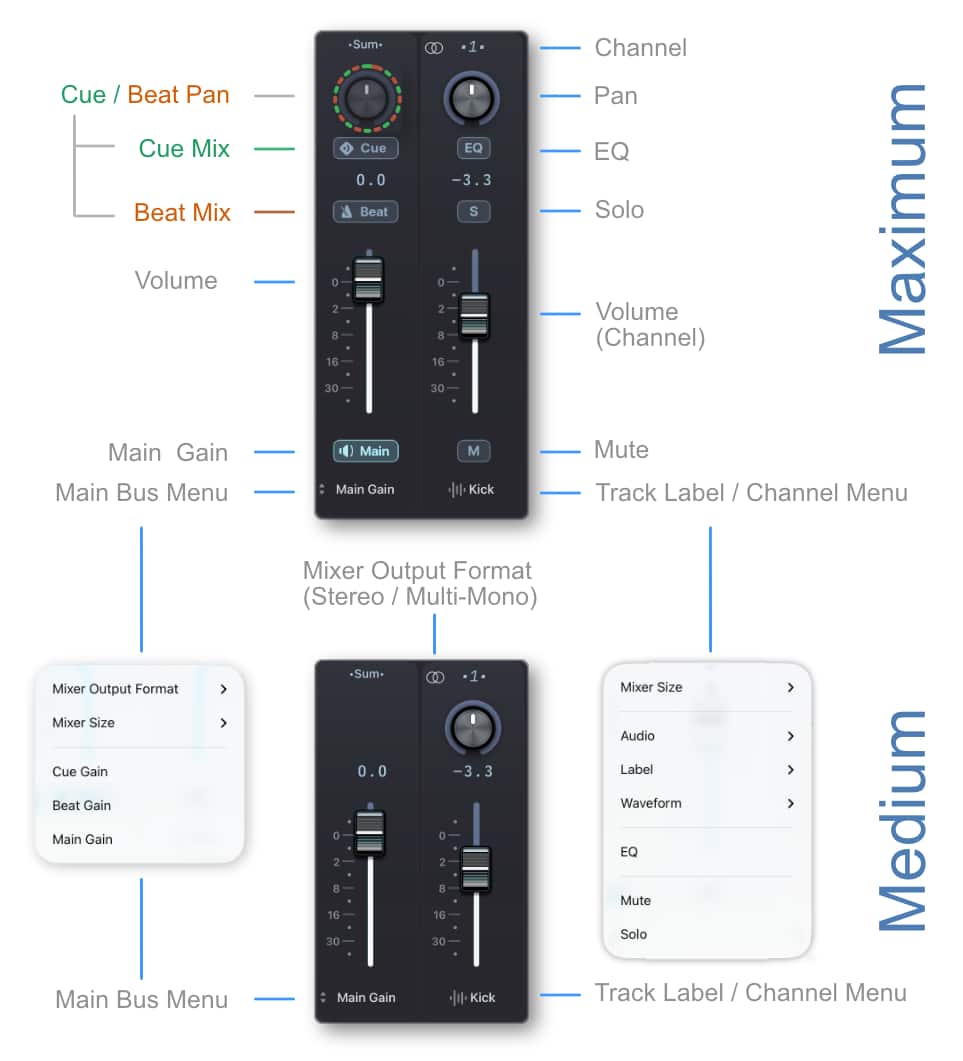
The 'Medium' size enables you to quickly adjust the volume and pan levels during a performance. |
|
|
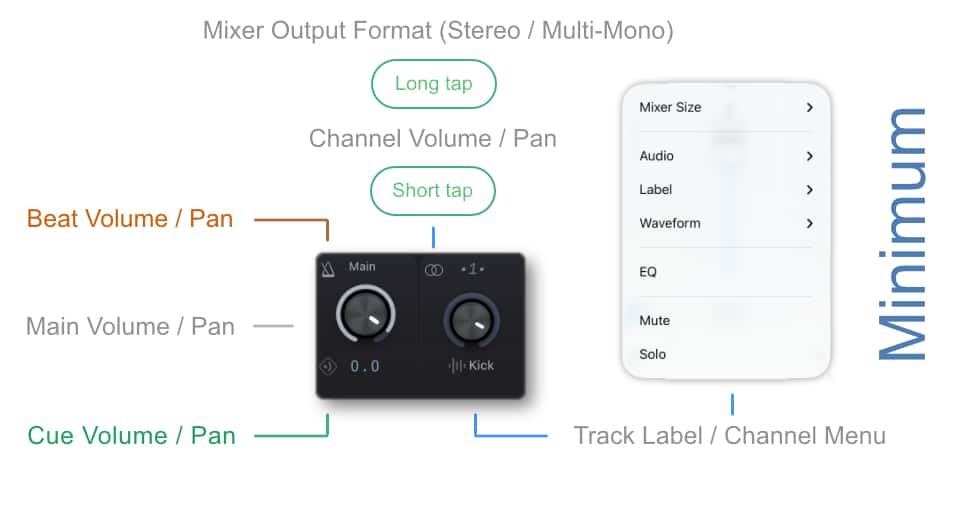
The 'Minimum' size allows you to make volume and pan level adjustments while editing timeline events. |
All mixer sizes allow you to access the track label / channel menu to…
-
customize the channel’s name,
-
access the channel’s EQ,
-
show or hide the audio track’s waveform in the timeline,
-
or to solo or mute the backing track.
Mixer Output Format
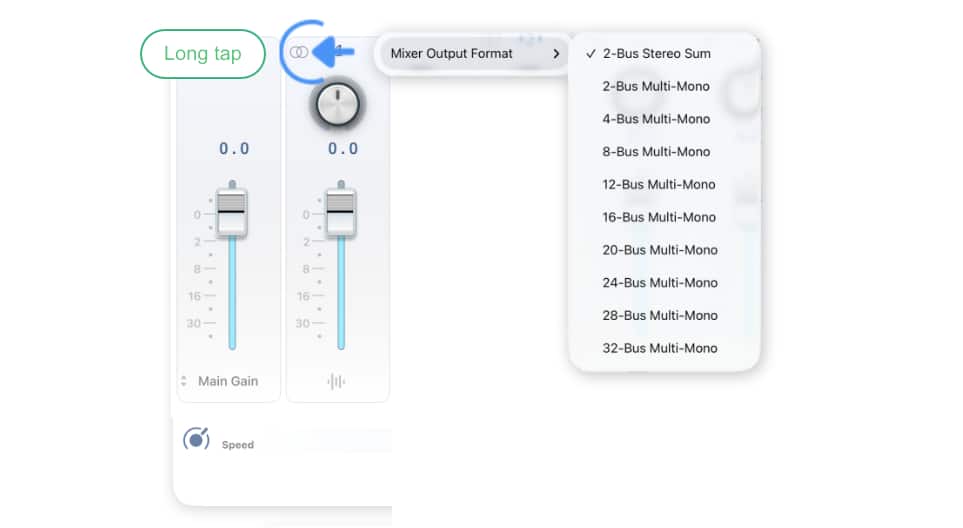
The mixer’s channels can either be summed to a single stereo output or send to up to 32 mono outputs. The mixer’s output format is applied globally and will affect all songs.
|
|
To specify the output format perform a long tap on any of the stereo/output icons and make a selection under 'Mixer Output Format'. |
|
|
The mixer uses the same volume and EQ settings for both output formats (stereo and multi-mono). The pan settings are only applied when the stereo format is selected. |
2-Bus Stereo Sum
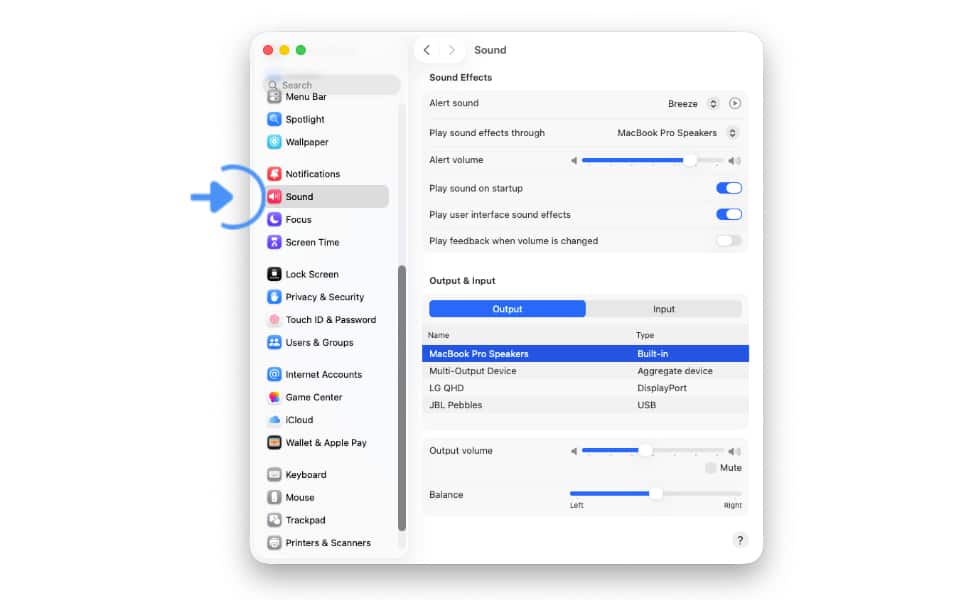
The summed stereo output format allows you to playback audio via external AirPlay or Bluetooth speakers, the device’s built-in speakers or the headphone jack as well as an external audio interface with 2 outputs.
|
|
When the stereo format is active the Songs app forwards the signal to the selected audio output of the macOS 'Sound' (or the iOS 'Sounds') settings. |
iOS
-
Settings > Sounds
macOS
-
Apple icon (top left) > System Settings > Sound
2-32 Bus Multi-Mono
The multi-mono output format allows you to playback audio via an external USB audio interface with up to 32 outputs.
|
|
To save on resources do not specify a higher channel output count than your hardware device is able to support. |
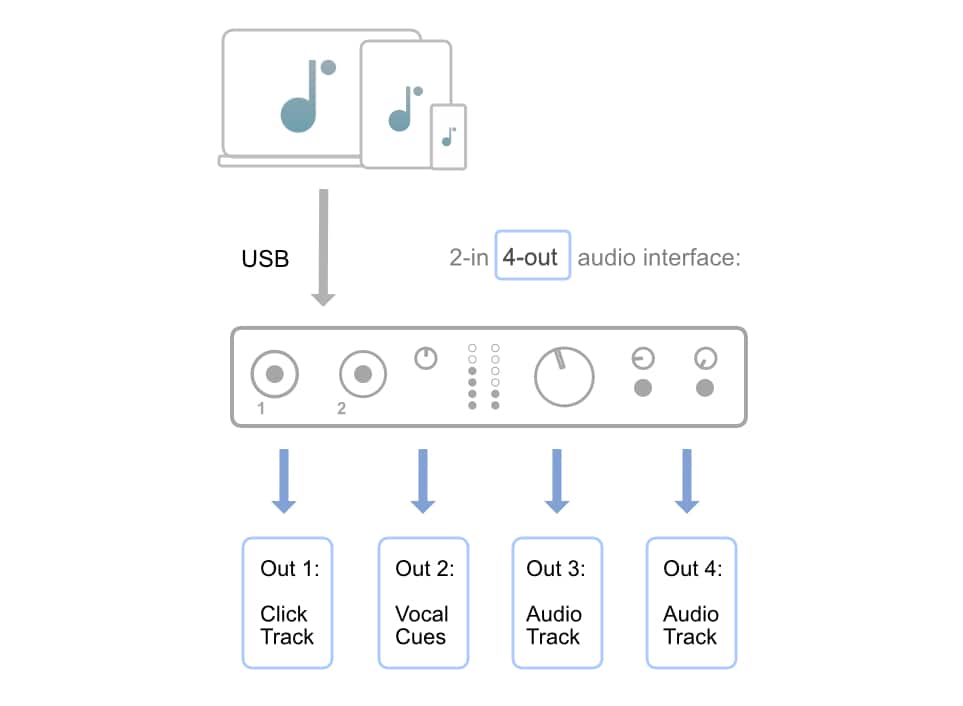
iOS and macOS connect to an external USB multichannel audio interface in different ways:
-
macOS allows the user to select an audio output device in the system settings under 'Sound'.
-
iOS does not allow the user to select an audio output device: Only connect one USB multichannel audio device to have your iPad (or iPhone) automatically route audio to it.
Once the setup is complete you may send any of the 50 tracks to one of the audio interface outputs:
|
|
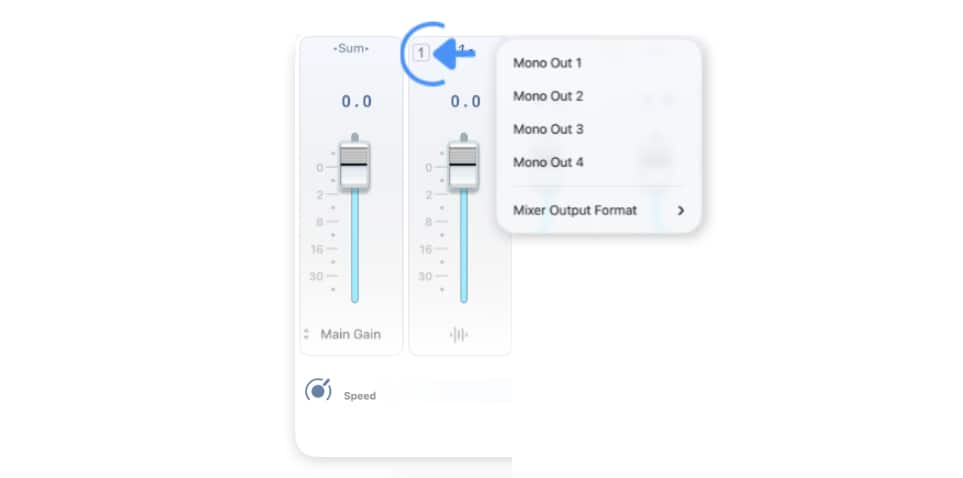
Perform a tap on the channel number and select the desired output in the pop-up menu. |
|
|
You may send multiple tracks to the same mono output channel after premixing the audio signals via the mixer’s volume and EQ settings. |
Consult the user guide of your specific audio interface to learn more.
Importing Backing Tracks
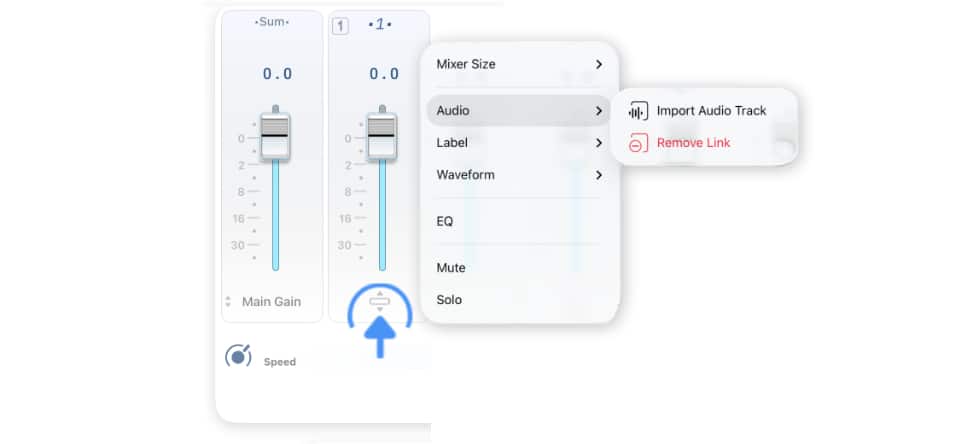
If you have not yet imported an audio track you can do so via the channel’s pop-up menu:
|
|
Import a single track by tapping/clicking on the two arrows at the bottom of the channel and make a selection from the 'Audio' submenu. |
|
|
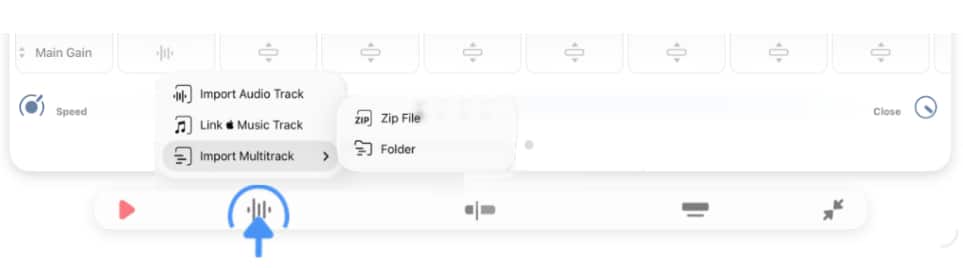
Alternatively you may import a multitrack by tapping/clicking on the waveform icon of the play mode toolbar. (If a link icon is shown instead of a waveform icon you access the menu by performing a long tap/click on the link icon.) |
Volume/Pan Knob
The minimum sized mixer has a knob that can adjust both the volume and the pan level.
|
|
To adjust the pan of one of the 50 audio backing tracks tap/click on the stereo icon next to the level indicator. (Tap/Click on the stereo icon again to return to the knob’s volume level control.) |

Mixing Guide Clicks (Metronome)
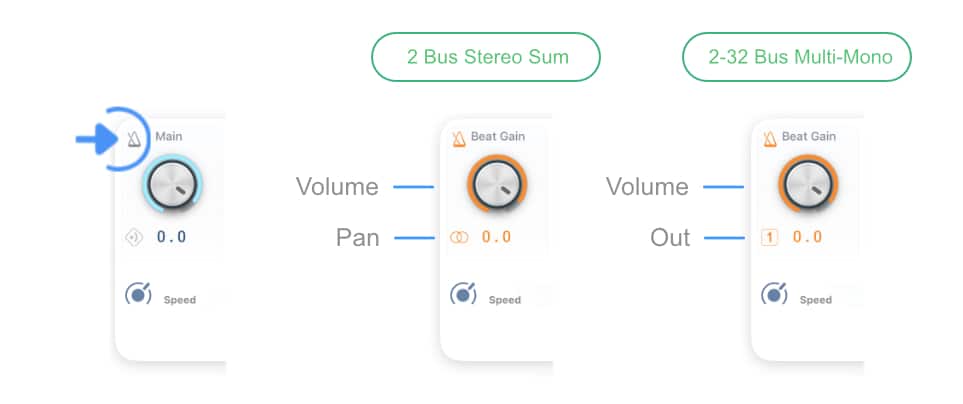
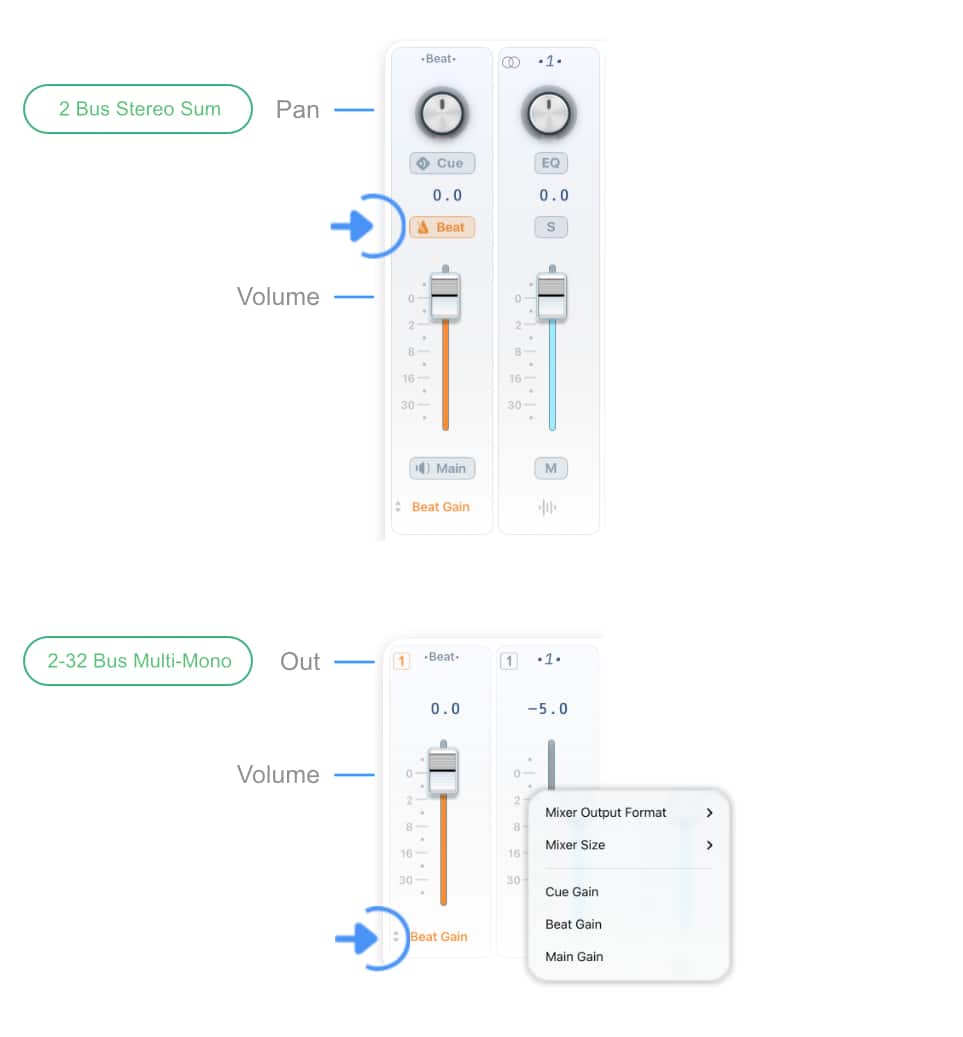
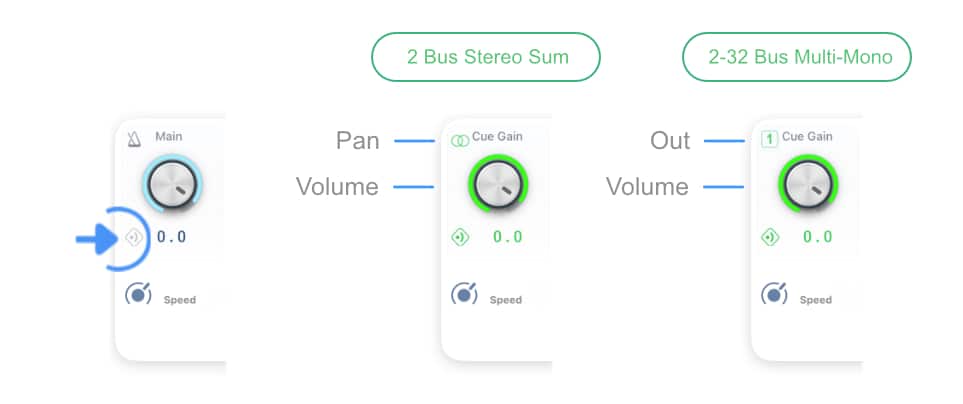
The volume level (and pan) of the built-in metronome can be adjusted via the main fader (or knob when the mixer is minimized) by engaging the 'Beat' option. This can be done in following ways:
|
|
Tap/Click on the metronome icon to the left of the main knob (minimized mixer). |
|
|
Tap/Click on the 'Beat' button or tap/click on the bottom track label and select 'Beat Gain'. (See Metronome to learn how to add a guide click to a song.) |
Mixing Vocal Cues
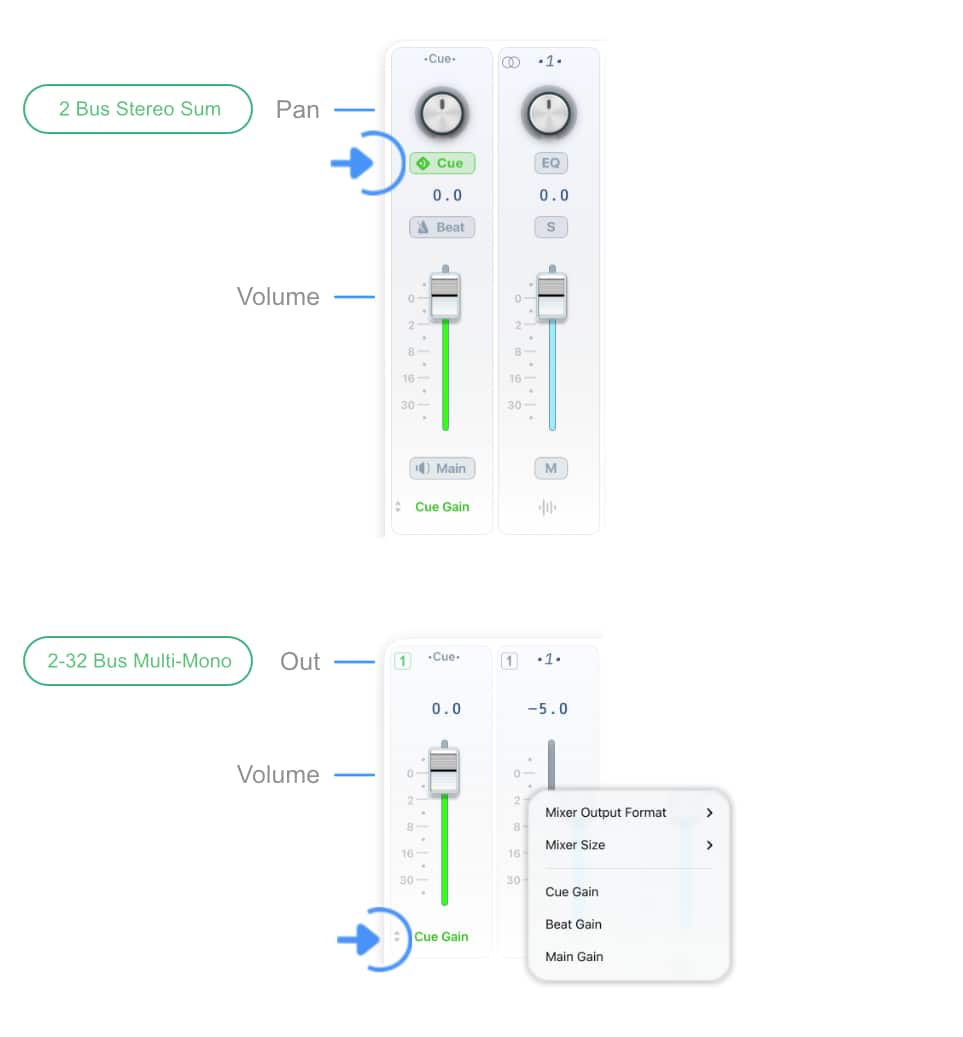
The volume level (and pan) of the timeline’s vocal cues can be adjusted via the main fader (or knob when the mixer is minimized) by engaging the 'Cue' option. This can be done in following ways:
|
|
Tap/Click on the vocal cue icon to the left of the main knob (minimized mixer). |
|
|
Tap/Click on the 'Cue' button or tap/click on the bottom track label and select 'Cue Gain'. (See Timeline to learn how to add vocal cues to the timeline of a song.) |
Equalizer (EQ)
An equalizer, often abbreviated as EQ, allows you to adjust the balance of frequencies in audio signals.
Equalizers are used in sound reinforcement to reshape the tonal characteristics of instruments/tracks and provide separation between similar sounds. The goal is to create a sonically pleasing mix in which all instruments can be clearly heard by accentuating or attenuating frequencies.
Each of the Songs app’s mixer channels offers an independent EQ. The mixer’s EQ settings are automatically saved and recalled when a song is reselected.
|
|
To adjust the EQ of a specific channel tap/click on the EQ button or tap/click on the track label and select 'EQ' from the pop-up menu. |
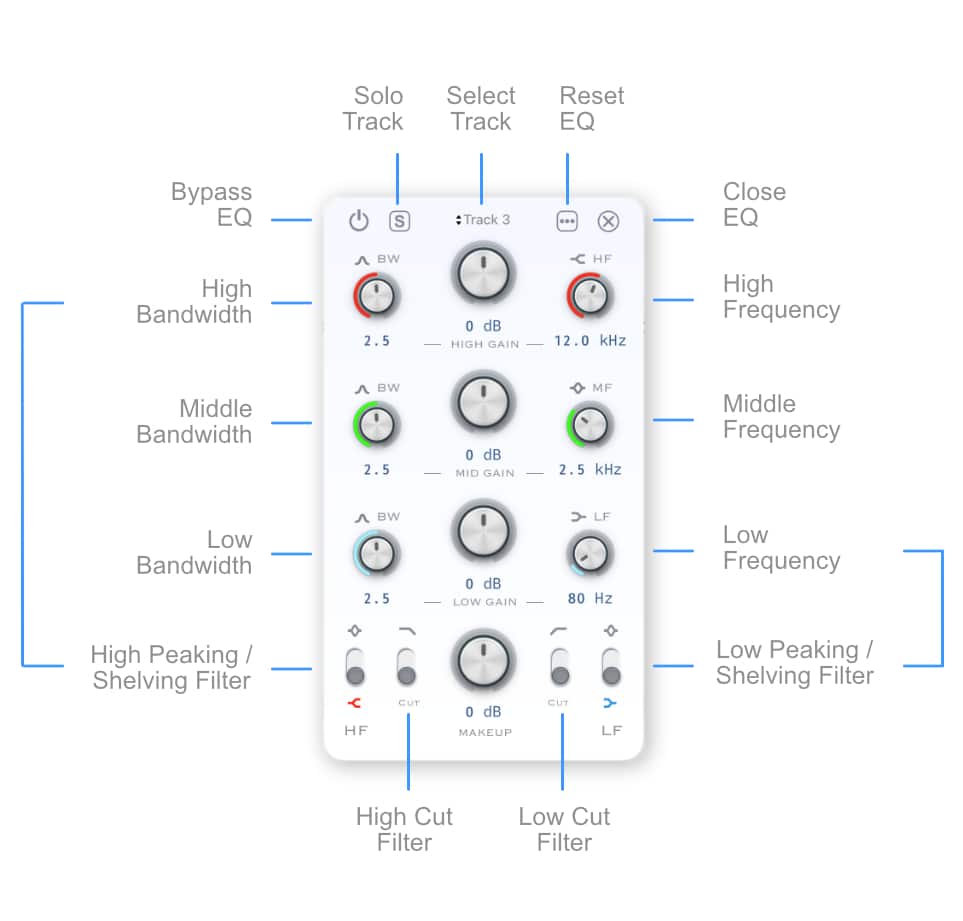
The EQ of the selected channel will open in a floating window above the mixer:
|
|
To close the EQ window tap/click on the circled 'x' at the top right. |
Gain Controls
At the center of the channel’s EQ are four gain (volume) knobs
-
The top 3 gain knobs allow you to improve the tonal balance of the mix by boosting or cutting the bass section (Low Gain), the middle section (Mid Gain) or the treble section (High Gain) of specific instruments or tracks.
-
The bottom gain knob ('Makeup') allows you to offset changes in the audio signal’s volume once the signal has been processed by the EQ.
Frequency Controls
Each gain knob has two frequency knobs, one to the left and one to the right. These allow you to make more precise adjustments to the audio signal.
The frequency knobs enable you to reshape the tonal characteristics of instruments to separate similar sounds (by boosting or cutting specific frequencies).
|
|
The bandwidth control knob (left) adjusts the width of the frequency range. |
|
|
The frequency control knob (right) moves the center of the frequency range (i.e. from the bass section with a low Hz value into the middle section with a higher kHz value). |
To adjust the specific frequency of an instrument:
-
Change the volume via the low, mid or high gain knob (center),
-
adjust the frequency knob (right) to locate the frequency of the instrument,
-
and then vary the bandwidth knob (left) to omit or include the neighboring frequencies.
Peaking Filter vs. Shelving Filter
The selectors to the left and to the right of the 'Make Up' gain knob allow you to toggle between a peaking filter and a shelving filter.
|
|
To toggle between the peaking and shelving filters of the high frequency band tap/click on the switch above 'HF' (left). |
|
|
To toggle between the peaking and shelving filters of the low frequency band tap/click on the switch above 'LF' (right). |
A shelving filter gradually boosts or cuts frequencies above or below a threshold. This type of filter is used in Hi-Fi equipment to adjust the bass and treble. The bandwith control knob (BW) allows you to adjust the curve of the shelving filter.
Example of a shelving filter’s frequency curve with a high bandwidth (BW) setting:

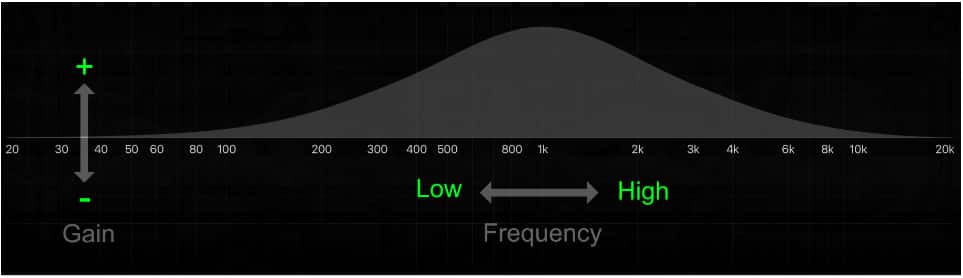
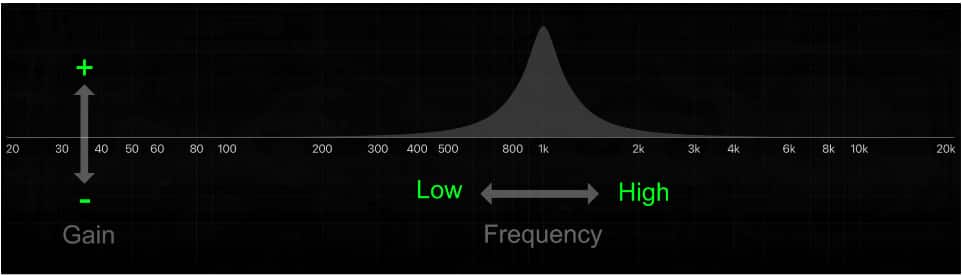
A peaking filter produces a bell-shaped curve to give you more control over the frequencies affected by the gain adjustments. The bandwith control knob (BW) allows you to adjust the width of the peaking filter.
Example of a peaking filter’s frequency curve with a high bandwidth (BW) setting:
Example of a peaking filter’s frequency curve with a low bandwidth (BW) setting:
High-Cut Filter
A high-cut filter allows low-frequency signals to pass through, while attenuating high-frequency signals. The Songs app’s high-cut filter affects audio signals above the 10 kHz frequency range.
|
|
To enable/disable the high-cut filter on a track tap/click on the selector to the left of the make up gain knob. |
Example of the high-cut filter’s frequency curve:
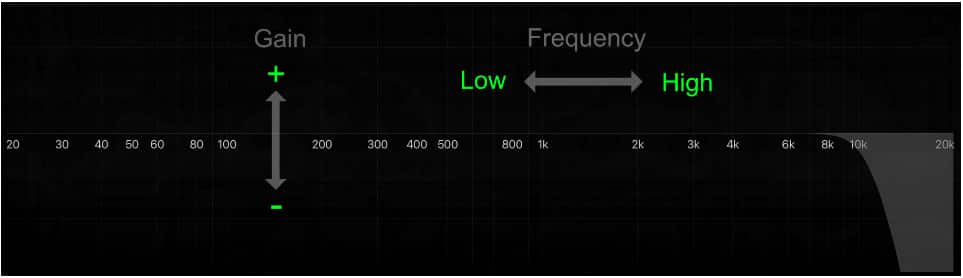
Engage the high-cut filter on instruments which produce a sound in the low to mid frequency range. This helps to reduce high frequency interference and adds clarity to the mix.
Low-Cut Filter
A low-cut filter allows high-frequency signals to pass through, while attenuating low-frequency signals. The Songs app’s low-cut filter affects audio signals below the 75 Hz frequency range.
|
|
To enable/disable the low-cut filter on a track tap/click on the selector to the right of the make up gain knob. |
Example of the low-cut filter’s frequency curve:
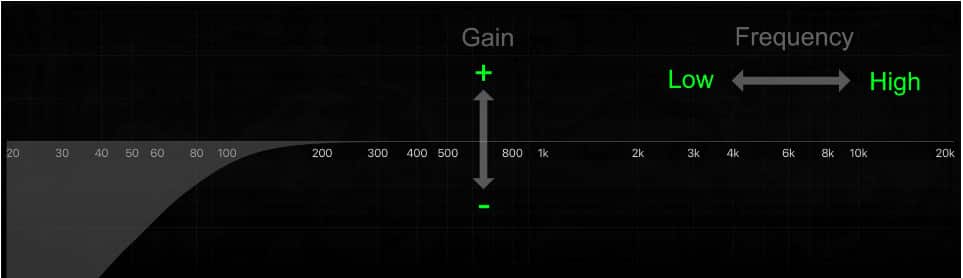
Engage the low-cut filter on instruments which produce a sound in the high to mid frequency range. This helps to reduce low frequency hum and rumble.