EDITING SONGS
Images
You can add portions of a full size PDF or an image file (JPEG, TIFF, PNG, GIF format) to a song. Up to 9 images can be inserted per song.

|
Images may be cropped, resized and annotated. The Songs app automatically adjusts the colors of an image when enabling/disabling the dark mode setting of the operating system. |

When printed the size of an image is automatically adjusted to match the length of the lines or the width of a column (when the double column format is used). An image that is placed directly underneath the (sub)title is formatted as a header image. Header images always fill the width of the page when printed.
Adding Images
You have two options to add an image to a song:
To add an image via the section label pop-up menu…
-
place the cursor anywhere in a specific line,
-
tap/click on the tag icon located in the left corner of the bottom toolbar,
-
select 'Image' from the pop-up menu.
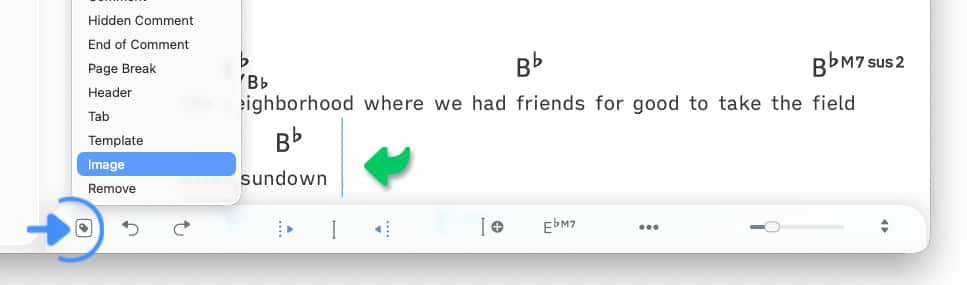
To add an image via the song editor’s side panel…
-
place the cursor anywhere in a specific line,
-
tap/click on the vertical bar at the left side of the screen,
-
tap/click on the header image icon to the right of 'Subtitle' and select 'Insert Image' from the pop-up menu.
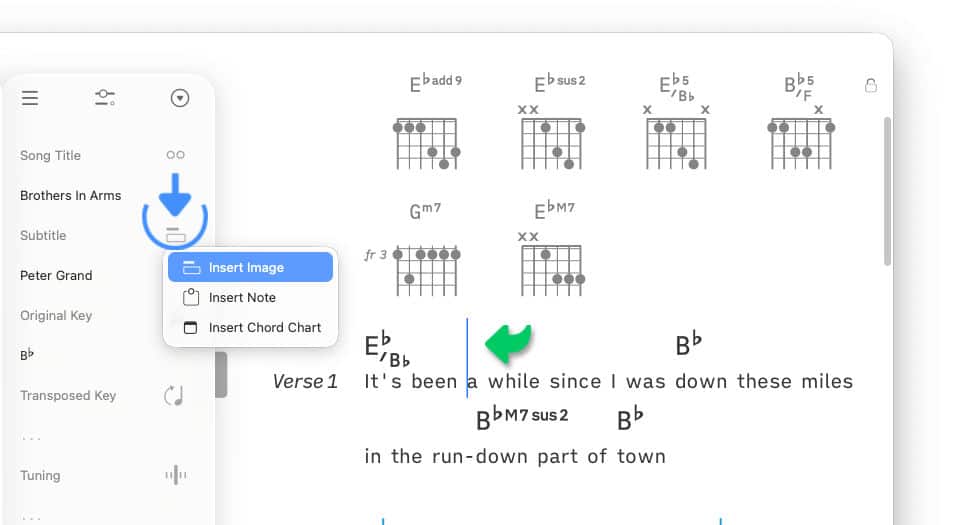
A file browser opens to allow you to select the desired PDF or image file. Once selected an image preview appears:

|
Drag the corners of the image preview to crop the image to the desired size. |
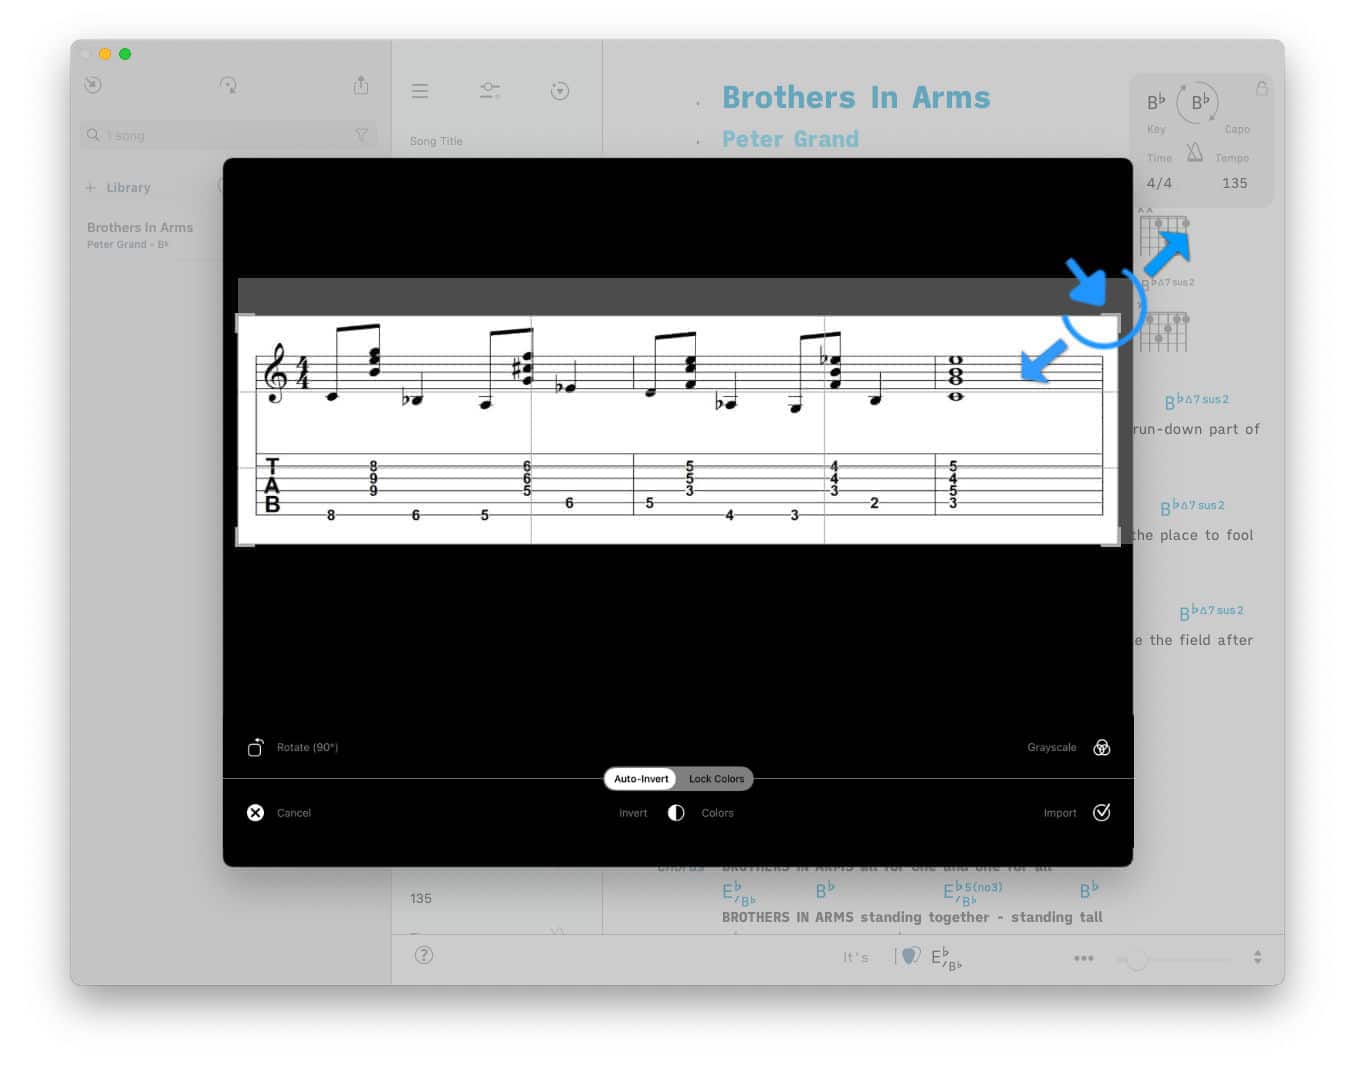
The Songs app automatically adjusts the colors of the image to match the dark mode setting of your operating system. You have several options to customize the colors:
-
Use the 'Invert Colors' button (bottom center) to toggle the dark/light mode version of the image.
-
Use the 'Grayscale' button (bottom left) to save storage space when importing a black and white image (e.g. music score).
-
Select the 'Lock Colors' option (bottom center) to only show the dark mode (or the light mode) version of the image regardless of the operating system’s dark mode setting.
|
|
Tap/Click on the checkmark in the lower right corner of the image preview window to add the image to the song. |
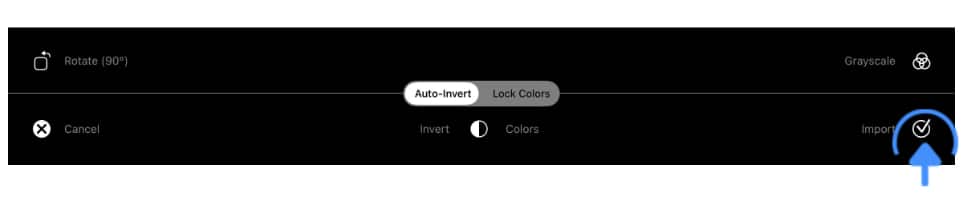
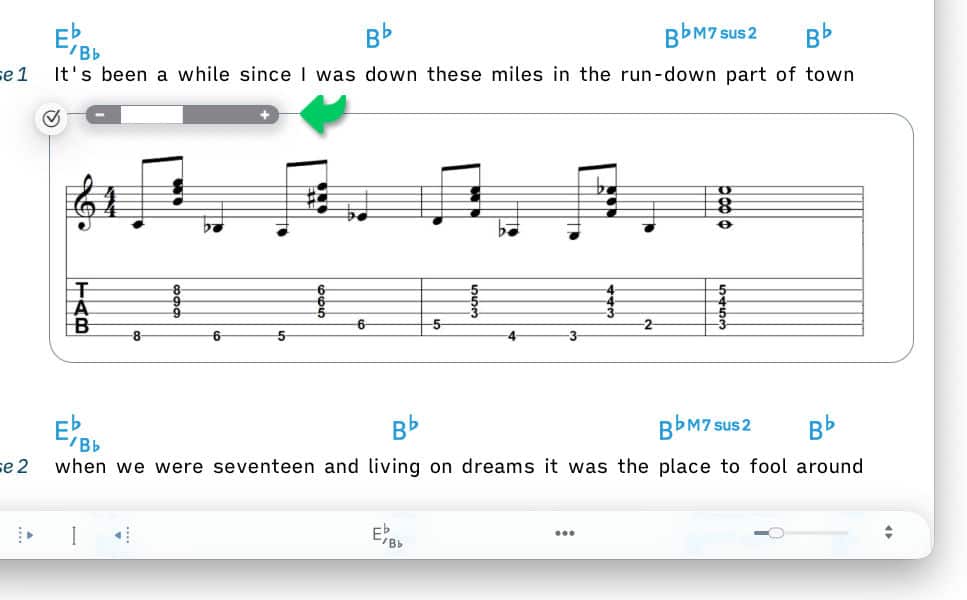
When the image is inserted a slider appears to allow you to adjust its size:
|
|
Drag the slider left or right to adjust the zoom level of the image. |
|
|
Tap/click on the check mark icon to the left of the slider commit the changes. |
Repositioning Images
Use the Songs app’s 'Drag & Drop' procedure to reposition an image. The 'Drag & Drop' procedure requires two taps/clicks:
|
|
Tap/Click on the image in the song editor to select it (the image will be outlined). |
|
|
Perform a second long tap/click on the selected image. A drop preview will appear. Move the cursor to the desired location and release the tap/click. |
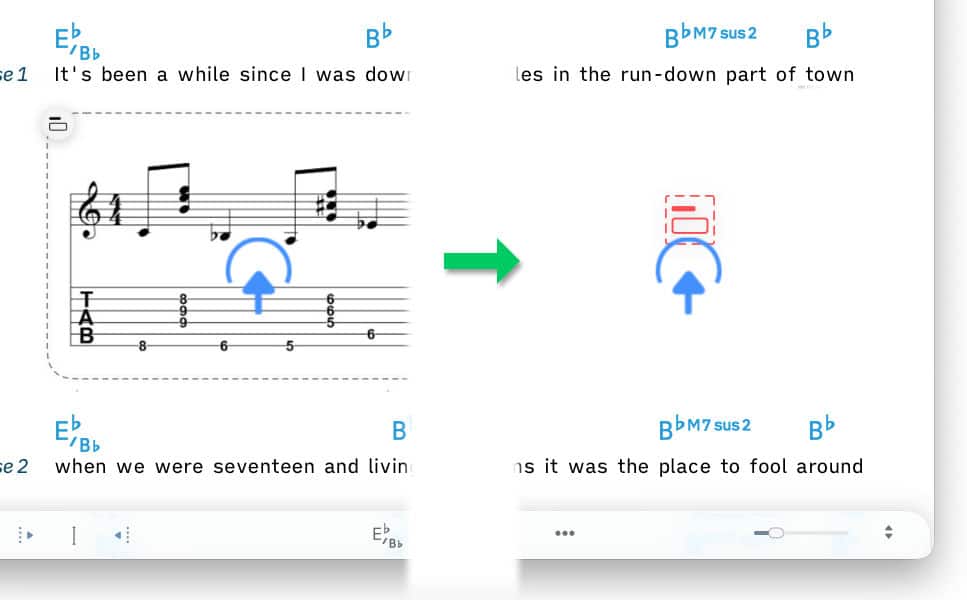
If you try to drop the image in a restricted area (e.g. a chord chart) the drop will be cancelled and the image will revert to its prior position.
Annotating Images
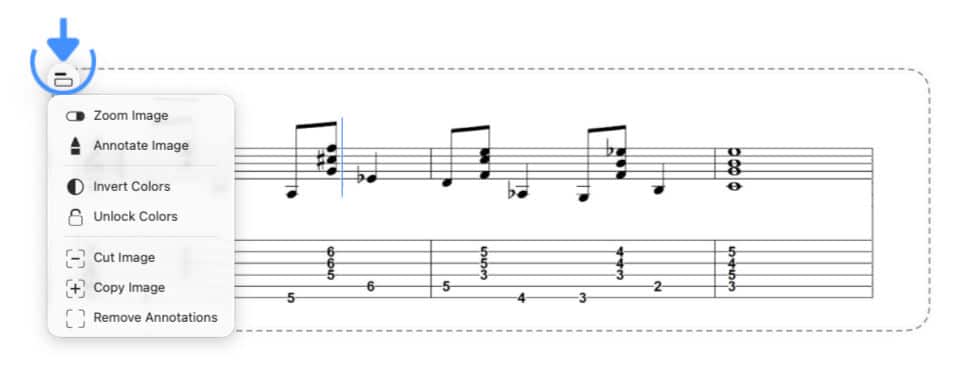
Each image offers a pop-up menu to allow you to customize the image colors, adjust the zoom level and add annotations.
To add annotations to an image…
-
Tap/Click on the image in the song editor to select it (the image will be outlined).
-
Tap/Click on the image icon in the upper left corner of the image.
-
Select 'Annotate Image' to access the annotation tools in the bottom toolbar.
-
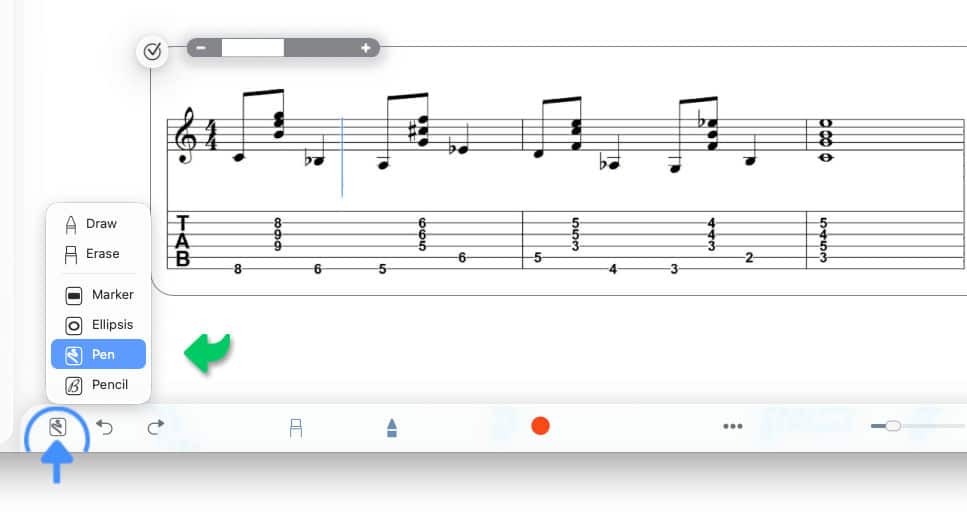
Select 'Pencil' to add handwritten notes.
-
Select 'Pen' to add drawings.
-
Select 'Ellipsis' to draw outlines to be auto-converted into ellipses.
-
Select 'Marker' to highlight areas.
|
|
Tap/Click on the pencil tip icon in the bottom toolbar to activate the annotation mode. |

The scroll position of the song is locked in place whenever the annotation mode is active.
-
Deactivate the annotation mode and re-enable scrolling by tapping/clicking on the pencil tip in the bottom toolbar or by tapping/clicking outside of the header image.
Change the annotation type as needed while you add drawings to image:

|
|
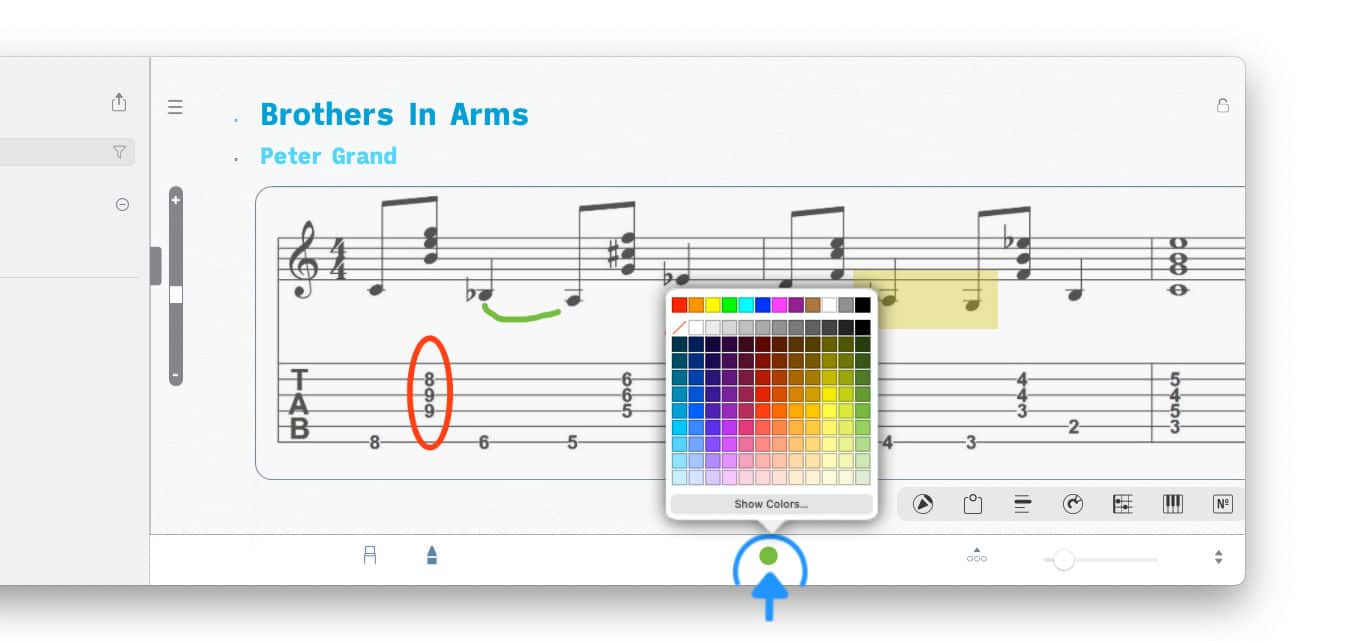
Tap/Click on the colored dot in the center of the bottom toolbar to specify a color for a new annotation. |

A color picker will appear to allow you to select the desired color:
|
|
Tap/Click on the pencil eraser icon and tap/click on an annotation to remove it. |

On iPhones the pencil eraser icon is not shown in the bottom toolbar: Select the 'Eraser' option in annotation pop-up menu (bottom left) instead.